Making a cheap LiFePO4 battery for SOTA.

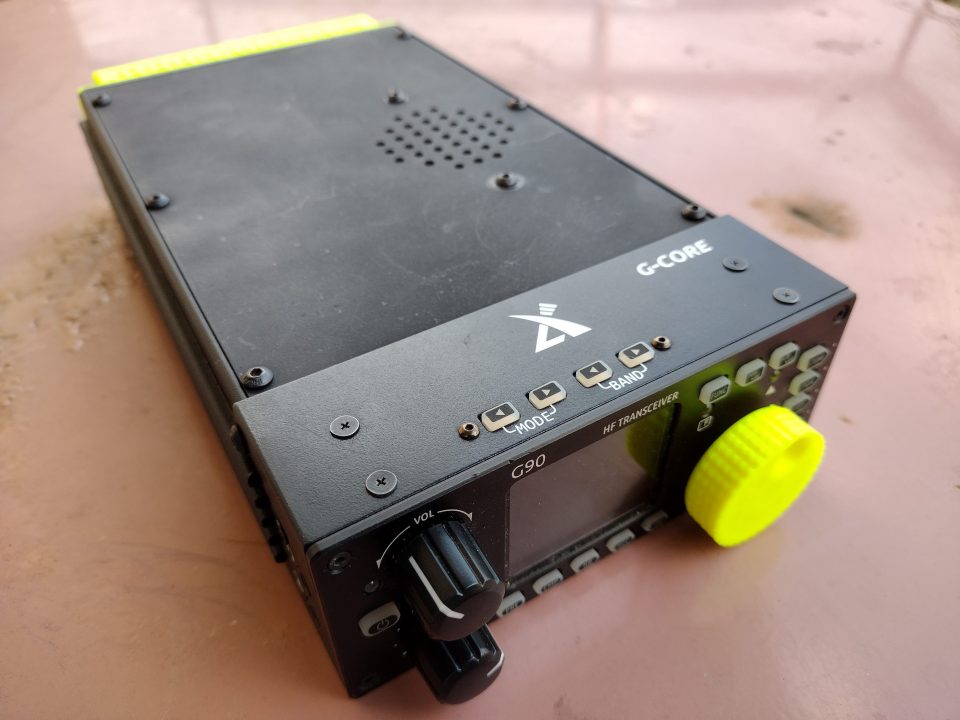
I needed a good battery to power my Xiegu G90, so that I could carry it up hills and talk to strangers in my bid to join the SOTA community.

In 2023 the general trend for portable lighteweight power is to buy a *premium* battery like the Bioenno pack–which are designed specifically for this purpose–or to go with a cheap *amazon special*. LiPo pillow packs designed for RC cars/aircraft can deliver good power-to-weight, however they are rumoured to have a fire risk, would need a regulator to make 12-13.8v and, most importantly, they are not cheaper than LiFePO4 packs.

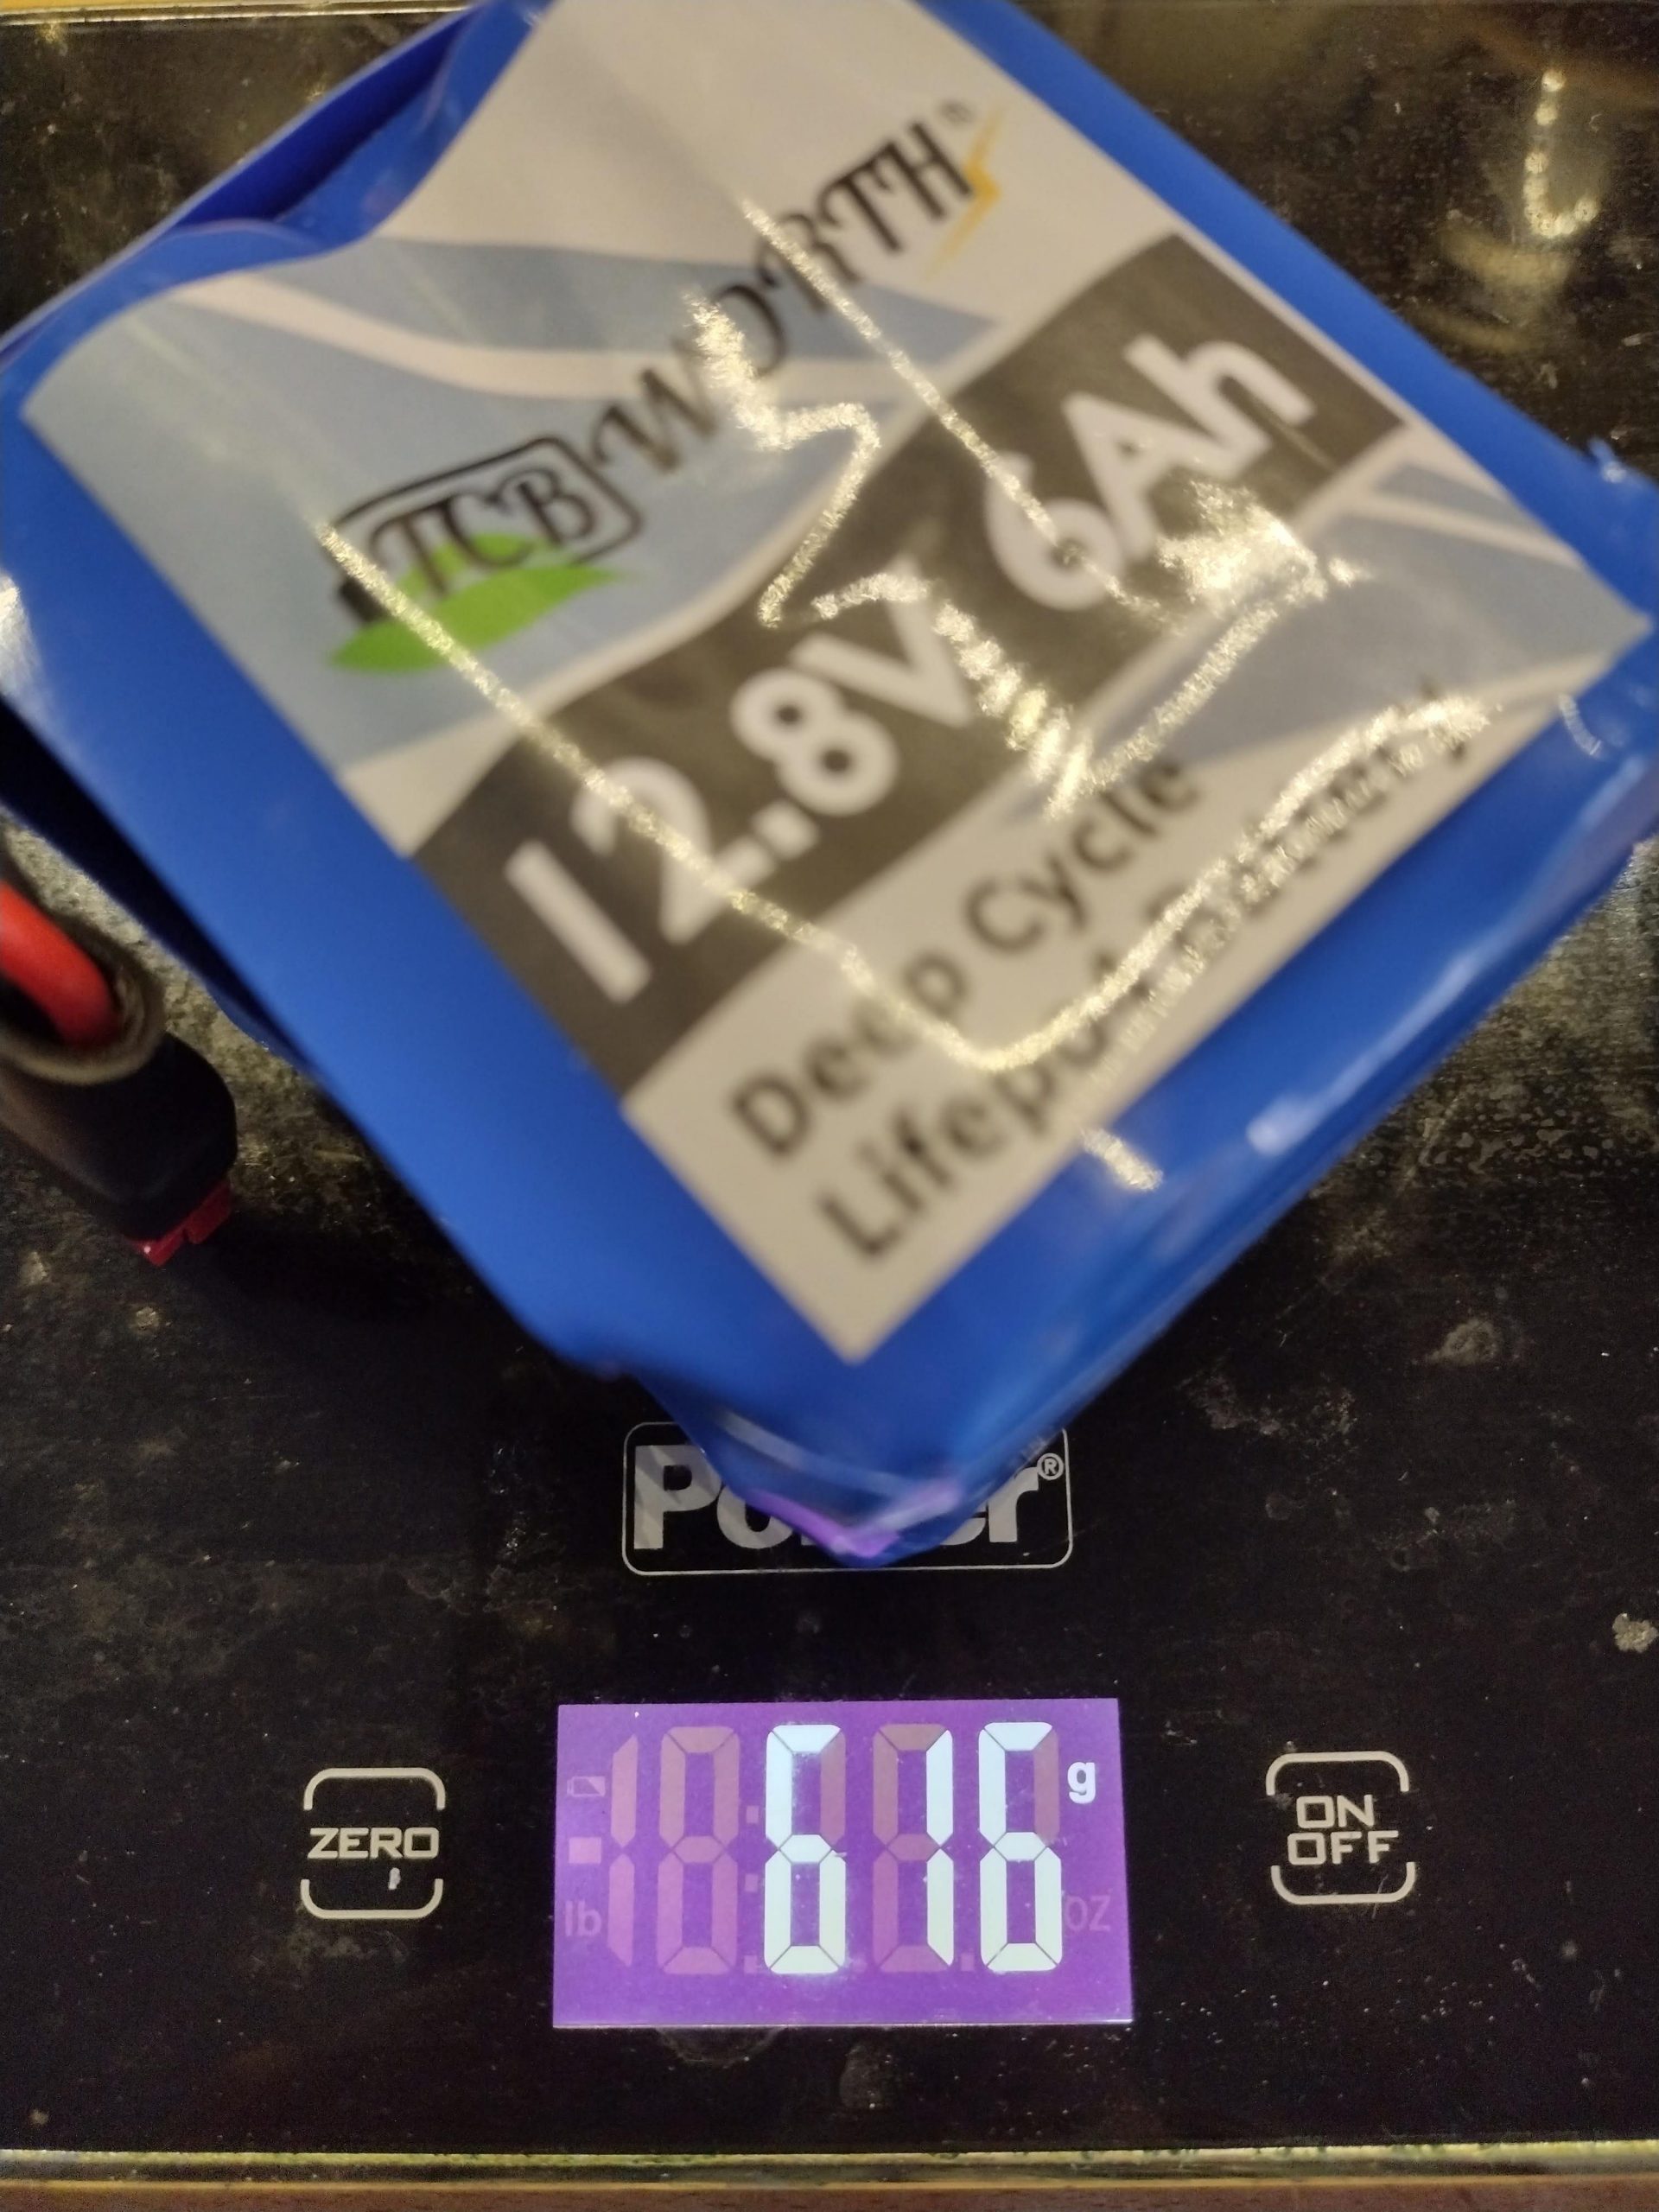
After some deliberation, I settled on a 12v 6Ah pack from Amazon, which cost $25USD, versus $80 for the Bioenno. I don’t have a way to test the capacity, so I don’t know how it would actually stack up against the premium battery, but mine works.

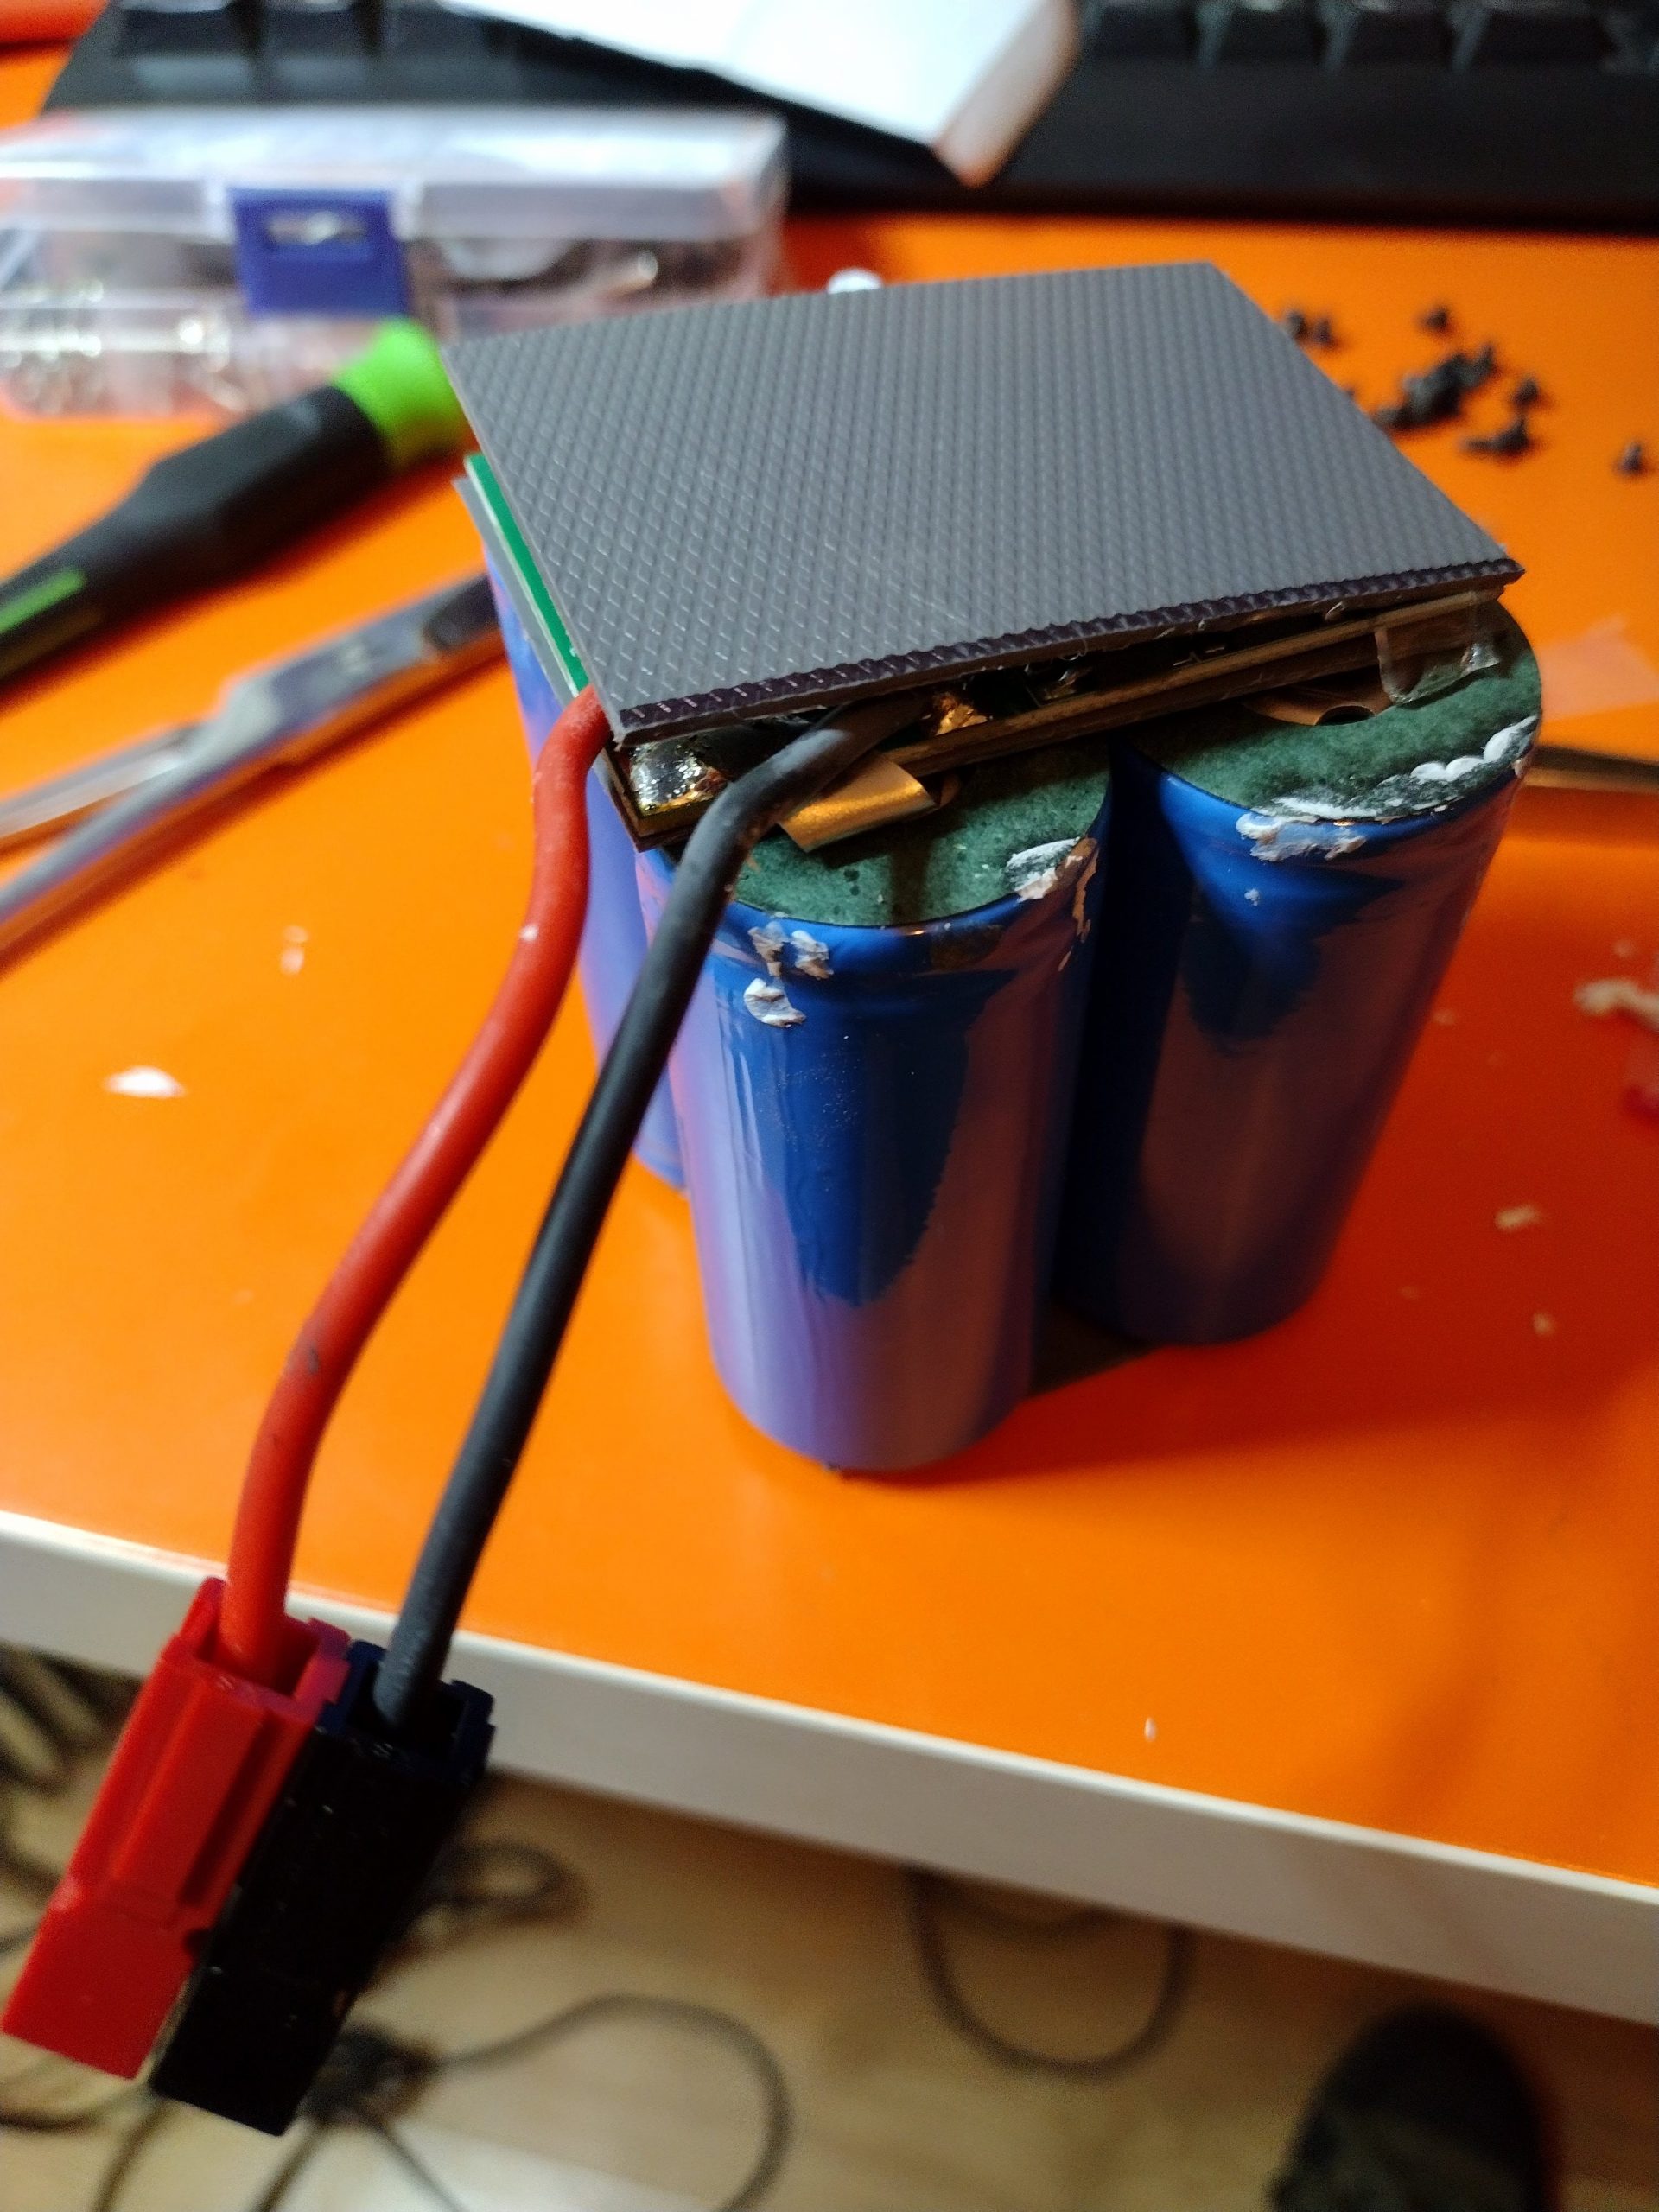
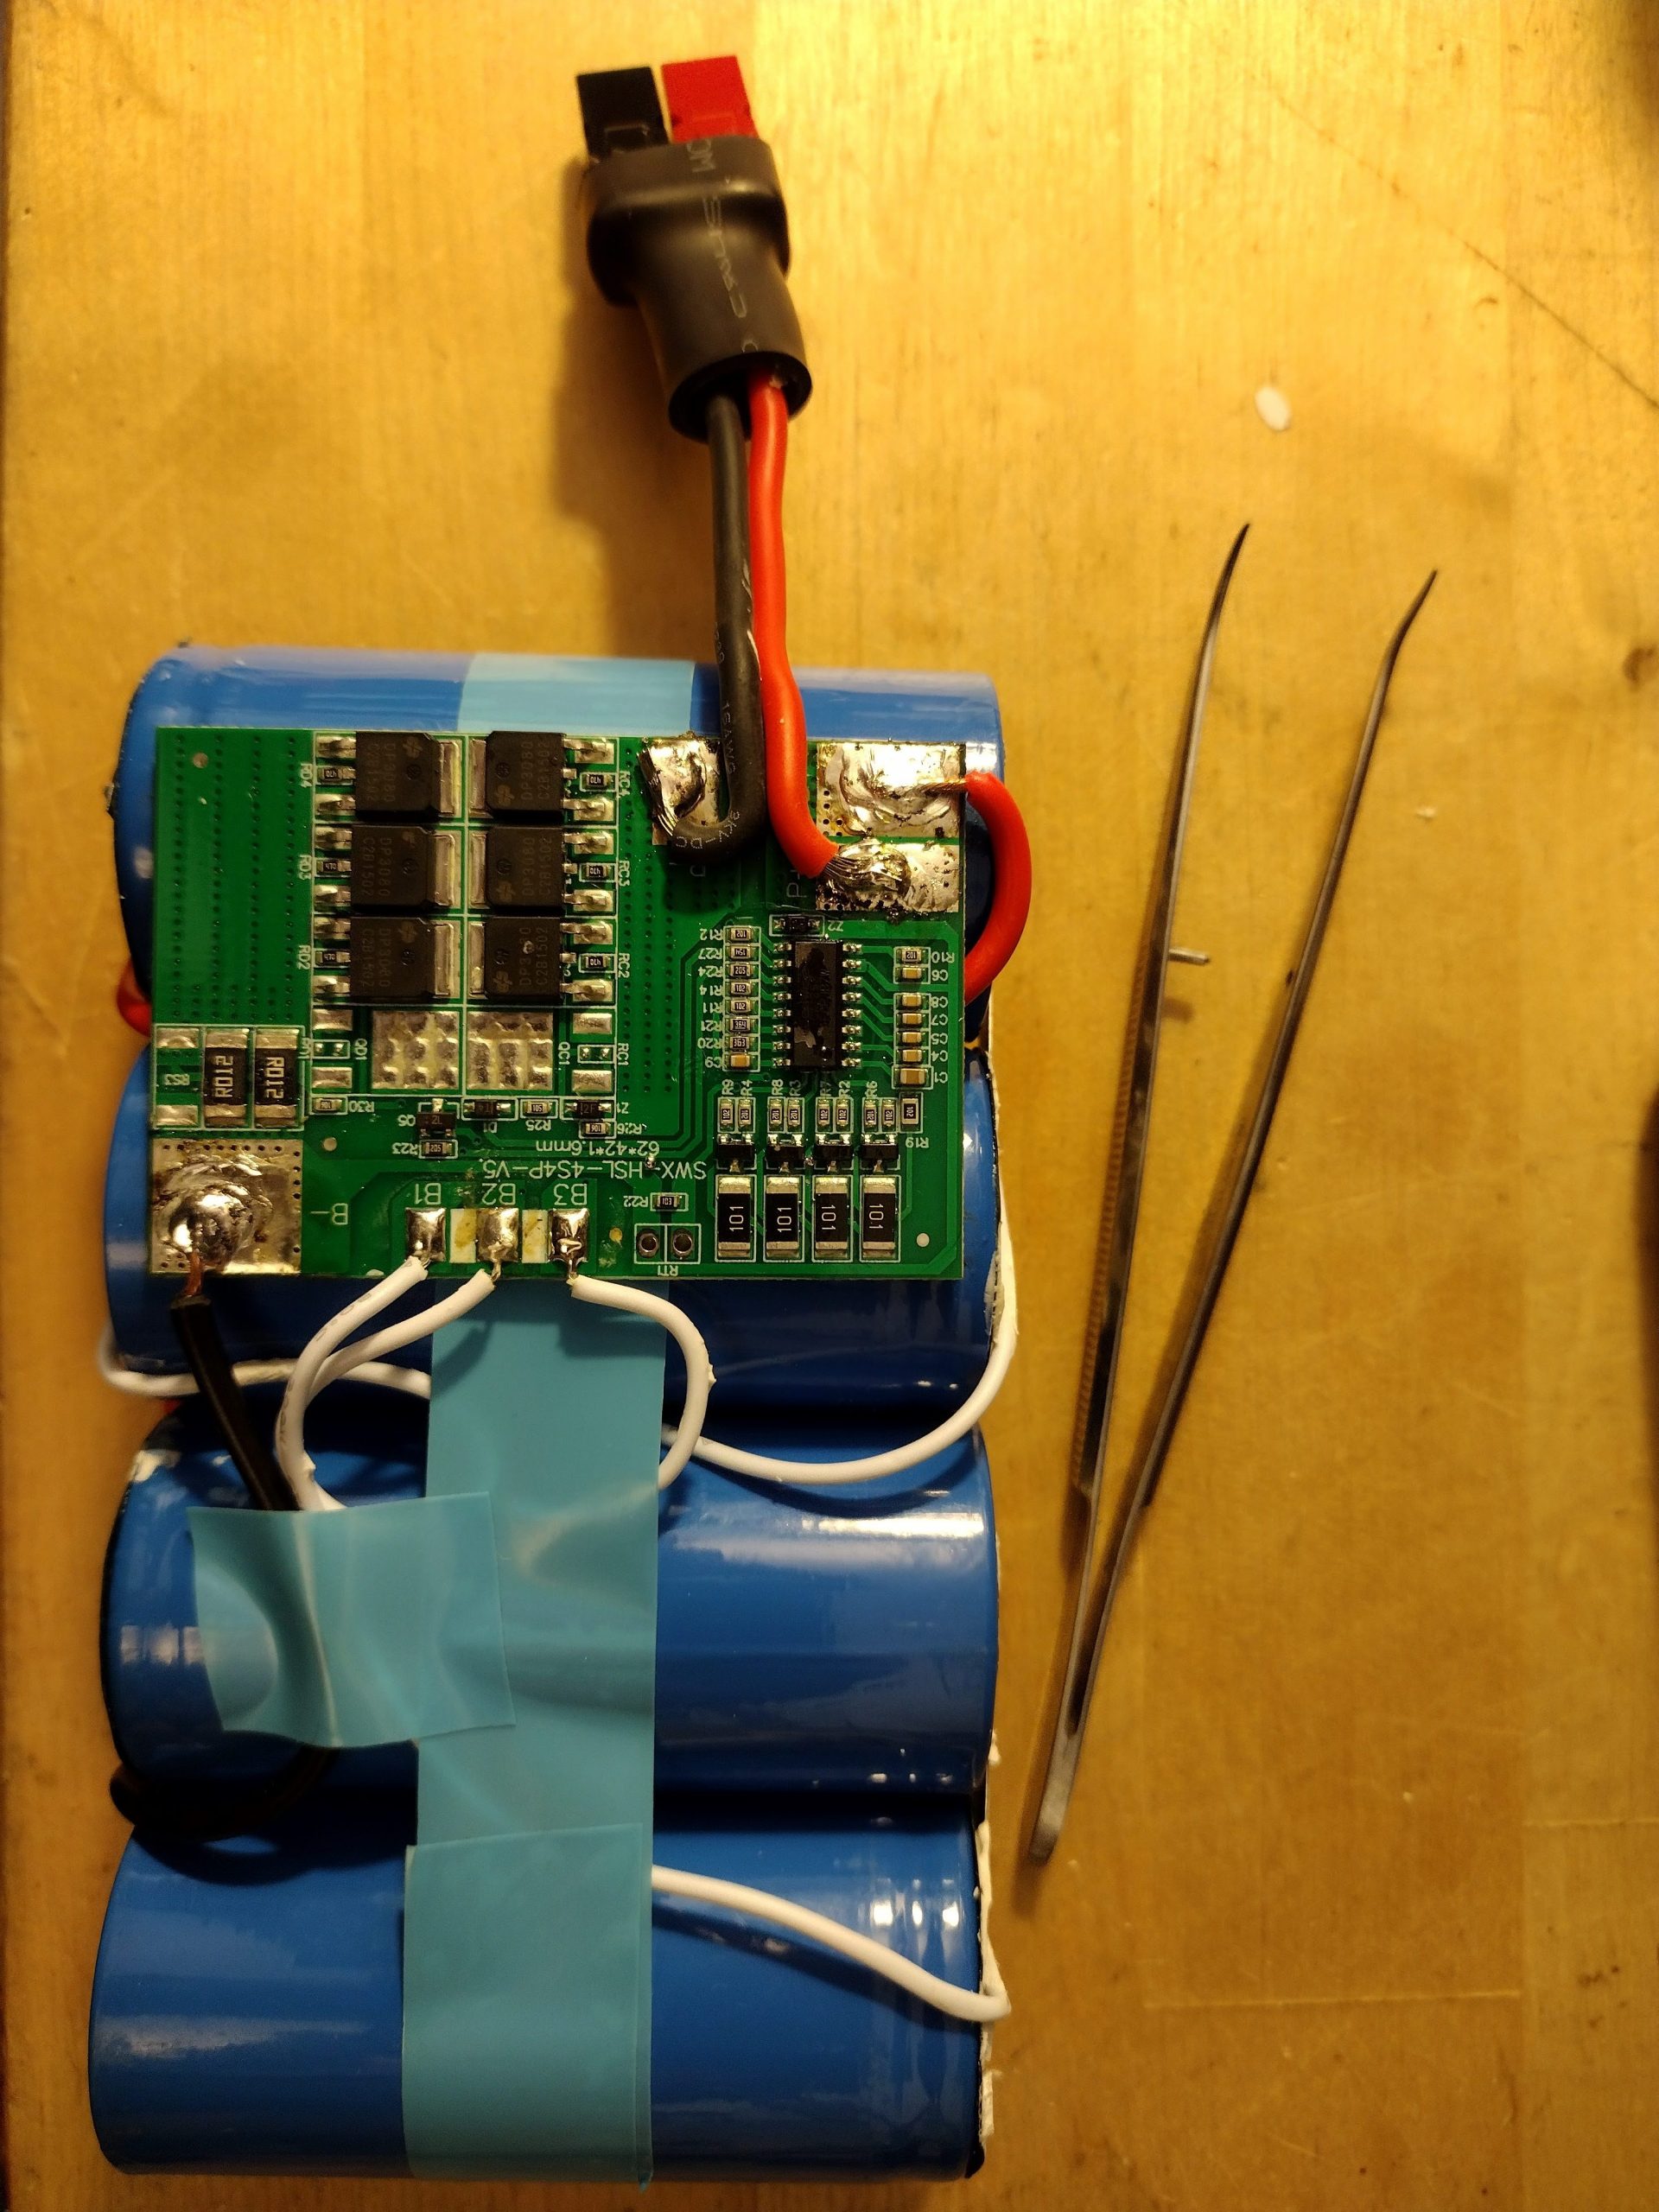
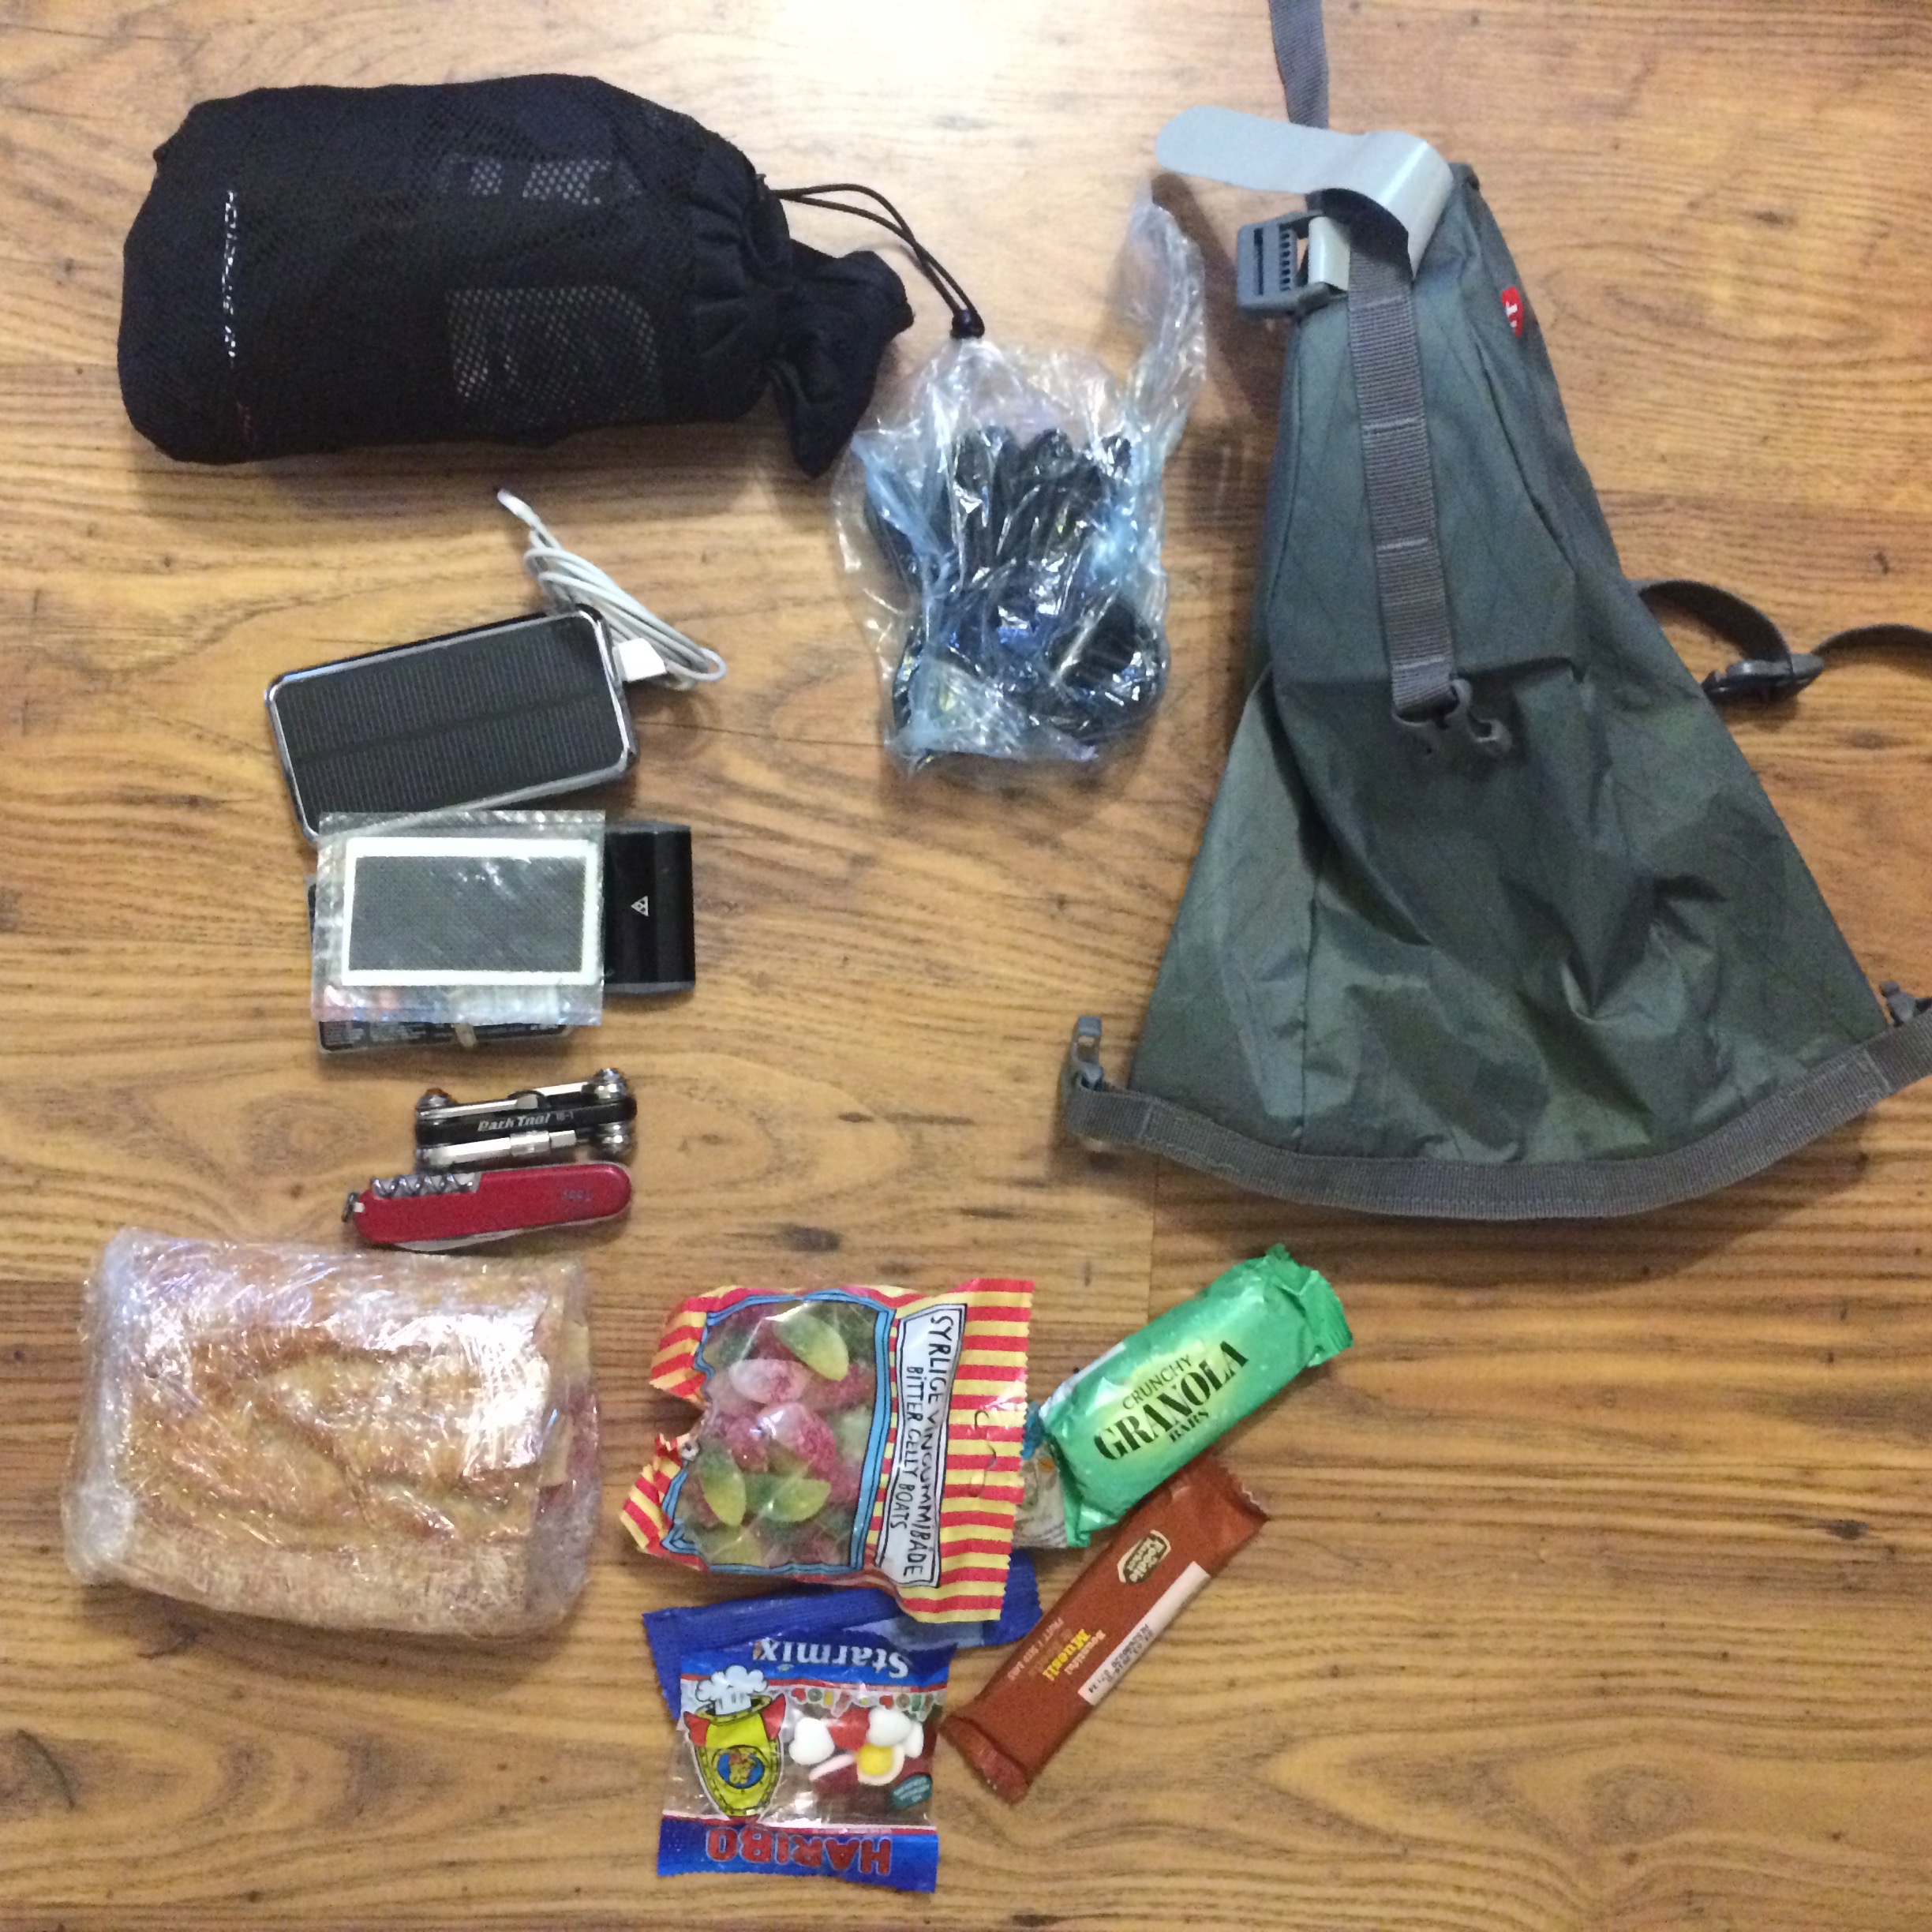
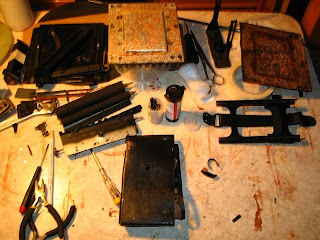
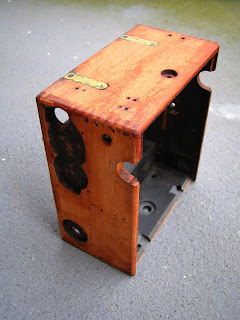
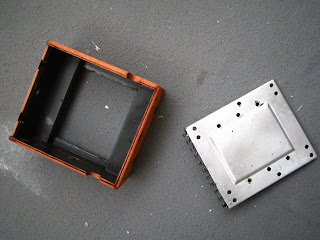
As one does, I didn’t even test the battery, I took it apart. Makes sense, right? This battery came in a plastic case, the Bioenno is just shrinkwrapped. Weight of this battery was advertised at 600g, and came in just over 700g.

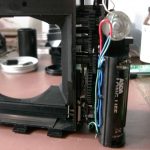
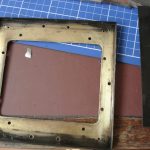
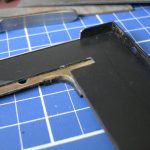
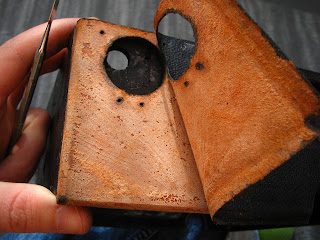
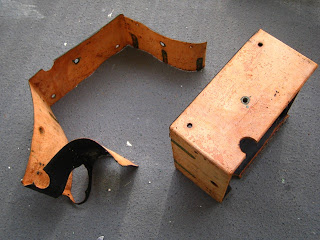
I removed the case, added Powerpoles to its existing leads, replaced a sheet of PCB material with a top and bottom protector made from Ikea polypropylene chopping board, and covered it in shrinkwrap.

The resulting 616g is not too heavy, and seems to be perfectly able to keep the G90 running at 20w for a good while.

Update: after a couple of SOTA activations I decided to change the form-factor of the battery. I think this fits in a backpack more easily, though it is arguably also more prone to changing position.

I will probably end up getting a Bioenno battery one day, but I don’t need one yet.

Tobias Feltus:
Share

Xiegu G90 weight loss: Preparing 20w for SOTA activations

I bought a used Xiegu G90 in 2023 as a portable rig to take on SOTA (Summits On The Air) activations, and to use as a travel rig. The G90 is a compact unit, about the size of an airport-best-seller novel which covers all modes from 160m to 10m at 20w output: it is SDR based with a colour waterfall display and a built in ATU.

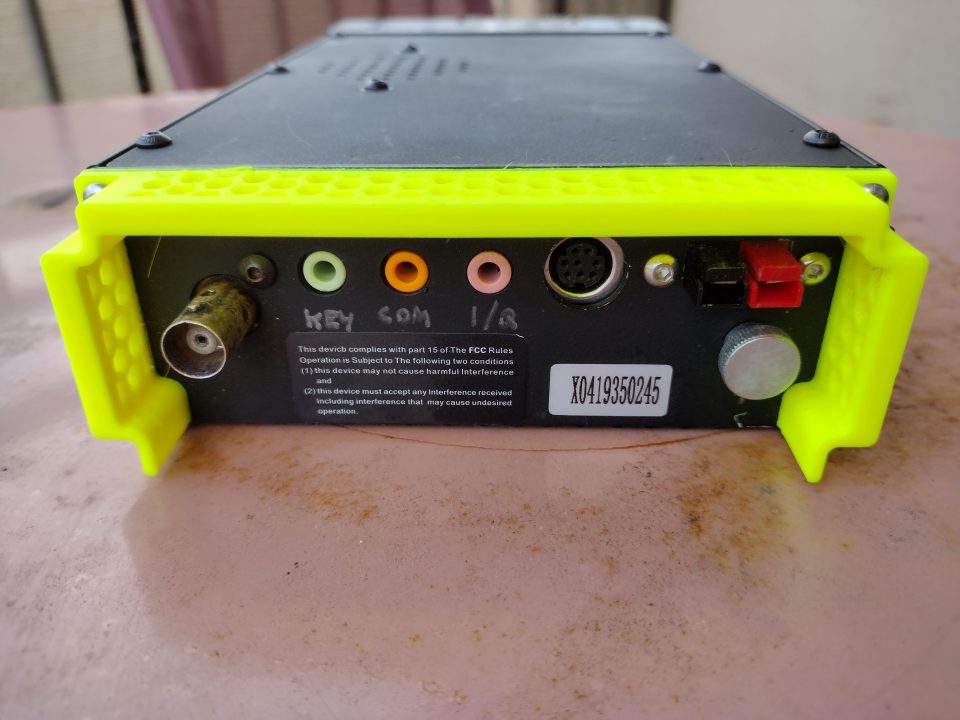
My modified Xiegu G90

The first change I wanted to make was a Powerpole cable since I was transitioning my shack to Powerpole distribution. When I found that the Tamiya-style power connector the G90 used cost significantly more than a Powerpole, I decided that I might as well take the opportunity to replace the connector on the back of the radio, and also replace the SO239 with a BNC so that I would not need to use an adaptor. When I removed the top and rear plates I discovered, much to my surprise, that they are made of steel!

The weight for the main unit (less the handmic) was 1659g, which is a huge selling point for those of us who want to be able to carry an HF transceiver that has more power than QRP. The main body is an extruded aluminium heat-sink with a ~2.5mm steel top and back. The detachable front “head unit” has a thin steel casing and two steel handle/guards, and if you are planning to keep the radio together as a single unit, there is a steel cover plate on the main body which can be removed (you can’t remove the back of the head unit as it is structural).

I had a piece of 6061 aluminium sheet, so I cut a replacement top and rear plate to match the exact dimensions of the originals. For the top plate I used double-sided tape to hold the new piece to the back of the original, and used the steel plate as a drill guide. The rear plate needed some modification to make it native Powerpole and BNC (Note that I put the BNC mounting plate on the inside, and doing this means that you need to be careful with the type of screw heads you use, and how they will clear the PCB and standoffs). I also added an internal fuse, using an automotive-type fuse with a couple of spade connectors, which have heat-shrink on them to avoid shorting. There is enough space within the housing (near the ATU) for the fuse to not be fixed in place. The existing wires were also long enough to use for the modification.

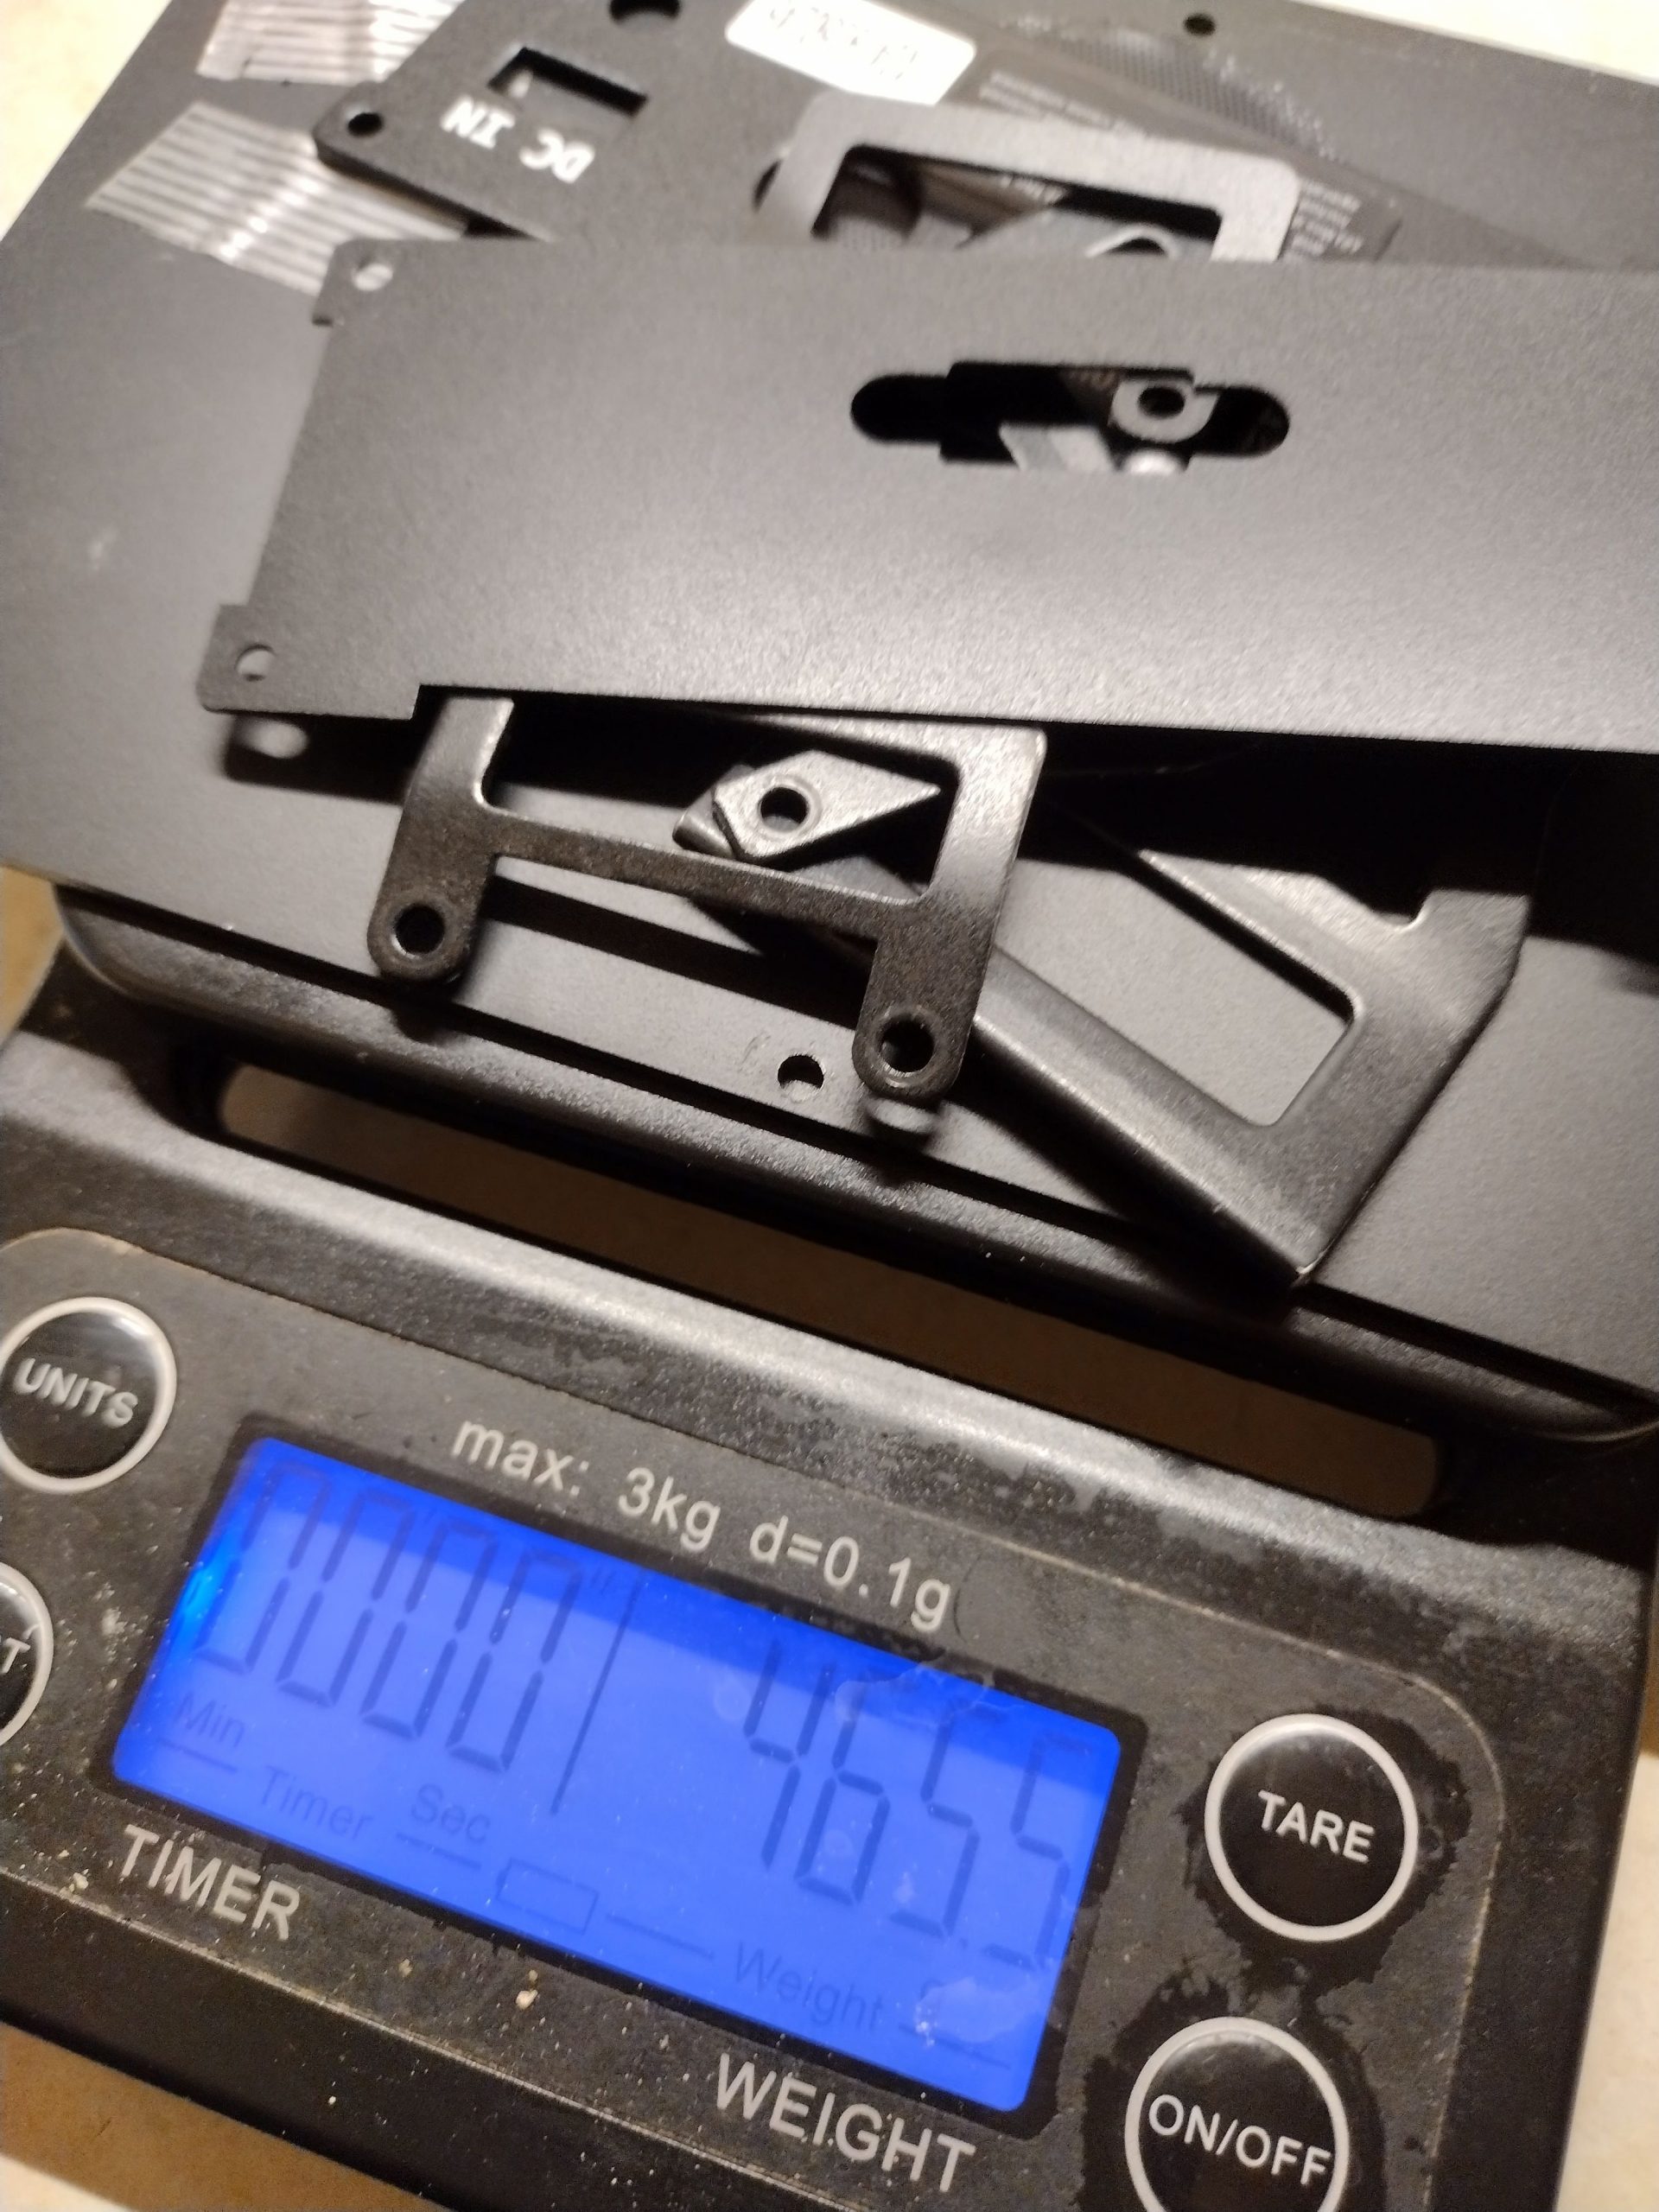
The total weight of the steel parts removed was 466g. The revised weight of the rig is 1304g, including the 3d printed bash-guard I made to protect the BNC connector, and with a 3d printed VFO knob. Though 300g may seem trivial, it is 20% of the original weight.

I did not purchase *real* Anderson Powerpoles, I bought Philmore 30A ones from CQ Radio Supply on eBay for this, and they work well.

STL files for the rear plate (above) a matching faceplate and the cover I have been using for shoving the radio in a backpack are all on Thingiverse HERE. The LiFePo4 battery pack I made for the radio is also on another post.

Tobias Feltus:
Share

SCSI in 2023: a struggle to keep good machines running

For the past few years I have been struggling with old Macintosh computers dying, trying to keep my film scanners in good running condition. I have an Imacon (now Hasselblad) Precision II for 35mm to 4×5, and a Microtek ArtixScan 2020 which can scan 8×10 negs, or prints up to A3. Both of these use different SCSI interfaces. When I bought the Imacon it ran on a Macintosh MDD, and when that died I moved to a Quicksilver, then a second Quicksilver. As far as I can tell, with these older macs the PSU was usually the first thing to die, and there was often a struggle with RAM modules malfunctioning.

If you are reading this, I will assume that you are in a similar situation, so I am taking notes on here.

My plan was to try to move to Windows, since this would permit a slightly bigger selection of hardware and software to meet my needs and, most importantly, I get to work with a 10 year old computer instead of a 20 year old computer, using a standard PSU that can be replaced. All SCSI cards are PCI, so you need a motherboard with at least one PCI slot (not PCIe), and there are a couple of generations of memory which are worth avoiding. My brother-in-law gave me a Dell Optiplex 755 which has a decent processor, SATA and 2x PCI slots.

First thing to do: install Windows 7 x86 (32 bit): this was the last version of Windows to support SCSI fully, and the scanner’s driver won’t work on 64 bit, I tried. Fortunately I found THIS article by Grav which was a huge help. In 2023 Windows 7 is not easy to get running properly: Internet Explorer no longer works with the internet (!), and the only modern browser that will work is Firefox, but I was unable to get Firefox to install until I had managed to install 160+ Windows updates. I found that the Updater itself would not work until I had installed SP1 and a couple of other updates manually. When Windows is all up to date with its last options, you can install Firefox and AVG Free since Win7 is also vulnerable to virii. Also, go over to the Hasselblad site and download/install FlexColor 4.0.3 (the last version to support SCSI scanners. Do note that you can use the current version to edit 3F files on the same computer, since the newer software is a little nicer to use. (3F is Imacon/Hasselblad’s RAW file format: the Precision II can produce a full resolution RAW file from anything it can scan, which later can be tweaked for colour grading, sharpening, etc.)

Next thing is getting the SCSI cards to work: in my case the Device Manager would find a driver, but then tell me that it was not compatible with my OS. Frustratingly the Device Manager does not tell you what driver you need (as in what chipset you need a driver for), however the cards I had were both Adaptec, and they have a chip on them with the generation written on it: I had one AIC-3860Q and one 2906. I found THIS repository which has a large number of Adaptec drivers: I think that the ones which worked matched the first two digits of the chip number, which probably corresponds to the generation. Install the driver by “browse for driver software on your computer” via the Device Manager. When the card shows as working correctly in the Device Manager, connect the scanner, turn it on and reboot the machine.

Thanks to Grav, I then checked the Device manager, saw the Imacon scanner sitting there with a question mark, clicked to update the driver and navigated to C:\Program Files\Hasselblad\Flex Color English v4.0.3\INF and it installed the scanner’s driver. This is probably the only part which is strictly 32 bit.

Launch FlexColor and everything should work. I will have to dig around for all my profiles which may or may not transfer to a Windows machine.

I still think the Imacon Precision II is the best scanner under 2000 dollars/euro/pounds for 35mm up to 4×5. I have made huge prints from its scans.

Tobias Feltus:
Share

Analogue to digital to analogue: 3d printing and lost wax casting.

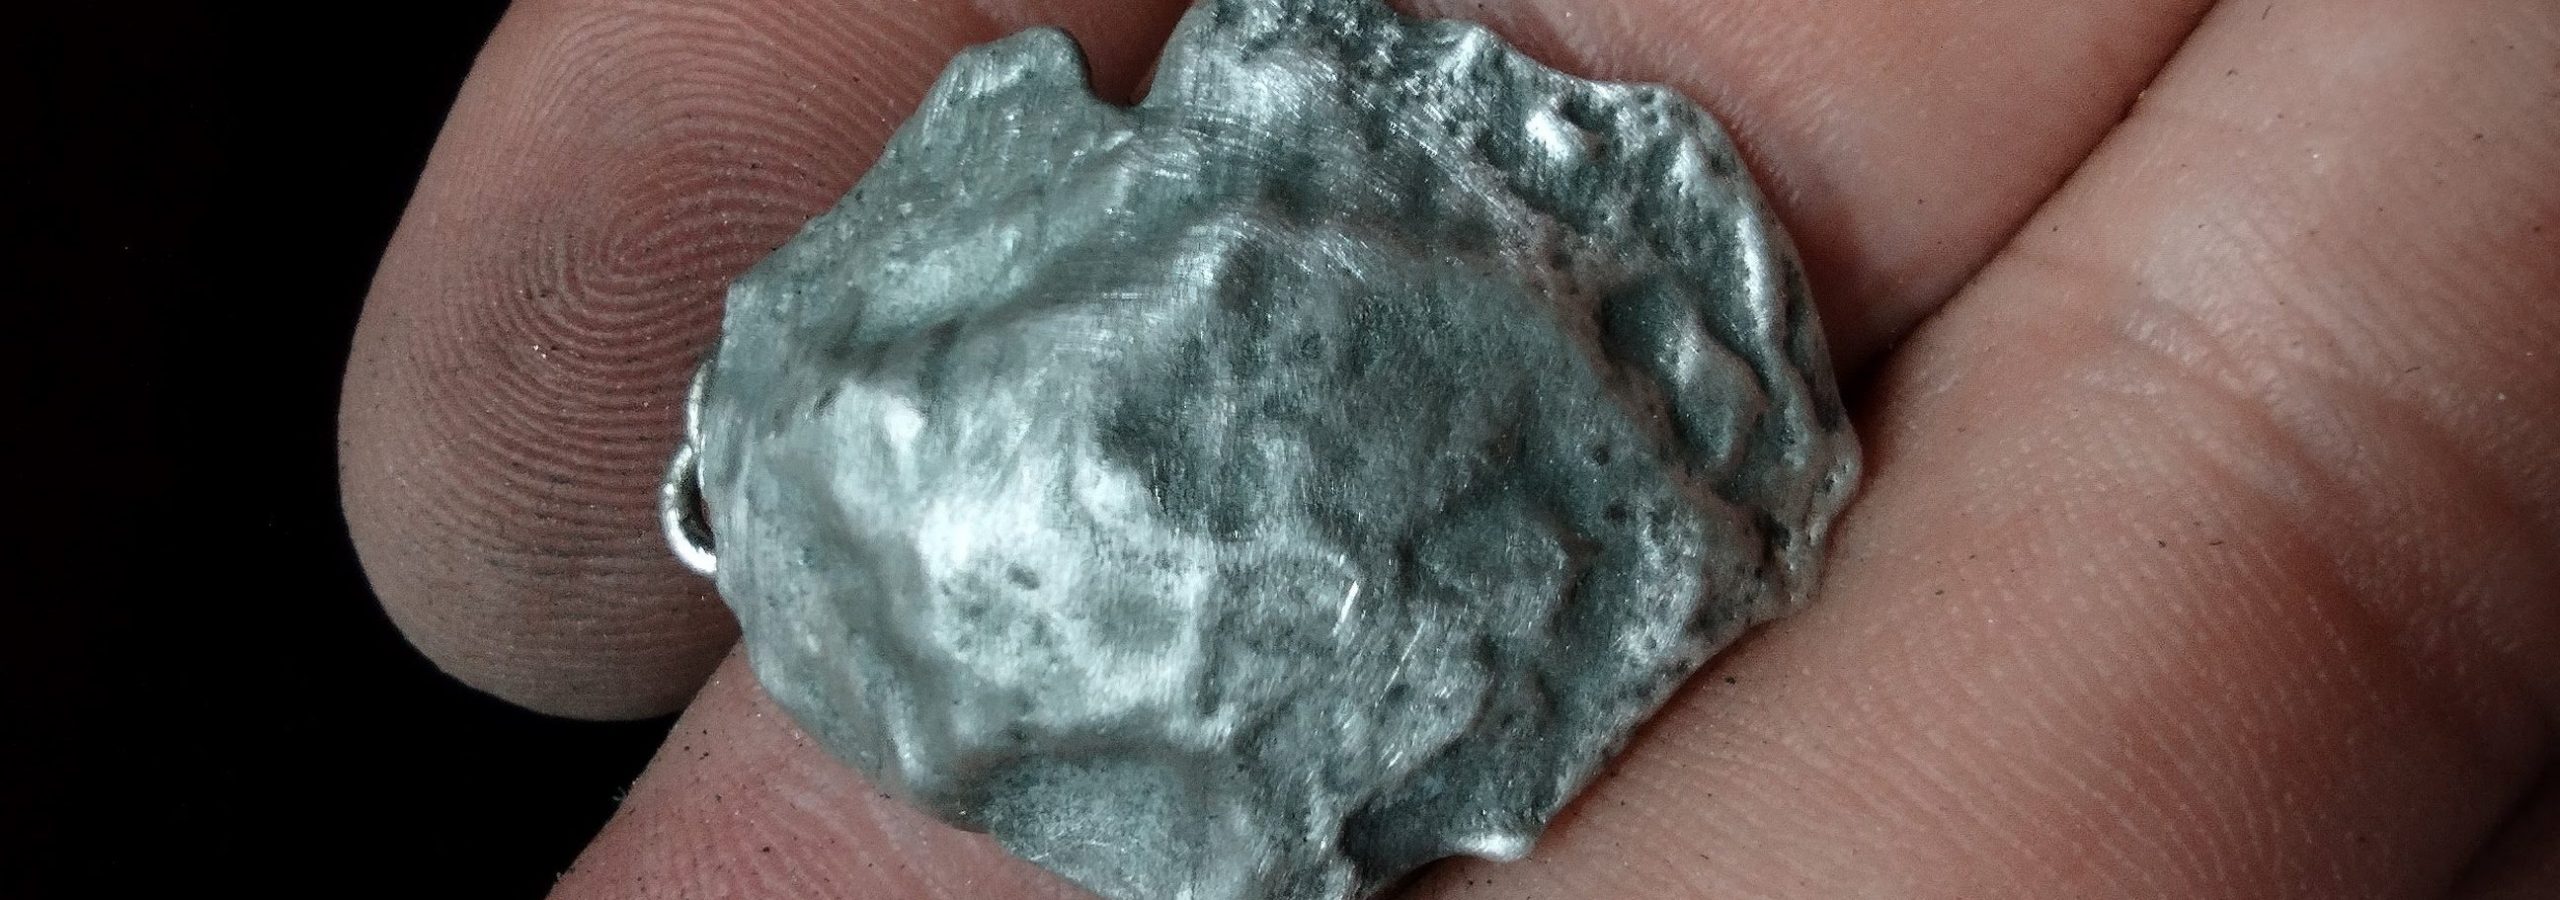
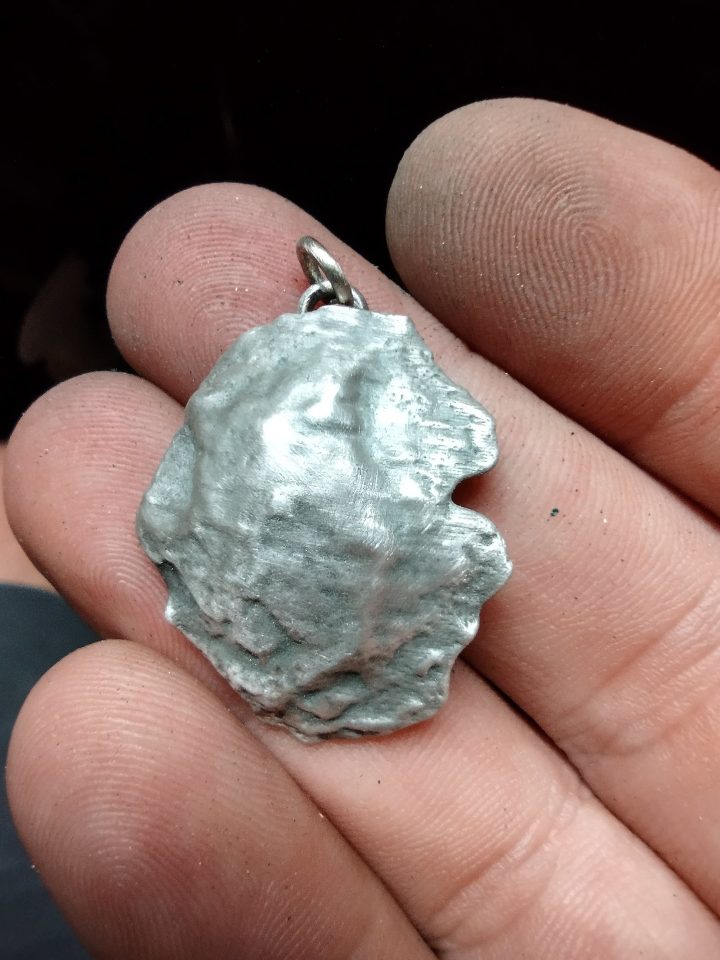
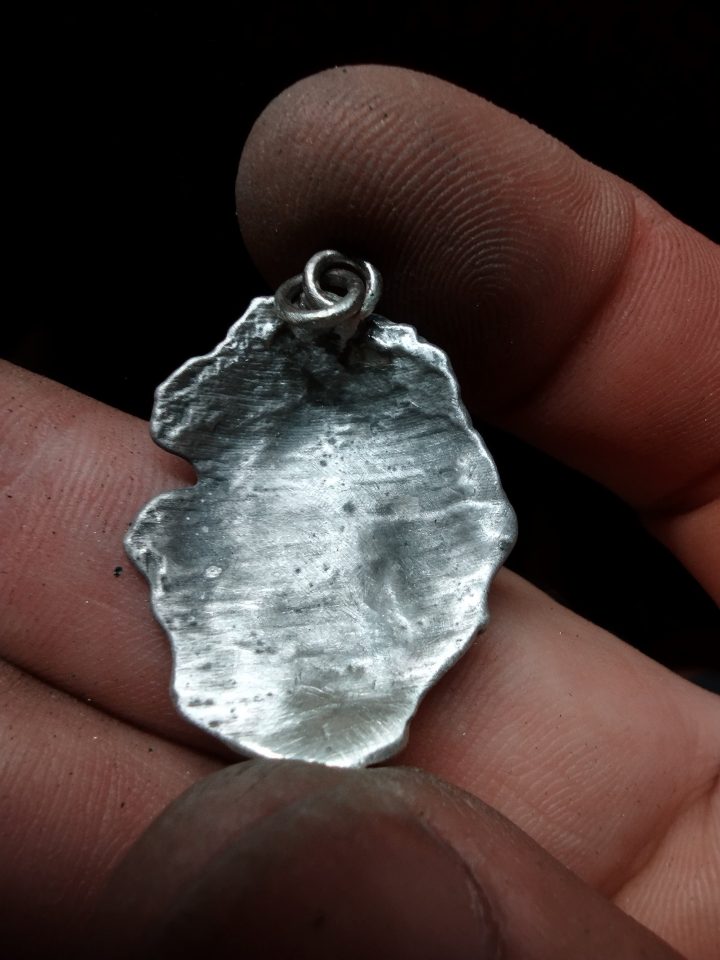
I recently delved into a slightly contorted process which seems to be somewhat unchartered territory: 3d scan an object with a mobile phone, 3d print the model in wax, then cast it in silver as jewellery.

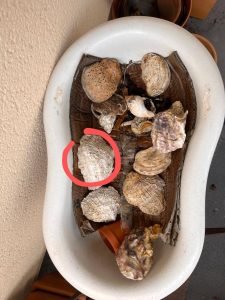
<TLDR> in October Lauren and I passed our tenth year together—something neither of us ever thought could happen, with anyone—so I decided to make her a pendant representing an oyster we ate around the time we got together. We found some Ostrea Edulis off the west-coast of Scotland, and ate them. We also ended up keeping the shells on the balcony, for all these years.

The process of playing with analogue and digital is one that I have been interested in for years, as a photographic tool. I have been shooting analogue photography for over thirty years, and in the last twenty I have been scanning colour, using “digital darkroom” techniques and then printing back to analogue (photochemical) material. So the idea of doing this in a 3rd dimension is not hugely abstract, however the price of the tech to perform the process has only recently been attainable, and my experience is more limited. </TLDR>

Now, this is what I did. Still a bit long, but I wanted to write enough detail that you might be able to skip some of the trial and error.

Scanning: a part of the process which could be optimised. I’m in Arizona, Will (https://wanderson.xyz/) is in Edinburgh with the shells, so he took a number of shots of the shell, as well as trying Scaniverse (https://scaniverse.com/) software. The individual pictures were processed with Meshroom (https://alicevision.org/), and I imported that files directly into Blender as I was unable to understand how the cleanup package worked. 

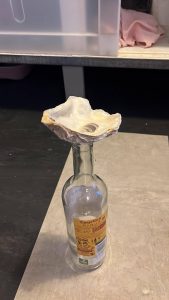
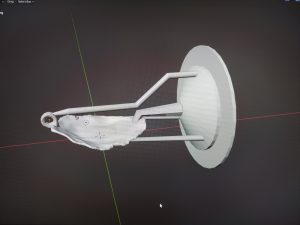
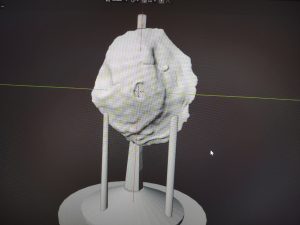
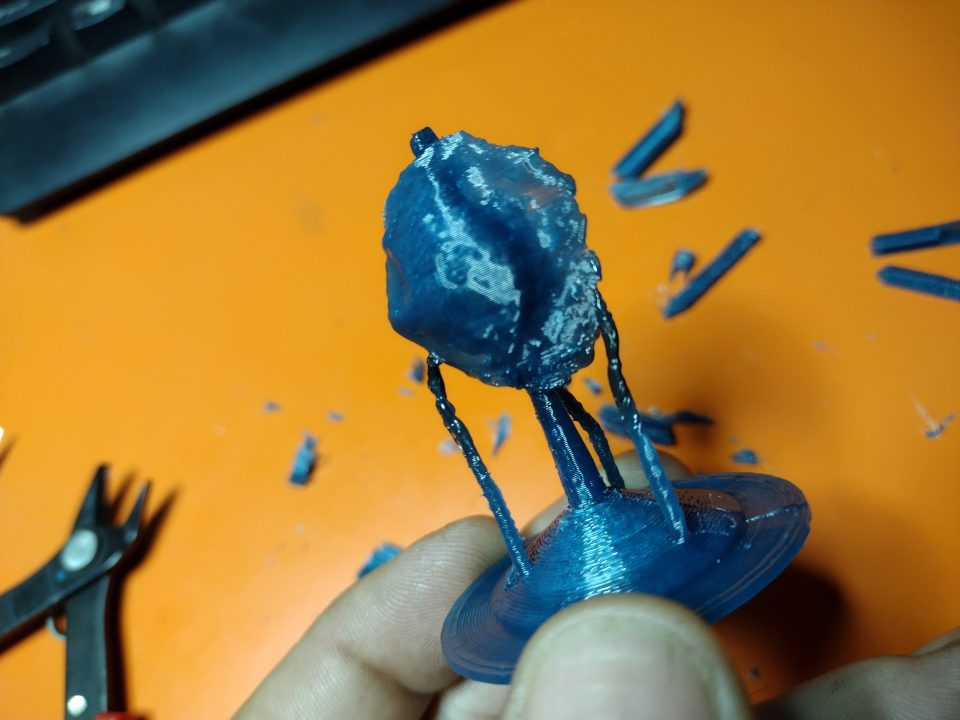
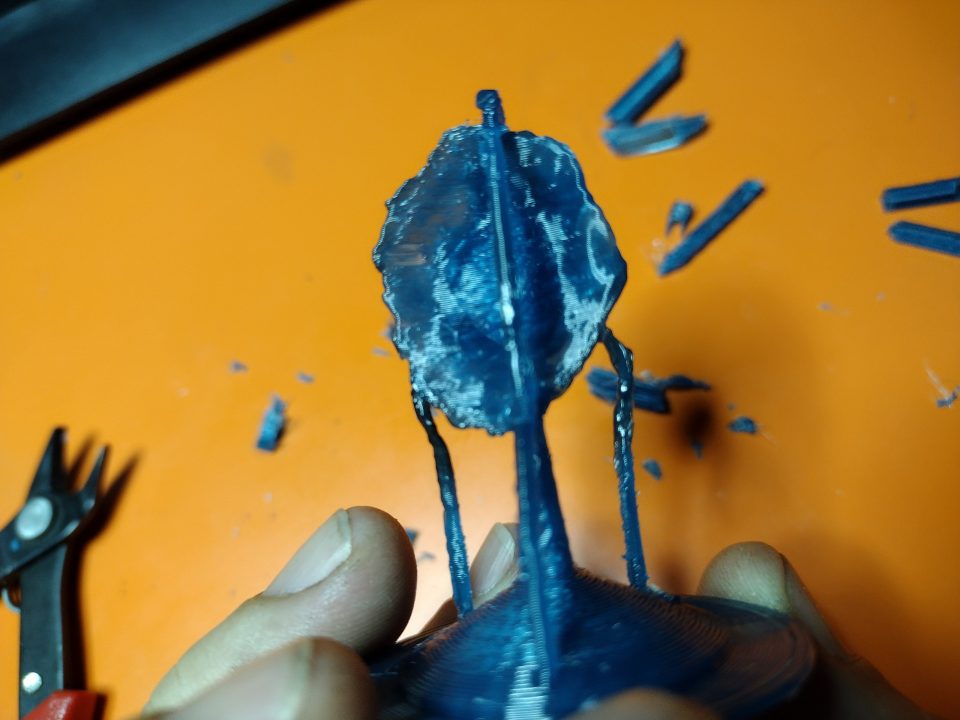
3d model: I used parts of the Scaniverse and parts of the Meshroom mesh, and spent a few days struggling with the file, which had a lot of stray geometry and way too many vertices. This is an issue with my experience and skills, and not pertinent to the process. The things to try and avoid are areas that are too thick, or too thin (this is a weight thing, balanced with areas that won’t print if they are under your minimum wall thickness of the printer), as well as needing to have a clean mesh with no stray geometry, good normals and all the other stuff that is necessary for Cura to be happy. I then added a shallow conical base, designed to fit inside an empty toilet paper tube, a runner and three vents. The eyelet did not print very well, so I added one later.

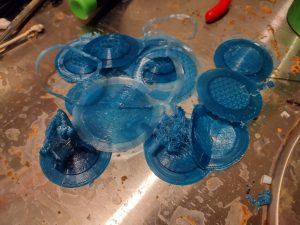
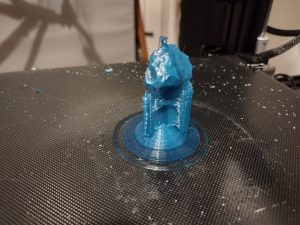
Printing: I have a Voxelab Aquila X1 with a direct feed, and I have been using Cura. The wax I bought is from Machinable Wax (https://machinablewax.com/wax-filament/), as it was the lowest temperature burnout I could find. The wax has a printing temperature range of 140-150c which is lower than the stock firmware on the Aquila will permit, so I installed the Alex firmware (https://github.com/alexqzd/Marlin/releases). Minimum extrusion temps (V1.3.5) are found at Control/Advanced/”Min Extrusion T” , and is a setting that resets to 180c each time the machine boots. I wasted many days trying to print with a 0.2mm nozzle, and kept getting a feed failure. These issues persisted with the 0.4mm as well. I think one of the issues is that I have the stock hot end, but there are many questions I never tried to answer. I contacted Leo (https://www.printsleo3d.com/) and he suggested changing the retraction amount, which may have been the cure, as prints started working.

Here are the Cura settings I used:

Quality

Layer height 0.1

Initial layer height 0.2

Walls

Wall thickness 1.2

Wall ordering: outside to inside

Alternate extra wall: yes

Print thin walls: yes

Z seam alignment: random

Top/Bottom

Top surface skin layers: 0

top/bottom thickness: 1.2

Top/bottom pattern: concentric

Infill

Infill density: 18%

Infill pattern: Triangles

Material

Printing temp 150c

Printing temp initial layer 155c

Final printing temp 135c

Build plate temp 80c

Build plate temp initial layer 90c

Flow 100%

Skirt/brim flow 110%

Initial layer flow 110%

Speed

Print speed 20mm/s

Infill speed 20mm

Wall speed 10mm

Inner wall speed 7.5mm

Travel speed 75mm

Initial layer speed 10mm

skirt/brim speed 10mm 

Enable jerk control: yes

Jerk settings 20mm (30mm for travel)

Travel

Enable retraction: yes

Retract at layer change: yes

Retraction distance 1mm

Retraction speed 45mm

Retraction extra prime 0

Combing mode: not in skin

Avoid printed parts when traveling: yes

Cooling

Fan speed 80%

Initial fan speed 0%

Regular fan speed at layer 2

Support

Structure: normal

Placement: everywhere

Pattern: concentric

Overhang angle: 45

Wall line count 2

Density 15%

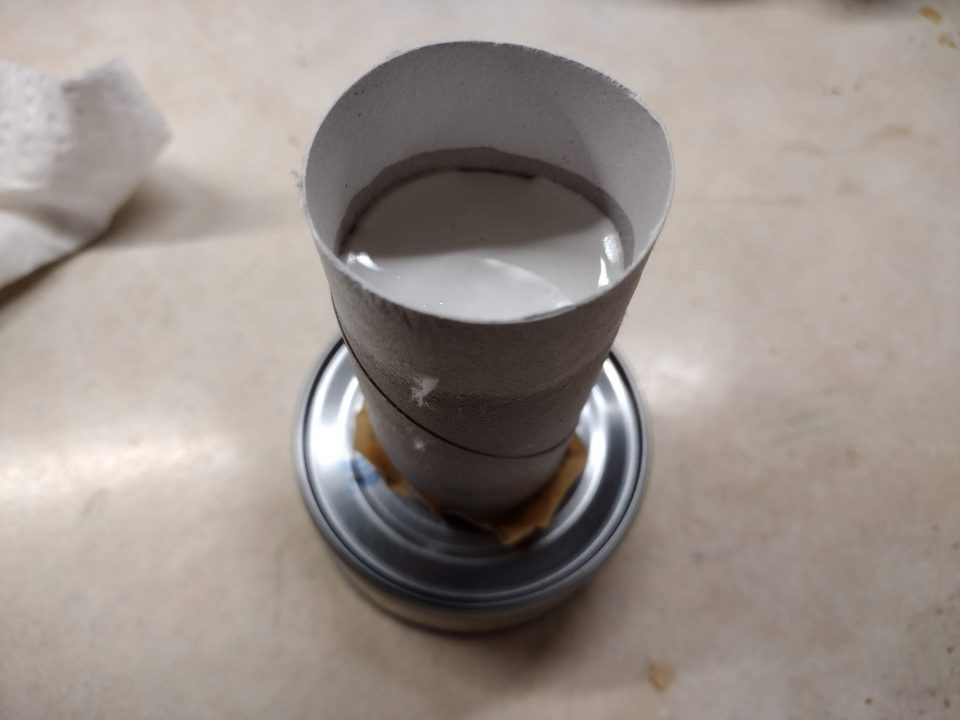
Lost wax: this is the part I am familiar with, though my familiarity is buried in my past. First, clean up your wax cast. I did this with a blade and flush cutters. The wax is flexible enough that it didn’t break. I bought a tub of DAP plaster of Paris, I went for the cheapest one I could get. I put the wax into the base of an empty toilet paper tube, added some packing tape for fun, and mixed up plaster.

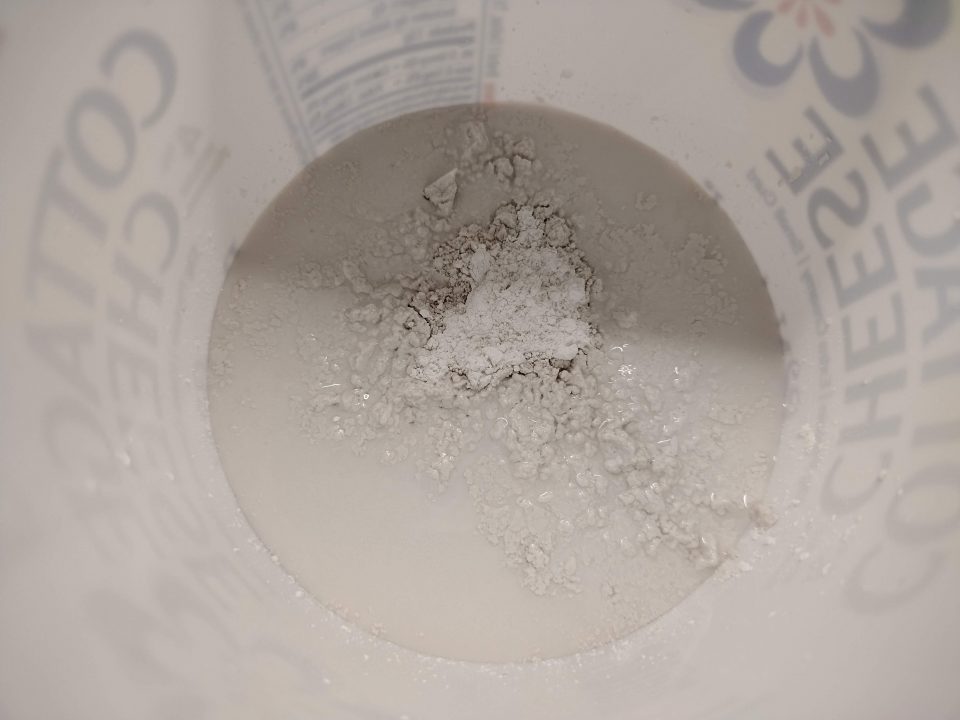
Note on mixing plaster for a mold: I watched a few youtube videos on lost wax casting and saw a lot of weird plaster mixing techniques which go against what I was taught. At college I dabbled in jewellery, glass and ceramics, and plaster mixing was the same in the three departments. Your main objective is to get a thin batter consistency with no air bubbles, so you don’t want to use an eggbeater, or even a spoon. This is what I recommend: guess or calculate the volume of plaster you will need, and measure that out in cold tap water, put that in a mixing tub (in my case, an empty yoghurt tub). Start sprinkling or sifting plaster onto the water, it will sink. DO NOT MIX IT. as you get close to saturation, you will get small dry islands (see below): wait a few seconds as the first islands will sink, add a little more until you have small islands that stay on the surface. You now have the correct amount of plaster in your mixture. Now use your hand, slowly, to mix the plaster and break up any clumps. You can use a glove, and you can wear a dust mask, but the hazards are pretty low, especially if you are not doing this on a daily basis. 

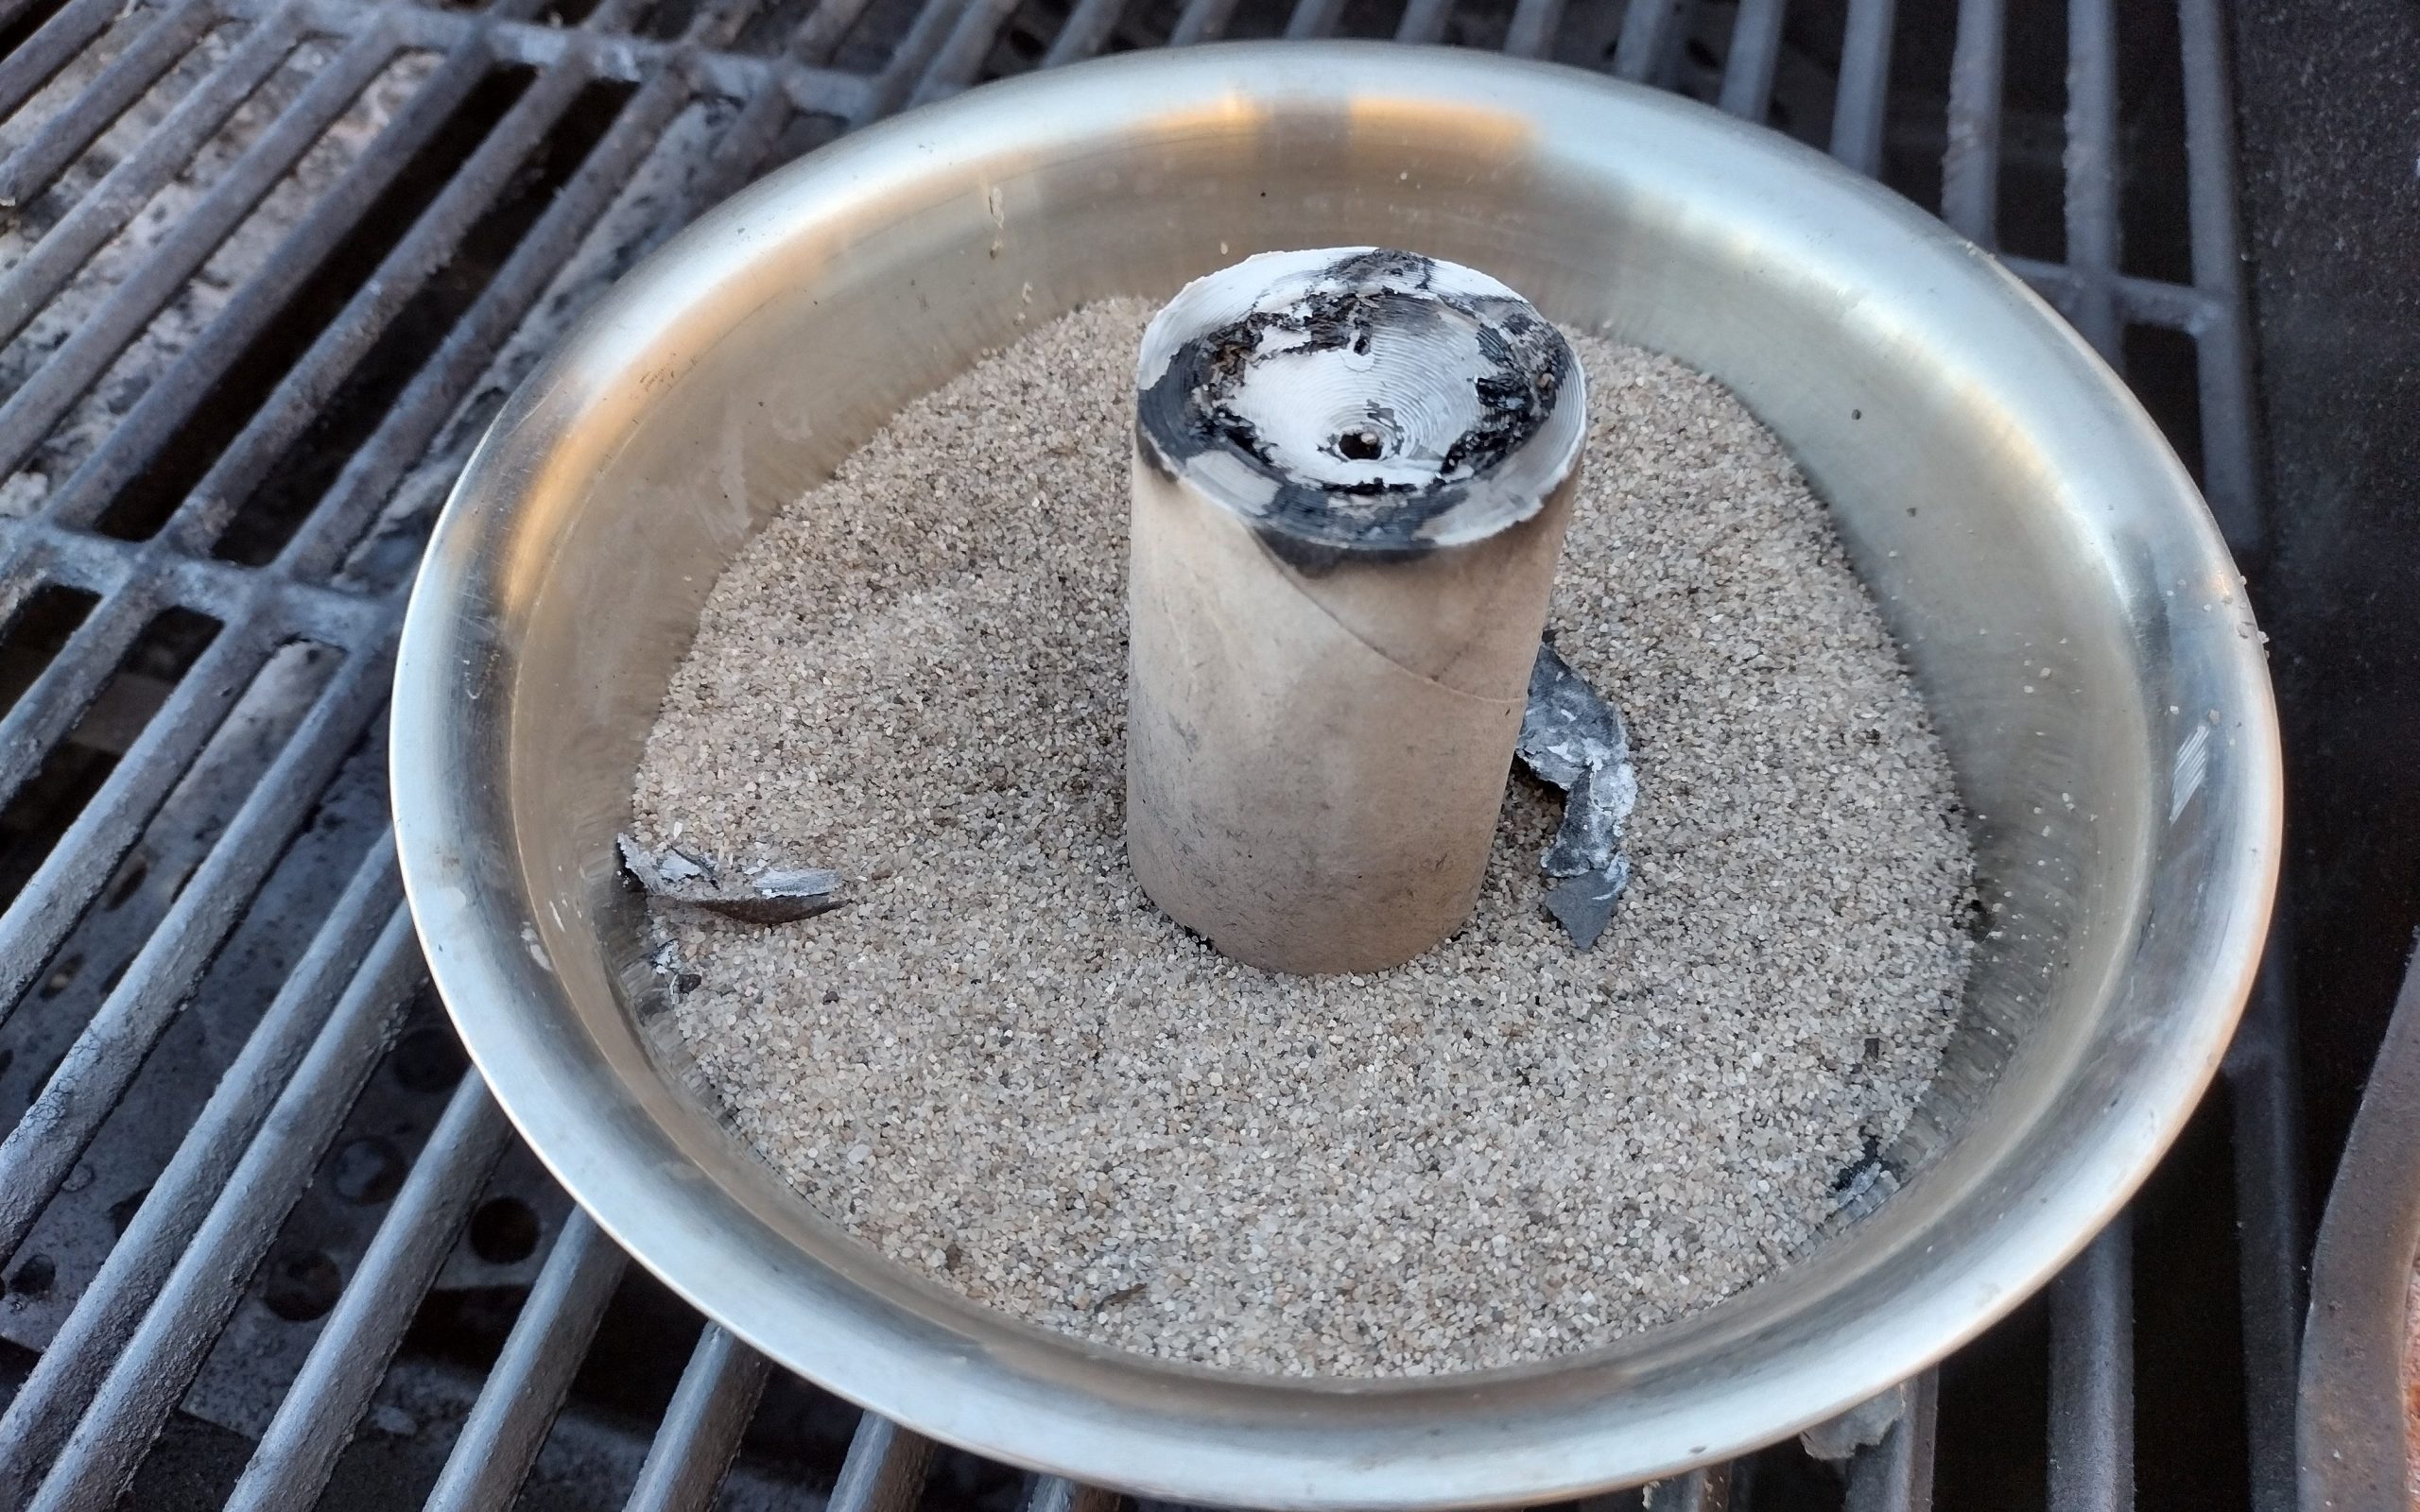
When you feel that the mixture is pretty smooth, go ahead and pour it into your mould: pour slowly, as far away from the object you are casting as possible. You want it to pour as a slow steady stream, no splats, no splashes. Your goal is to avoid any air bubbles. Fill the mould, it doesn’t matter if you have loads of mould material, you really just need enough to maintain thermal mass when casting. If you are using an absorbent mould, like the toilet roll tube, then it will absorb a little water and cause a dip in the level as it cures, this is ok. Plaster takes a while to cure, it is exothermic, so it will warm to the touch, and once it starts to cool down, you can start drying the mould. I put the mould in the oven (wax side down, on an empty tuna tin) at 300c. This started to melt the wax, but was not sufficient, so I took it outside and put it in the gas grill, and left it burning for a couple of hours. Once the wax had burned out, I turned the mould over and put it in a container of sand, and left it in the grill to heat up. This is to help keep some heat in the mould so it doesn’t chill the casting too quickly. 

Casting: this is not hard, but if you haven’t done it, maybe hit Youtube for a bit. Most of Youtube suggests you need vacuum machines and spinning things to cast a small object, but this is not gospel, my casting came out fine, using a toilet roll and a gas grill. I have a MAPP gas torch, and I bought a porcelain crucible from eBay, along with the springloaded handle and a bag of borax. You need to “prime” the crucible with borax, watch a couple of videos on this. Basically, you heat the porcelain, take the heat off, sprinkle a little borax, then melt it to create a glaze. Keep it thin.

Keep it safe: wear full length clothing, eye protection and use leather gloves. I used channel-lock style pliers to pick up the mould when it was hot, so have something on hand.

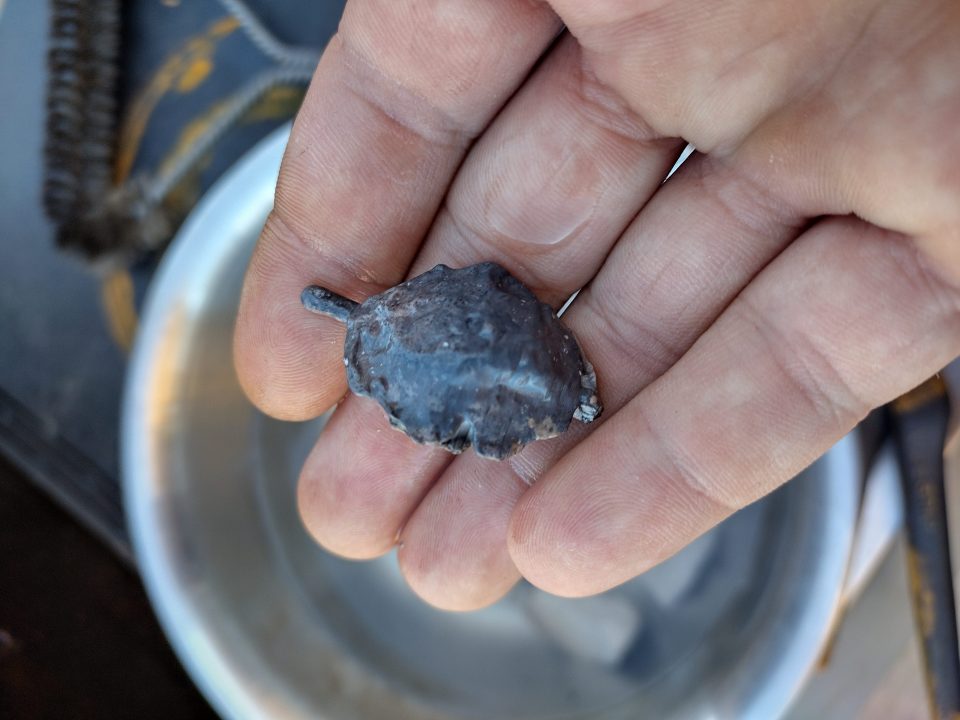
Guestimate the amount of metal you will need, put it in the crucible, sprinkle some borax on it, then heat it up with fire. Once it has puddled, keep the heat on it a little bit longer than you think you need to, then pour it quick/steady into the runner in your mould. Wait a couple of minutes, then pick up the mould, and drop it in some cold water. The heat shock will destroy the structure of the plaster, and it should break away with your fingers.

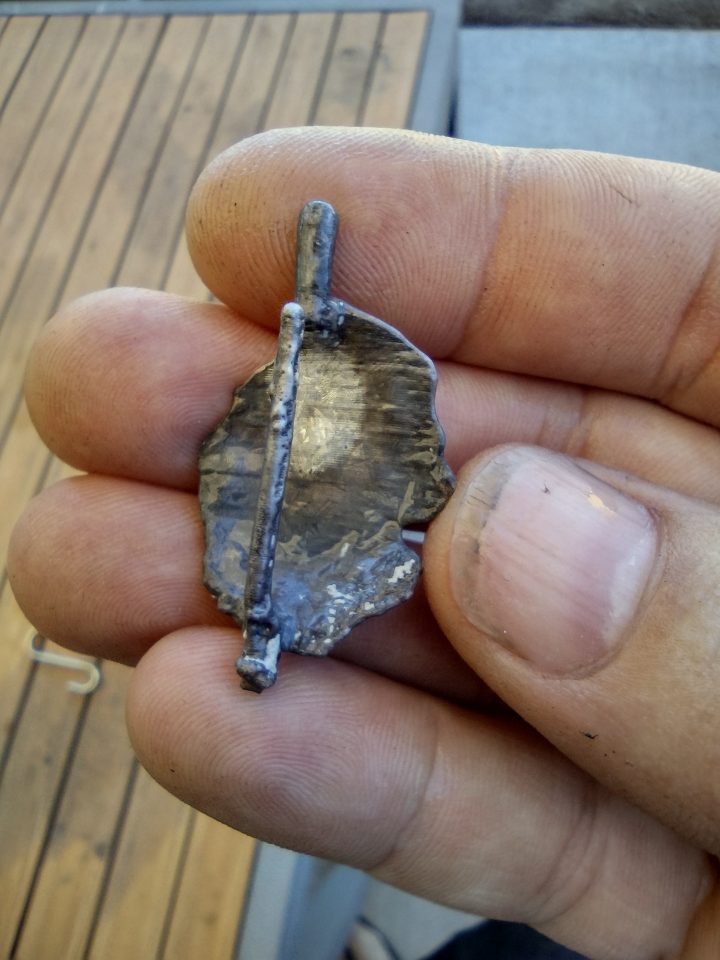
Finishing: I bought a piercing saw, and some small files. I attached an eyelet ring made from silver wire using silver solder. Silver solder comes in soft, medium, hard and extra hard, which is a temperature rating: hard takes more heat, so you always start with hard and work backwards, allowing yourself to attach things together without the heat undoing your previous work. You can make flux by mixing borax with water, and covering the area you are trying to solder with this. Try to hold your pieces in place, this is the hardest part of the process. I ended up finishing the pendant with a piece of Scotchbrite, as it brought up the highlights and kept some of the patina from the cast.

Tobias Feltus:
Share

Finding the way.

I’d been thinking that I needed to complicate my life to rekindle my attraction to photography, and what better way than picking up a 4×5 camera, finding a film that is cheap and, more than anything, has very little technical data published anywhere on the internet?

Enter FreeStyle’s Arista Ortho Litho 3.0, an orthochromatic technical film (note 1) which, I assumed, could be exposed for continuous tone and processed in Rodinal, as I have done with Tri-X Ortho and Kodak Technical Pan in the past.

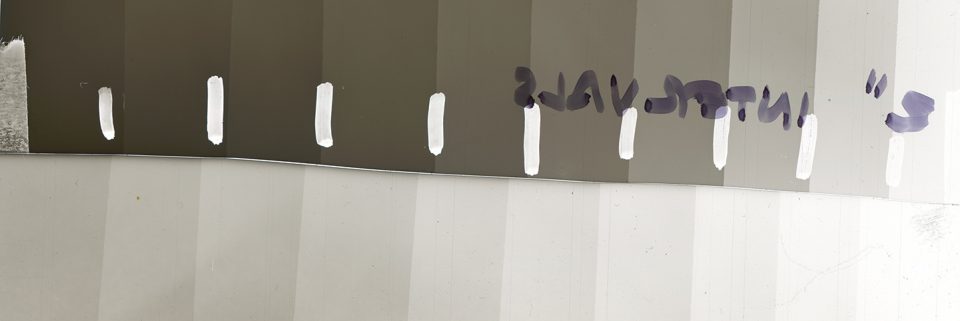
My first tests showed contrast, but some mid-tone. I exposed at ISO6, and processed by inspection, diluting Rodinal to roughly 1+150 (3ml/L), for 5 minutes. Subsequently, I read THIS article which suggested flashing the film, which is not something I have done much of. The idea behind flashing or pre-exposing film is that you deliberately fog the film, essentially pulling up the base exposure to just before it would otherwise start to show tone. In a digital world, it’s like calibrating, or changing a threshold. I set my enlarger to its highest position, and closed the lens to its smallest aperture, took one sheet that was undersized and cut it in half, flipping one half upside-down. I then marked intervals with a marker, and made 2″ steps. I found that flashing the film from behind gave me a little more resolution to my exposure, so I went with 3″. The goal is to choose a time that does not expose a tone.

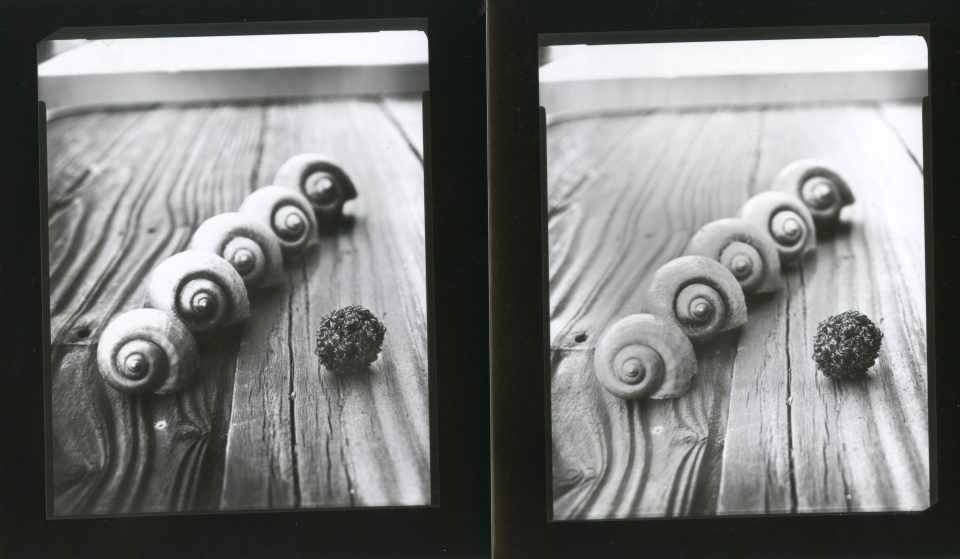
I then flashed 2 sheets, and loaded 2 darkslides with one standard and one flashed sheet each.

The above test was shot with the Nikkor W 135/5.6 for 40″ at f22. Though the film does show reasonable detail on its own, the flashing did contribute a significant amount of mid-tone and highlight detail. The contact prints were made at contrast 1.5, and I increased the exposure of the flashed neg from 30″ to 35″. The flashed negative could be printed well at a higher contrast.

Similarly, this other test was exposed the same, but with the Tele Xenar (in Compur Dial shutter) 270/5.5, at f5.5 for 1/10″. I may have under-exposed this negative by a stop, as I am still not 100% on how bellows compensation works with a telephoto lens and I exposed it per the meter. The increased highlight detail is still significant, and I am excited by the results.

Processing on both tests was 8 minutes, dilution of 3ml Rodinal per Litre of water at around 20c, as it is too warm for me to really control tray development. Agitation is reasonably constant in a tray.

Note 1: The film is manufactured in Belgium, probably by Agfa in Mortsel. I also have a hunch that the film is sold as Ultrafine Ortho Litho, though this is based on price and processing data, as I have not tried the latter. I also do not believe it to be the same film as Agfa Ortho, as the Massive Dev Chart suggests it can be exposed at ISO25, and processed in Rodinal 1+24 for a mere 4 minutes. I really ought to try this rating, before ruling it out. I think I only ever shot a couple of rolls of Agfa Ortho, and probably in the late 90s. I am surprised that Fotoimpex does not have a packaging of this film for sale.

Tobias Feltus:
Share

What is Conteporary?

It is mid 2021, the world has been ravished by my first global pandemic, and by some strange accident most of postwar design is now referred to as “mid century design”. That definition we used to know which separated the modern, post-modern, po-po-mo; Art Nouveau, Art Deco, 50s, 60s, 70s, 80s and Memphis. Somehow most of that is now just bundled into one ignorant title, as though these were all the same.

I am sitting on the sofa in Edinburgh, after having fixed a couple of issues with the plumbing, stopping leaks between brass, copper and plastic from the 1950s, my interventions from 2001 and today. Lauren is listening to a live performance of “contemporary music”, to which she just said “I don’t like contemporary music”, despite it being her field. I responded that it is not really contemporary, since it has sounded the same for the past 40+ years.

Which is why I am typing.

The Tate states that: “[…] the date of origin for the term ‘contemporary art’ varies.

The Institute of Contemporary Art in London, founded in 1947, champions art from that year onwards. Whereas The New Museum of Contemporary Art in New York chooses the later date of 1977. In the 1980s, Tate planned a Museum of Contemporary Art in which contemporary art was defined as art of the past ten years on a rolling basis.”

This—-of course—-must not be confused with Modern Art, which according to Wikipedia is a period from the 1860s to the 1970s, go figure.

I believe the Tate’s approach makes more sense than other defining periods. I struggle with the fact that the design industry has apparently died in the past 20 years, so there may not actually be any contemporary design to contribute to the next decade. The rolling decade approach should be pretty robust, though it does require some self-awareness amongst those who consider themselves to be proponents of contemporary creative practices.

Tobias Feltus:
Share

Wrapping Surly Moloko bars.

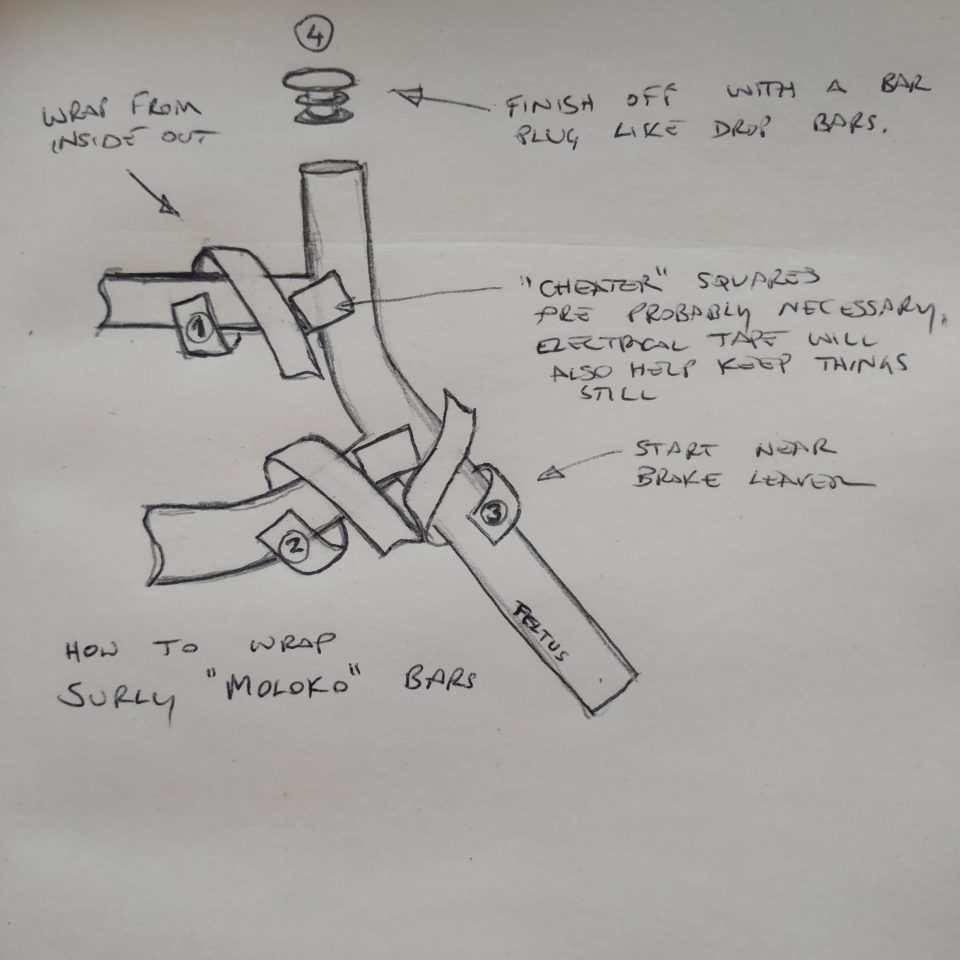
I’ve wrapped a few of these, and usually with difficult tape. Using a traditional “cork” tape would probably be a lot easier. My approach has been to try and not have any visible tape, so I start at the inside and wrap out, then use some tape to hold the loose end, and probably add a little “cheater” square or two. The main wrap starts from behind the brake lever and you then finish it off at the top with a bar-plug like you do on drop-bars.

Tobias Feltus:
Share

Olympus E-P2 “full spectrum” conversion.

When we go camping out in the sticks I keep finding myself in awe of the night sky, and I’m drawn to photographing it, like a moth. My Fujifilm XPro2 is exceptional in low light, but I’ve found it almost impossible to get a sharp shot of the moon with a manual 135mm lens, and my swirly starscapes taken with the Fujinon 23/2 are sharp, but swirly.

After seeing Rick Oleson repeatedly taking crisp and detailed pictures of the moon with a variety of lenses, I decided to get a lens to take a picture of the moon. KEH had a Sigma 600/8 catadioptric lens in F mount for a decent price, and I decided to also get an E-P2 since it was dirt cheap, to try a full spectrum conversion. The conversion involves removing the IR filter that sits in front of the sensor (but behind the dust shield). I was planning to buy an IR “heat absorbing filter” from Edmund Scientific for another project, I’m hoping the filter out of the Olympus will work for this, which would make the E-P2 free.

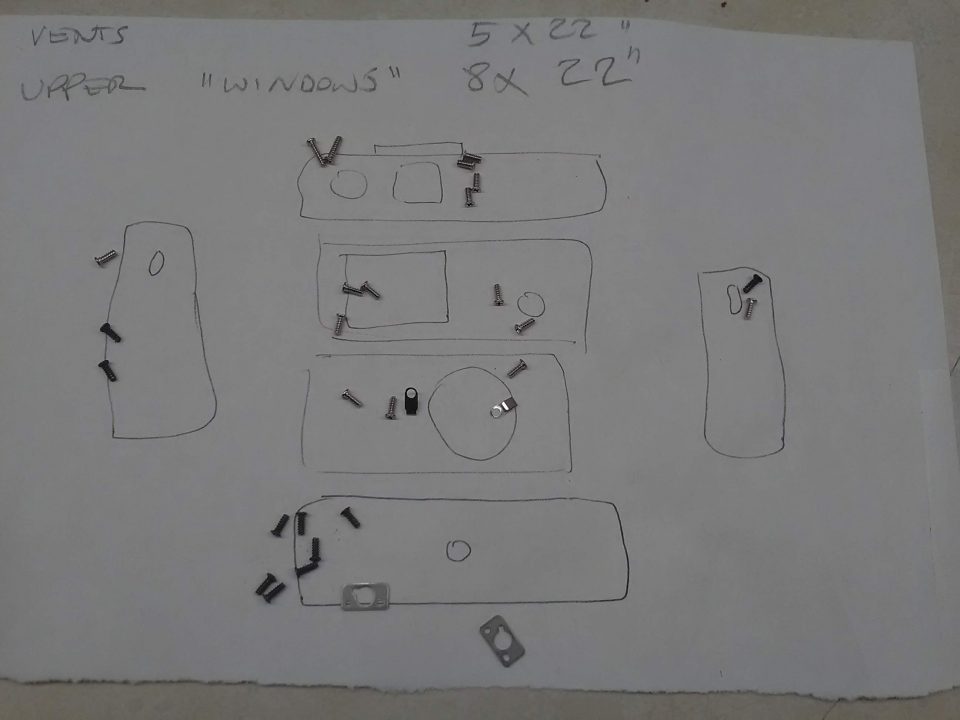
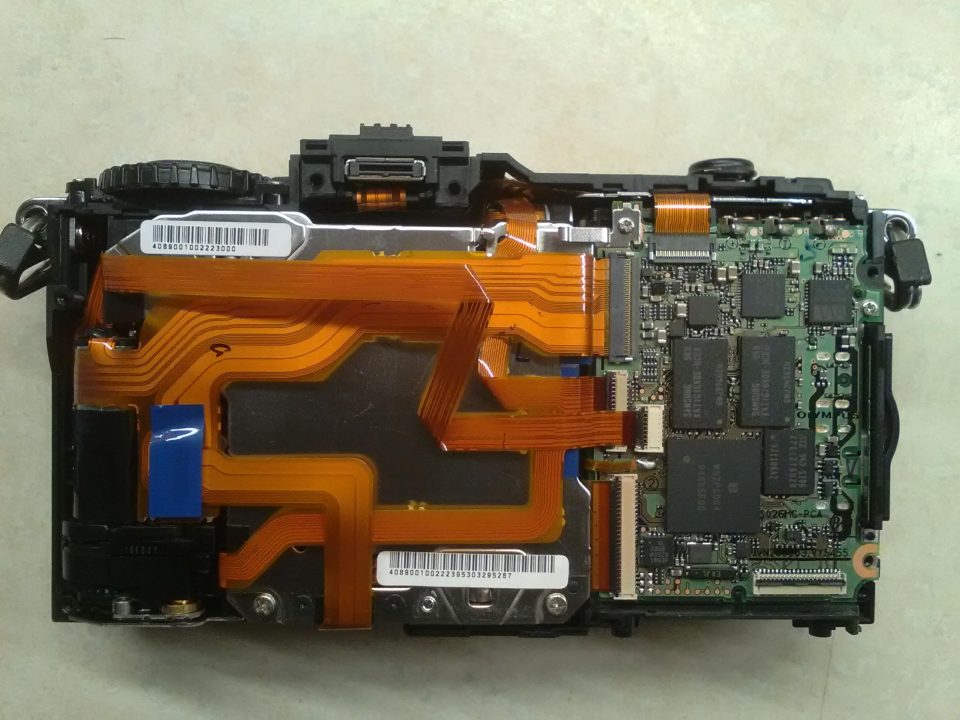
I couldn’t find any teardown images for the E-P2, so I looked through a couple of Olympus conversions here, then got stuck in. I didn’t photograph the whole sequence. It is NOT EASY, and I take no responsability over your actions. Clear a good workspace with good light. Get some tape and paper to draw the 6 sides of the camera roughly, to sort screws.

Disassembly order:
1: Remove base (don’t remove the tripod mount as with the E-P1, it will fall into the sensor assembly), 7 screws.
2: Remove sides (top marks to Olympus for not requiring any adhesive trim to be removed for any of this).
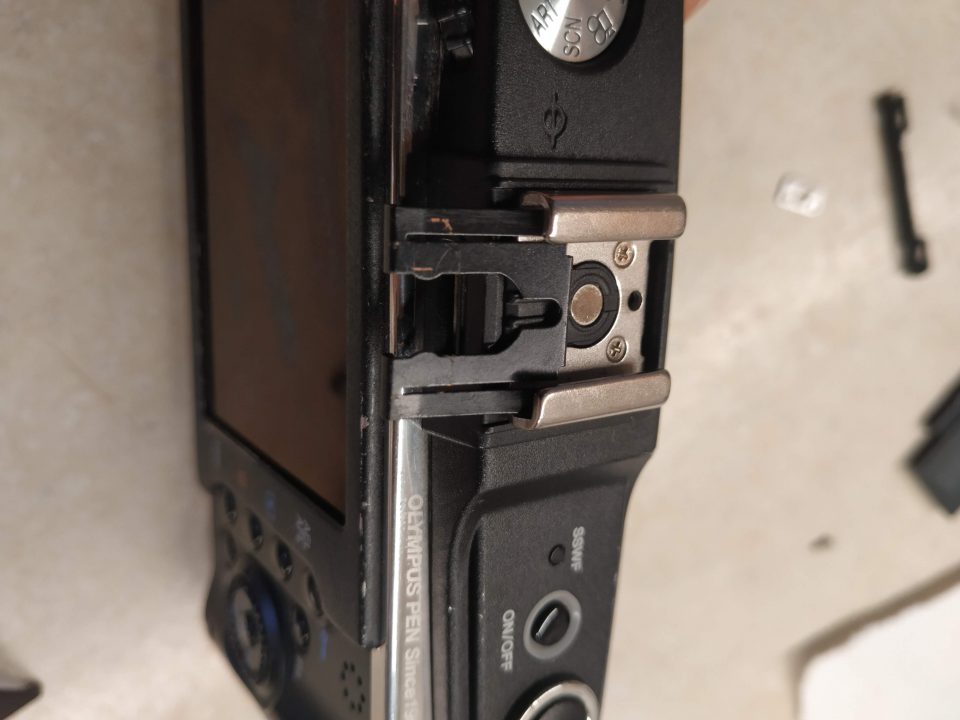
3: Remove hot-shoe then top cover: hot-shoe has a clip covering the screws, this gets lifted from the front of the camera, then it pops out. The 4 hot-shoe screws are the only countersunk screws you will find today. Below the EVF socket you will find the only two longer screws you will see today, set them aside. The top plate is now held in by a couple of screws on tabs that poke through the chrome bezel, two of which have little springs on them.


4: Remove rear/LCD: 4 small screws, then one on the left on what looks like an earth-contact. Lift it up a little, then remove one screw holding the ribbon, flip up its clip and the rear comes away.
5: Remove 4 black screws from just outside the lens flange.
6: Gently remove some black strapping tape from the ribbons behind the sensor.
7: looking at tutorials for other Olympus cameras, I found the need to dissolder the ground to the sensor. Do this now.
8: One of the 4 screws that holds the sensor assembly onto the shutter assembly is hidden under the shutter ribbon. Disconnect the smallest ribbon (timer LED), loosely fold it back around the camera chassis and tape it out of the way. Unclip the other ribbons: most are the “traditional” kind with a black lever on the ribbon side which you can pop up with a finger nail, but the one at the top has a grey clip at the back (opposite the ribbon), very close to a bunch of components on the main board. This one is harder to unclip, be careful. This ribbon will not come out without removing the shutter assembly (held in by those 4 black screws you took out at the front). Gently wiggle the left side of the shutter assembly up: the lens mount needs to fit through the chassis, and you need to be careful of that ribbon you folded back earlier, it has folds in it more or less exactly where this assembly needs to move.
9: Remove the 4 screws which hold the sensor to the shutter: PLEASE be careful (I was not), there may be shim washers under each screw. They are magnetic, so you can loosen the screws and use a magnet to retrieve each stack and label them (colour code with a sharpie works). I didn’t know they were there, and they fell out, no idea where they are meant to go (more on this later).
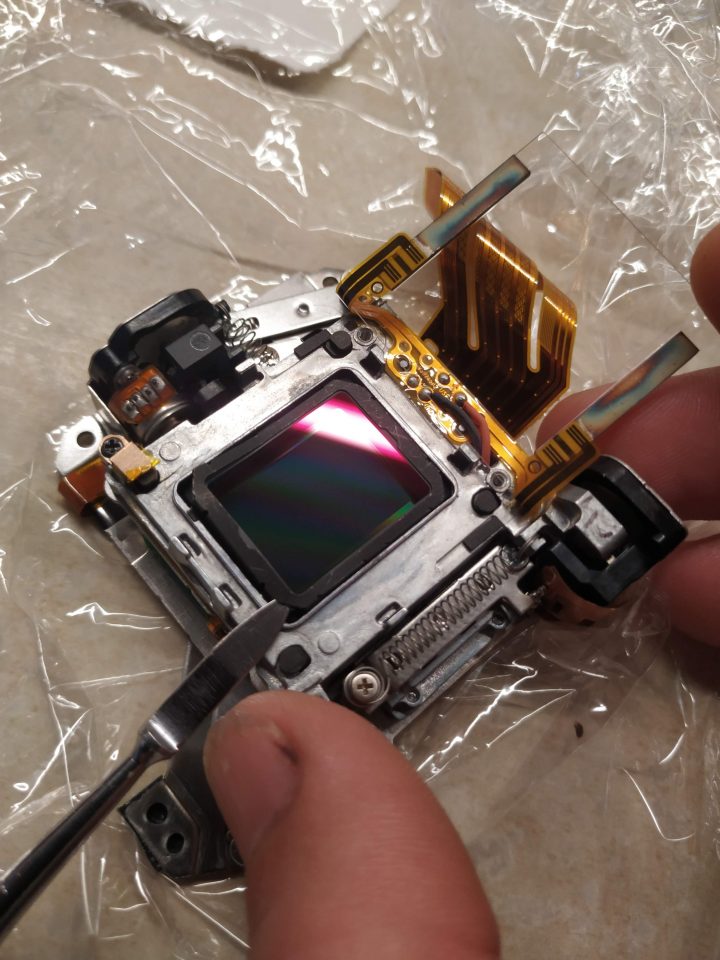
10: 4 screws hold the dust shield onto the sensor assembly, I only removed 3, as you end up putting a lot of pressure on the stabiliser assembly, which I was not keen on. DO NOT TOUCH the inside of this piece of glass. If there is any air movement in the room you are in, try to stop it. Removing these 4(3) screws was the hardest part of the job.
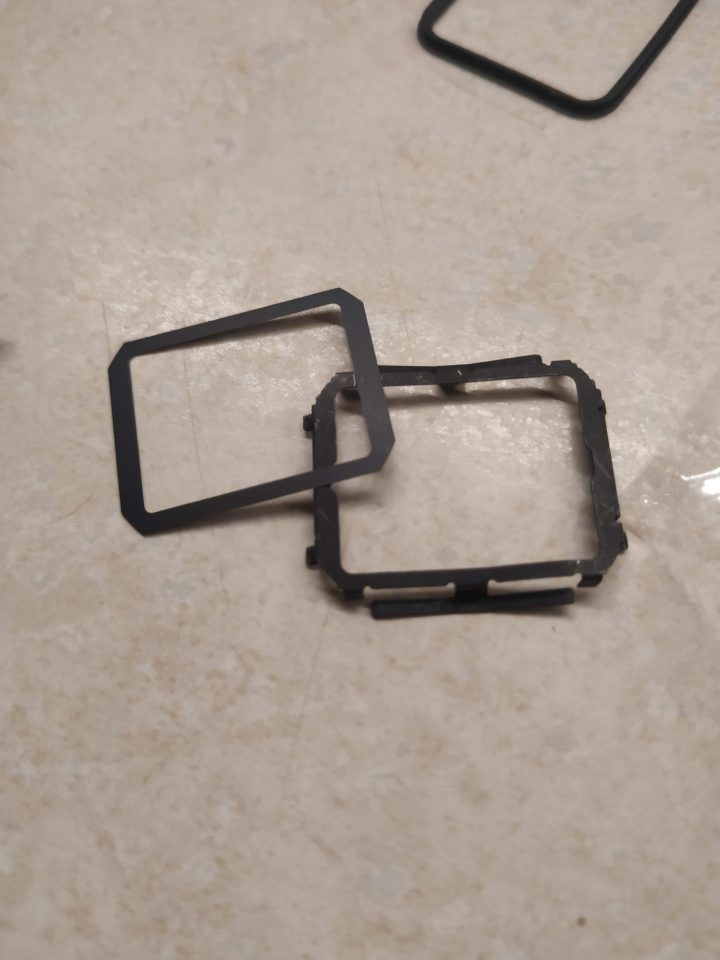
11: Whilst holding the dust shield with one finger, use a tool to prise up on the black spring clip which holds the IR filter in place. It came out without getting too mangled. Once its out, there is a plastic mask, then the IR filter (I wouldnt touch its surfaces, I’d wrap it in a Kimwipe or something delicate). Now, put the dust shield back without getting any dust inside/on the sensor. Check multiple times with a bright light. Make sure the rubber seal is in place, then reverse the process of putting it back together.

NOTES: I tested the camera with just the shutter assembly back in place and the LCD plate attached, to verify the camera worked. I found that I could not reach infinity with a manual lens (and my F-Mount adapter does go past infinity!) so I took it back apart and removed all the sensor shims, which now permits it to go slightly past infinity. This is now due to the fact that the camera is picking up incompatible wavelengths of light. This may not be the case with your camera, but it is worth having a note of the shims regardless. AF seems to work fine with my Panasonic lens.

Though I am not a huge fan of polycarbonate chassis and screws threaded into plastic, the overall design of the camera is pretty robust and impressive. I especially like the fact that no trim needs removed to access screws. It is also worth note that the shutter is a Copal unit, I wonder how many cameras use Copal shutters nowadays? I did find it interesting that there are several motors in a digital camera. The shutter has a motor, the stabiliser has two motors, and I think there was another, though I can’t remember what it does.

The full spectrum image is weird, as it has both the attributes of “visible light” and infrared, which in daylight seems to look like a halo around a softer image.
Tobias Feltus:
Share

Culicidae

From the moment they left their accommodation, their conversation had mooted. She looked over to him, and was met with a vacuous expression. Distracted by rabid females, he quickly forgot about her, as he was rapt in a battle of certain discomfort.

His skin was being teased by his new admirer’s touch. She was attracted to his unfit panting and premature sweat. He’d neglected to shower that morning, deeming it gratuitous before a brief hike. And yet she seemed drawn to his odour as though it were a beacon. She brushed past and gently touched his brow so delicately he could barely feel her caress. Salivating, she took a firm hold, exposing her labella. Before he could intervene, he was penetrated with her labium, sucking around his enlarged blood vessels. As he writhed under her diminutive weight she moved in unison, using her labrum to suck vehemently as to cause his blood vessels to collapse in the frenzy.

As quickly as the exchange had begun, the strumpet left him like a succubus nightmare. Inflamed, confused and irritated he looked over at her. She swatted and twitched like a mare, still flailing at the continued presence of mosquitoes which seemed to materialise from nowhere.


This was written in Kilpisjärvi, Finland, on our residency at ArsBioarctica in 2017.

Tobias Feltus:
Share

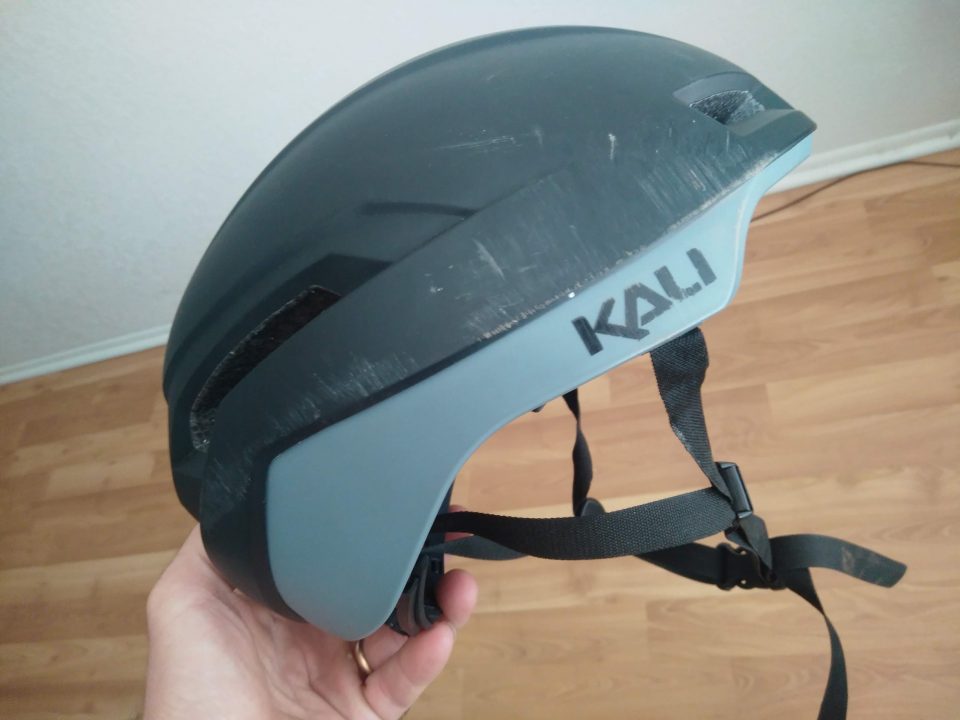
Crashing my third helmet: the Kali Tava

I’m guessing not too many people write about their experience of crashing with a helmet to the manufacturer. Crashing is not a pleasurable experience, but it is interesting to find interesting details within a crash.

A couple of months ago I was wondering if an aero helmet would be cooler than wearing a cap under a vented helmet. Kali helmets come with a lifetime crash replacement warranty on their cycling helmets, which is a fantastic selling point. I chose the Tava due to its lack of venting on the top, and found my theory to not be wrong, the helmet breathes pretty well. Aero helmets do look a bit weird, but the Boa closure system and shell fit my head well. Unlike other helmets I’ve worn, this helmet sits in a single position, and I can’t adjust its angle on my head.

Last sunday, on my way to work at Rage Cycles (Scottsdale, AZ) on the cross-cut canal path, I pushed too hard coming out of the tunnel under McDowell (despite the path being dry and clean in the apex) and hit the concrete really hard. I have road rash on the top of my shoulder, couple of scrapes on my elbow and bike, but thankfully my head is fine.

I’d just been thinking about how I hate crashing, and how thankfully I’d not crashed in a long time.

Since it had rained heavily the night before, the tunnel was full of mud, but as I entered it I could see the exit was dry and clean. I was momentarily confused right before this point as the path had some interruptions due to an Xterra event which was not signposted. It always irritates me that events use the path I commute on every day, without giving forewarning. As I reached the end of the tunnel I got out of the saddle, and the front wheel continued in a straight line, whilst I turned up to the right. I was probably moving at around 14mph, though Strava tells me I was at 23mph just before entering the tunnel. Judging by the road rash on my shoulder, I think most of the impact was directly to the side of my head. And yes, you do get the gift of greater detail in memory, as the whole event probably lasted around 1/10th of a second, but within that I was able to feel the sensation of the helmet feeling loose and rotating on my head as I looked down at the bike sliding away from me. I got up, moved my arm to make sure I’d not broken anything, and got back on the bike as I was in a blind corner.

Without the helmet I’d have been concussed, since I lost the front wheel at a reasonable speed. The Tava is a top-tier helmet and uses all of Kali’s tech, including carbon nanotubes and the marriage of different densities of foam in the shell, keeping structural integrity separate from deceleration and crumple zones (Composite Fusion and Nano Fusion). Furthermore, they have their Low Density Layer (LDL) liner in the helmet which is Kali’s version of MIPS: these innovations in helmet design help reduce the rotational inertia caused by your head (in movement) coming in contact with a static obstacle, permitting the helmet to rotate without jerking your brain with it. MIPS looks like a cradle that is attached to the helmet with little rubber bands, the LDL looks like octopus tentacle suckers made of rubber. The LDL made it feel as though the helmet was on loose, as I felt it slide towards my left ear – though in reality I would imagine that I moved and the helmet stayed in place on the ground. The right side of the helmet is flattened. The only discomfort to my head was what felt like my hair (the little I have) was pulled a little, so the skin felt mildly tender. This lasted about 3 days.

This is the third helmet I’ve crashed in my life. Twice have been due to the loss of traction with the front wheel, and all three would probably have lead to hospitalization without a helmet. I forget that I am a helmet advocate for this reason.

Tobias Feltus:
Share

Broken components and out-of-the-box alternatives (part 6)

Three weeks ago I remembered that my erratic shifting might be due to the fact that I was using Tacx jockey wheels. In a previous attempt to eliminate noise I had changed jockeys. It is a strange anomaly that all aftermarket jockey wheels use cartridge bearings, and none that I have seen have a floating guide wheel which Shimano derailleurs do need. So I put the XT jockeys back in the cage and shifting returned to smooth precision.

Two weeks ago I sprinted to get through a short green light, and after that I could not shift past half the cassette. The b-spring broke, cementing the fact that my modification was not a viable solution. It lasted around 1400 km (granted, it was an old and second-hand derailleur).

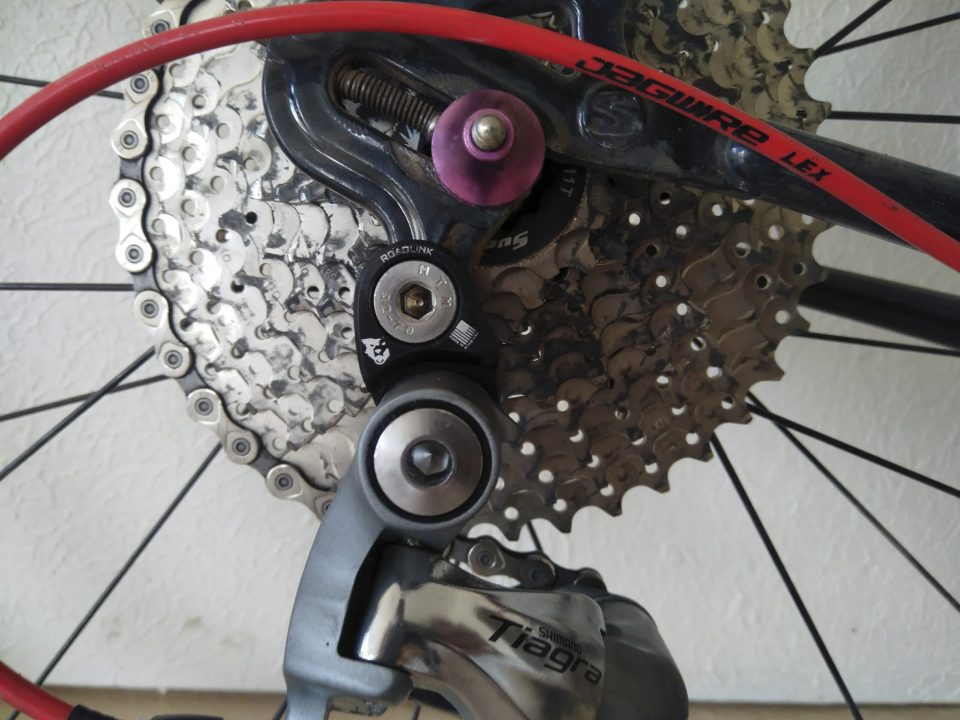
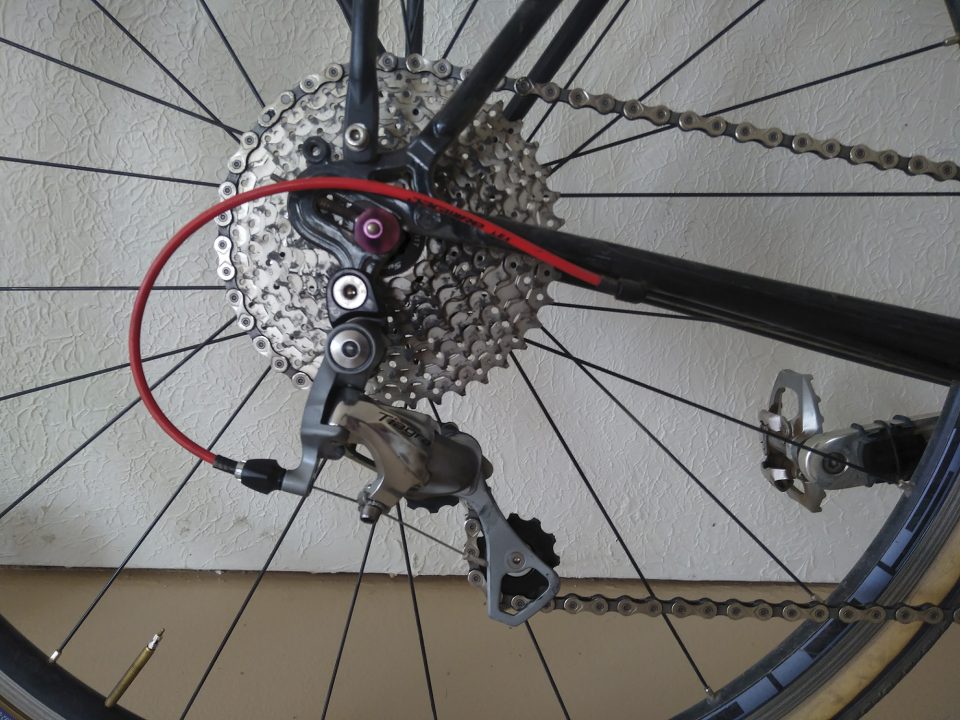
I promptly ordered a Tiagra 4600 SS derailleur and a Wolftooth Road Link, as this combination is (according to Wolftooth) going to work out of the box. Assembly took a whole 5 minutes, including shortening the chain to Shimano/Sheldon Brown’s 2 full link overlap sizing. Contrary to Wolftooth’s directions I was forced to screw the b-tension screw in fully, else the chain would have no tension on it in smaller sprockets. Also, after dropping the chain a couple of times, I had to adjust the derailleur’s a-pivot to the tighter setting.

The Road Link does what it says it will do, however shifting is not perfect. I think this is a better solution to modifying a derailleur, however it is still not as robust as a native wide-range 1x drivetrain. I am looking forward to trying SRAM with a similar setup.

Wolftooth Road Link

Tobias Feltus:
Share

Moulton Tour d’Ecosse 2013

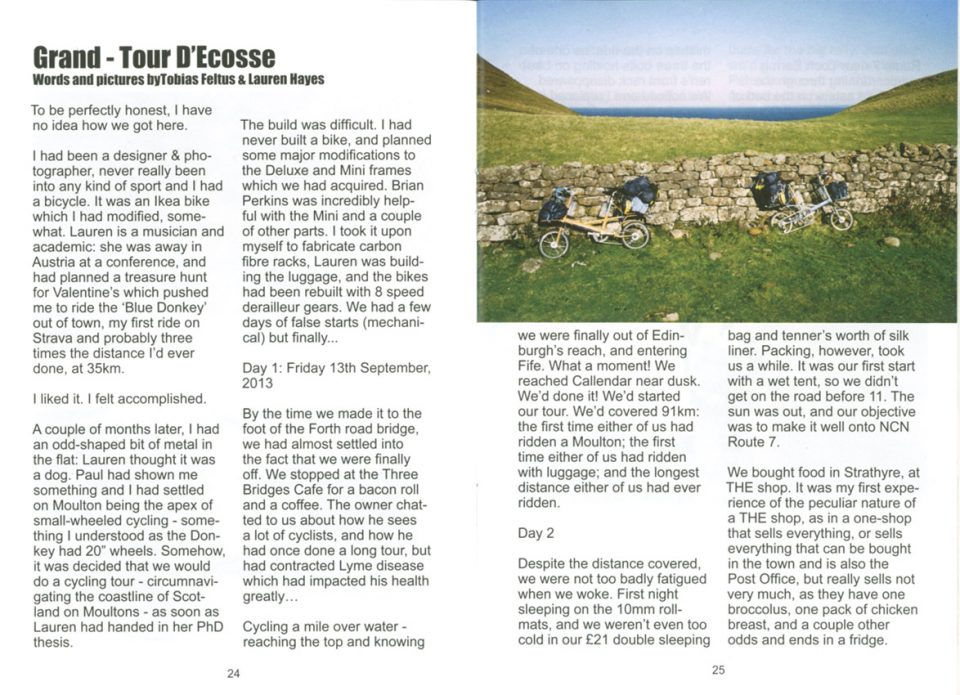
2013 was a different time. I had only really been into bikes for a few months, and yet somehow this unfolded. The text was published in The Moultoneer (I forget which issue), attached with pictures below.


The Moulton – Grand – Tour D’Ecosse


To be perfectly honest, I have no idea how we got here.


I had been a designer & photographer, never really been into any kind of sport and I had a bicycle. It was an Ikea bike which I had modified, somewhat. Lauren is a musician and academic: she was away in Austria at a conference, and had planned a treasure hunt for Valentine’s which pushed me to ride the ‘Blue Donkey’ out of town, my first ride on Strava and probably three times the distance I’d ever done, at 35 km.


I liked it. I felt accomplished.


A couple of months later, I had an odd-shaped bit of metal in the flat: Lauren thought it was a dog. Paul had shown me something and I had settled on Moulton being the apex of small-wheeled cycling – something I understood as the Donkey had 20” wheels. Somehow, it was decided that we would do a cycling tour – circumnavigating the coastline of Scotland on Moultons – as soon as Lauren had handed in her PhD thesis.


The build was difficult. I had never built a bike, and planned some major modifications to the Deluxe and Mini frames which we had acquired. Brian Perkins was incredibly helpful with the Mini and a couple of other parts. I took it upon myself to fabricate carbon fibre racks, Lauren was building the luggage, and the bikes had been rebuilt with 8 speed derailleur gears. We had a few days of false starts (mechanical) but finally…


Day 1: Friday 13th September, 2013


By the time we made it to the foot of the Forth road bridge, we had almost settled into the fact that we were finally off. We stopped at the Three Bridges Cafe for a bacon roll and a coffee. The owner chatted to us about how he sees a lot of cyclists, and how he had once done a long tour, but had contracted Lyme disease which had impacted his health greatly…


Cycling a mile over water – reaching the top and knowing we were finally out of Edinburgh’s reach, and entering Fife. What a moment! We reached Callendar near dusk. We’d done it! We’d started our tour. We’d covered 91 km: the first time either of us had ridden a Moulton; the first time either of us had ridden with luggage; and the longest distance either of us had ever ridden.


Day 2


Despite the distance covered, we were not too badly fatigued when we woke. First night sleeping on the 10mm roll-mats, and we weren’t even too cold in our £21 double sleeping bag and tenner’s worth of silk liner. Packing, however, took us a while. It was our first start with a wet tent, so we didn’t get on the road before 11. The sun was out, and our objective was to make it well onto NCN Route 7.


We bought food in Strathyre, at THE shop. It was my first experience of the peculiar nature of a THE shop, as in a one-shop that sells everything, or sells everything that can be bought in the town and is also the Post Office, but really sells not very much, as they have one broccolus, one pack of chicken breast, and a couple other odds and ends in a fridge.


Route 7 near Loch Earn is magic, running through the Glen Ogle estate on the bed of the late Callander and Oban Railway line. We camped by the side of the path, where we barbecued our chicken breast before bedding.


Day 3


We woke wet. Our disorganised unpacking meant that we had bags stuffed in all corners of the tent, making contact between the rain-sheet and the inner tent, so rain was dripping on us. Later on we had our first mishap on the ride, as one of the three bolts holding on Lauren’s front rack disappeared. We noticed and I replaced it opposite the Killin Gun Club, which I thought was hilarious.


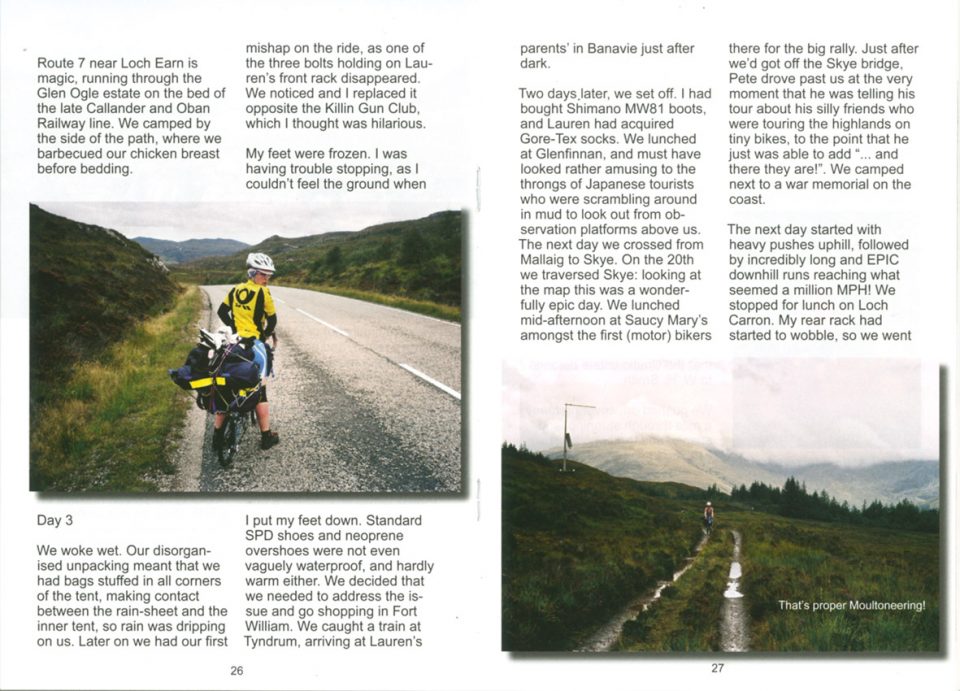
My feet were frozen. I was having trouble stopping, as I couldn’t feel the ground when I put my feet down. Standard SPD shoes and neoprene overshoes were not even vaguely waterproof, and hardly warm either. We decided that we needed to address the issue and go shopping in Fort William. We caught a train at Tyndrum, arriving at Lauren’s parents’ in Banavie just after dark.


Two days later, we set off. I had bought Shimano MW81 boots, and Lauren had acquired Gore-Tex socks. We lunched at Glenfinnan, and must have looked rather amusing to the throngs of Japanese tourists who were scrambling around in mud to look out from observation platforms above us. The next day we crossed from Mallaig to Skye. On the 20th we traversed Skye: looking at the map this was a wonderfully epic day. We lunched mid-afternoon at Saucy Mary’s amongst the first (motor) bikers there for the big rally. Just after we’d got off the Skye bridge, Pete drove past us at the very moment that he was telling his tour about his silly friends who were touring the highlands on tiny bikes, to the point that he just was able to add “… and there they are!”. We camped next to a war memorial on the coast.


The next day started with heavy pushes uphill, followed by incredibly long and EPIC downhill runs reaching what seemed a million MPH! We stopped for lunch on Loch Carron. My rear rack had started to wobble, so we went to Lochcarron to the amazing Spar shop, and got some gardening wire to brace it with. We camped in the enchanted forest of Achnashellach Lodge.


Day 10: Hell of the North followed by Paradise.


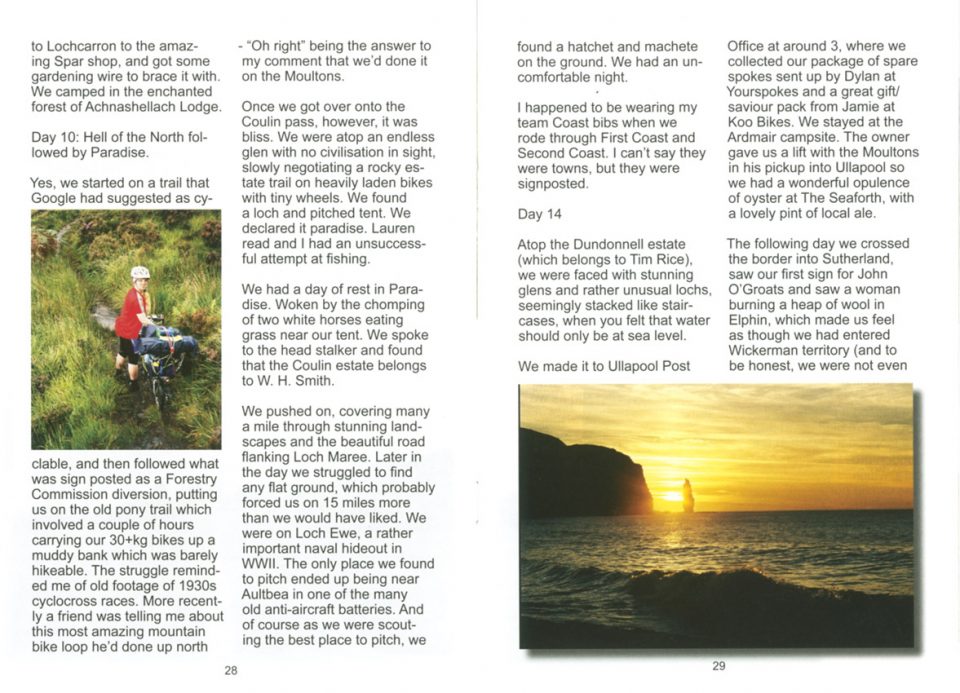
Yes, we started on a trail that Google had suggested as cyclable, and then followed what was sign posted as a Forestry Commission diversion, putting us on the old pony trail which involved a couple of hours carrying our 30+kg bikes up a muddy bank which was barely hikable. The struggle reminded me of old footage of 1930s cyclocross races. More recently a friend was telling me about this most amazing mountain bike loop he’d done up north – “Oh right” being the answer to my comment that we’d done it on the Moultons.


Once we got over onto the Coulin pass, however, it was bliss. We were atop an endless glen with no civilisation in site, slowly negotiating a rocky estate trail on heavily laden bikes with tiny wheels. We found a loch, and pitched tent. We declared it paradise. Lauren read and I had an unsuccessful attempt at fishing.


We had a day of rest in Paradise. Woken by the chomping of two white horses eating grass near our tent. We spoke to the head stalker and found that the Coulin estate belongs to W. H. Smith.


We pushed on, covering many a mile through stunning landscapes and the beautiful road flanking Loch Maree. Later in the day we struggled to find any flat ground, which probably forced us on 15 miles more than we would have liked. We were on Loch Ewe, a rather important naval hideout in WWII. The only place we found to pitch ended up being near Aultbea in one of the many old Anti Aircraft batteries. And of course as we were scouting the best place to pitch, we found a hatchet and machete on the ground. We had an uncomfortable night.


I happened to be wearing my team Coast bibs when we rode through First Coast and Second Coast. I can’t say they were towns, but they were signposted.


Day 14


Atop the Dundonnell estate (which belongs to Tim Rice), we were faced with stunning glens and rather unusual lochs, seemingly stacked like staircases, when you felt that water should only be at sea level.


We made it Ullapool Post Office at around 3, where we collected our package of spare spokes sent up by Dylan at Yourspokes, and a great gift/saviour pack from Jamie at Koo Bikes. We stayed at the Ardmair campsite. The owner gave us a lift with the Moultons in his pickup into Ullapool so we had a wonderful opulence of oyster at The Seaforth, with a lovely pint of local ale.


The following day we crossed the border into Sutherland, saw our first sign for John o’Groats and saw a woman burning a heap of wool in Elphin, which made us feel as though we had entered Wickerman territory (and to be honest, we were not even geographically far from Summer Isles). We camped near prehistoric caves and a place where fish spawn is fertilised and sheep are dipped. Lauren enjoyed the chatter of stags, as their season of rutting had just begun.


We cycled against a big road race. As we pushed, almost each and every racer waved and smiled. We had soup and a sandwich at the Maryck tea room, near Unapool, which was pretty magical with its doll museum on a landscape that looked more like Hawaii than anything I was familiar with. We had dinner at the Scourie Hotel, both eating venison in vengeance for the loss of sleep due to rutting.


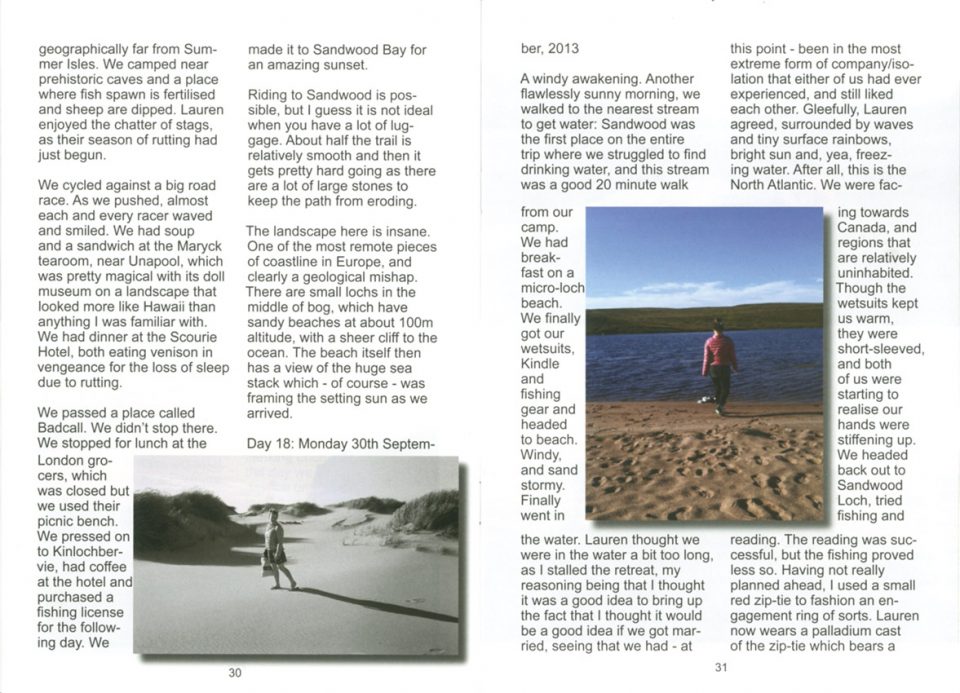
We passed a place called Badcall. We didn’t stop there. We stopped for lunch at the London grocers, which was closed but we used their picnic bench. We pressed on to Kinlochbervie, had coffee at the hotel and purchased a fishing license for the following day. We made it to Sandwood Bay for an amazing sunset.


Riding to Sandwood is possible, but I guess it is not ideal when you have a lot of luggage. About half the trail is relatively smooth, then it gets pretty hard going as there are a lot of large stones to keep the path from eroding.


The landscape here is insane. One of the most remote pieces of coastline in Europe, and clearly a geological mishap. There are small lochs in the middle of bog, which have sandy beaches at about 100m altitude, with a sheer cliff to the ocean. The beach itself then has a view of the huge sea stack which – of course – was framing the setting sun as we arrived.


Day 18: Monday 30th September, 2013


A windy awakening. Another flawlessly sunny morning, we walked to the nearest stream to get water: Sandwood was the first place on the entire trip where we struggled to find drinking water, and this stream was a good 20 minute walk from our camp. We had breakfast on a micro-loch beach. We finally got our wetsuits, Kindle and fishing gear and headed to beach. Windy, and sand stormy. Finally went in the water. Lauren thought we were in the water a bit too long, as I stalled the retreat, my reasoning being that I thought it was a good idea to bring up the fact that I thought it would be a good idea if we got married, seeing that we had – at this point – been in the most extreme form of company/isolation that either of us had ever experienced, and still liked each other. Gleefully, Lauren agreed, surrounded by waves and tiny surface rainbows, bright sun and, yea, freezing water. After all, this is the North Atlantic. We were facing towards Canada, and regions that are relatively uninhabited. Though the wetsuits kept us warm, they were short-sleeved, and both of us were starting to realise our hands were stiffening up. We headed back out to Sandwood Loch, tried fishing and reading. The reading was successful, but the fishing proved less so. Having not really planned ahead, I used a small red zip-tie to fashion an engagement ring of sorts. Lauren now wears a palladium cast of the zip-tie which bears a small diamond, bezel mounted where the ratchet was in the plastic original. Magpie Jared did a stunning job of making this a reality, and the ring still has “CHINA” written on its side, as proof of its humble origins.


Day 19


Exiting Sandwood was only the beginning of our day. We saw waterfalls coming out of the tops of fields, and our first sighting of peat harvesting. As the sun was setting, we had the most incredible descent which felt endless, and looked out upon a texture and colour that looked like cinema’s martian landscapes. We’d made it to Durness for a very windy, sleepless night


We managed to find a B&B so we could sleep the following night, but were faced with less than a week free in our calendar and 30 mph headwinds which were not expected to calm.


Day 21: Thursday 3rd October, 2013


We cut our losses and chartered a bus to Lairg, as the bike-bus had stopped running a few days previous. Train to Inverness and then we arrived in Edinburgh Haymarket in late evening.


It was at this stage that we knew we were cyclists.


We weren’t able to finish our Moulton Tour d’Ecosse in 2014 due to other commitments, but did complete the 55 mile route of L’Eroica Britannia on them, much to the amazement of many ‘serious’ cyclists. We plan to complete the tour in 2015.


Tobias Feltus:
Share

Typologies of Scale

I didn’t know what to expect, what I discovered was great contrast in scale, between mini and macro.


I arrived at Kilpisjärvi for the ArsBioarctica Residency to work on a collaborative project, Sounding Out Spaces. I strove to accept my presence there as though I were a blank canvas.


Reaching the Finnish Arctic Tundra after having lived in Scotland for many years gave me an initial feeling of deceptive comfort. Though there are aesthetic similarities between northern Scotland and northern Finland, the compactness of the Scottish Highlands becomes imminently obvious.


This northern outpost is a pretty incredible destination, and magic to be able to spend time as a resident. Historically it is Saami territory, we were a couple of kilometers south of the Norwegian border, 11km hike from the Norwegian/Swedish/Finnish border trig point, and almost a day’s drive north of the Arctic circle. It’s normal to carry a rigid blade by your side. It’s normal that booze is expensive. It’s normal that a sauna is the first form of doctor you see. Your bins are divided in: recyclable and burnable, the latter referring to a small domestic incinerator near the house. And yet the air quality is one of the purest in the world, at 4mg/m3 of particulates, which contrasts nicely to parts of Beijing at over 400mg/m3. Our water supply was a pipe that poked up in the stream across the road: the most memorable flavour of the Tundra is drinking the water. Sweet and incredibly pure, from any source. Absolutely miraculous!


The two main trees are Birch. Dwarf Birch (Betula Nana) lives above the tree line and is rarely taller than an apple, choosing the lay flat in a bid to survive most of its life under a thick blanket of snow. The tree line itself is made of a hybrid between the Dwarf and Betula Alba, rarely more than a couple of metres high, and with almost no canopy. Their spindly white legs poking out from their hairy, mossy bodies.


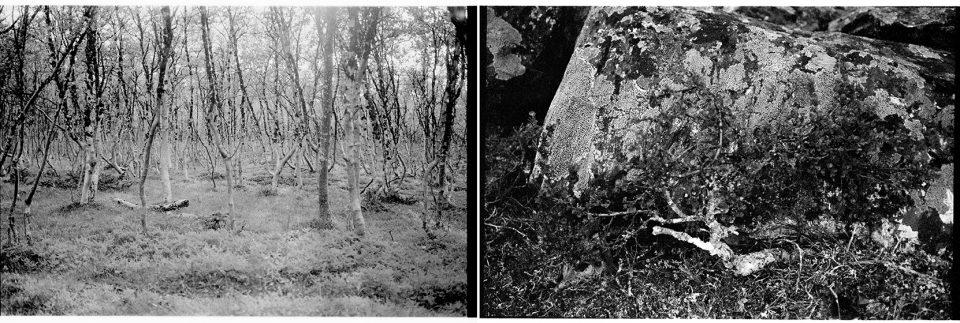
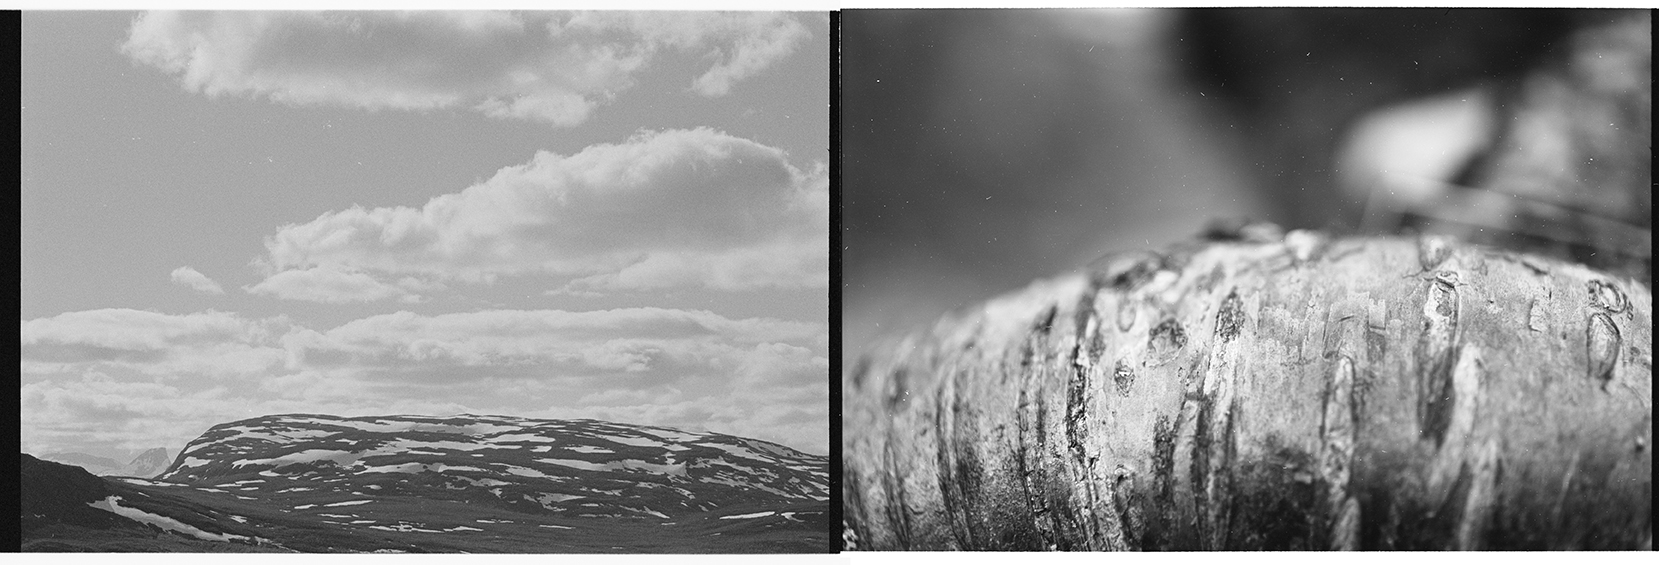
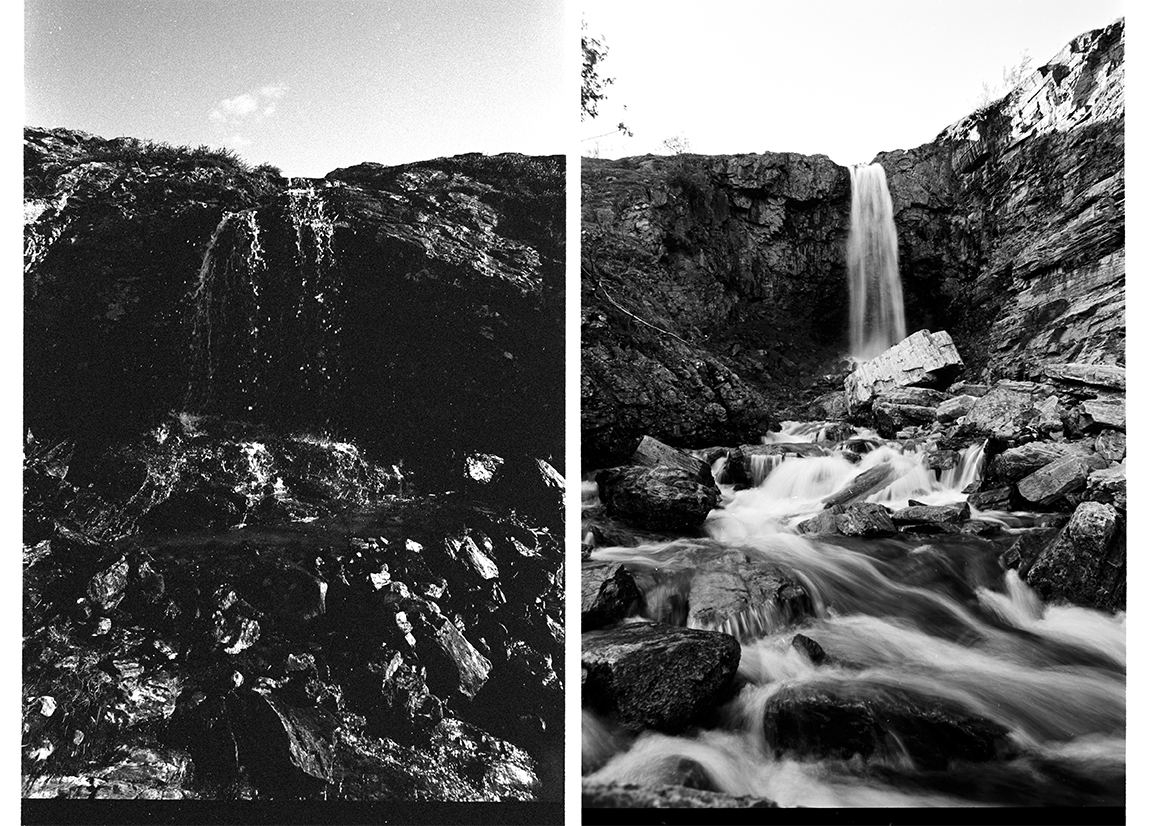
Landscapes have always been about first-hand experience for me, and I love them this way. However, landscape has never interested me in photography nor painting; in Kilpisjärvi I became obsessed with constituents of the landscape. Though more of an observation, manifested as diptych typologies of contrasted scale, in the vein of Bernd and Hilla Becher.


Moss, lichens and rocks are both features and constituents. Saanastill littered with WWII installations, huts and observation pointsis covered in ever smaller constituent parts of itself: a human definition of a fractal of nature.

Originally posted HERE

Tobias Feltus:
Share

Modifying a rear mech for road 1×10 and a 11-40t cassette (Part 5)

One final piece in this puzzle is the rear mech or derailleur: no Shimano road-shifter compatible mech was designed to reach a cog even as big as 34t, much less 40t. In fact, cassettes with 36t have only become common in the past few years when 1×10 mountain bike drivetrains started to appear. SRAM has this under wraps since their10 and 11 speed  road shifters are compatible with MTB 10 speed rear mechs as well as 11 road mechs (but not their MTB 11 and 12 speed mechs). With Shimano 10 speed road shifters, rear mech compatibility is restricted to 8, 9 & 10 speed road mechs and 8 or 9 speed MTB mechs, except for 9 speed Shadow: though the cable pull should be the same, I have not been able to get these derailleurs to shift correctly on a road setup (I tried several combinations).

See the followup. This is arguably not a great solution…

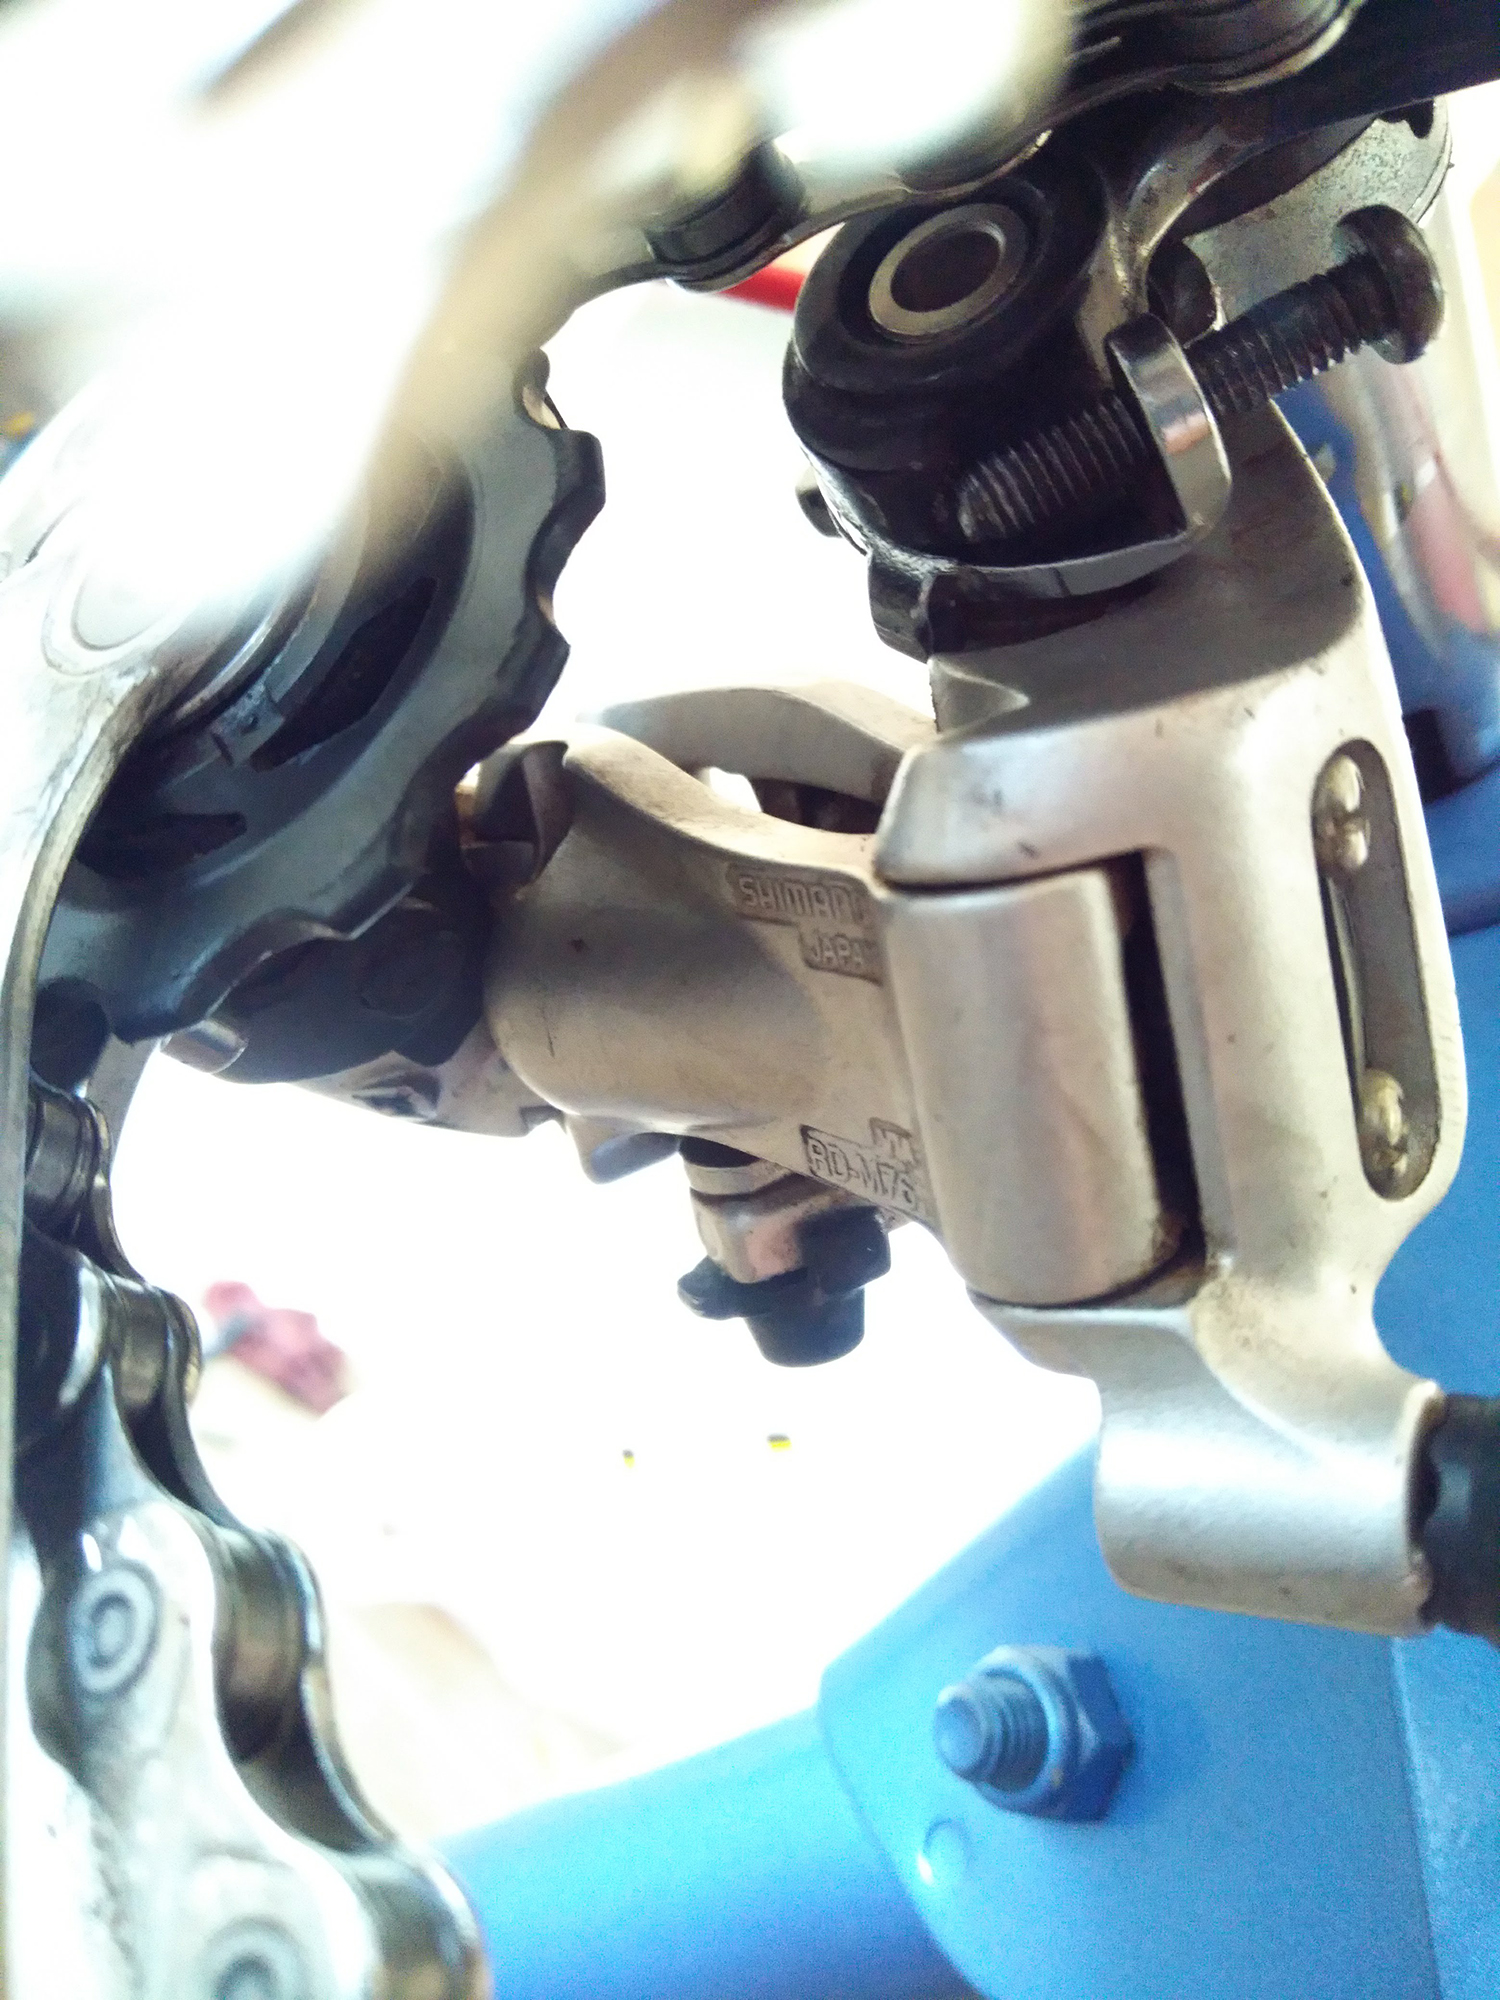
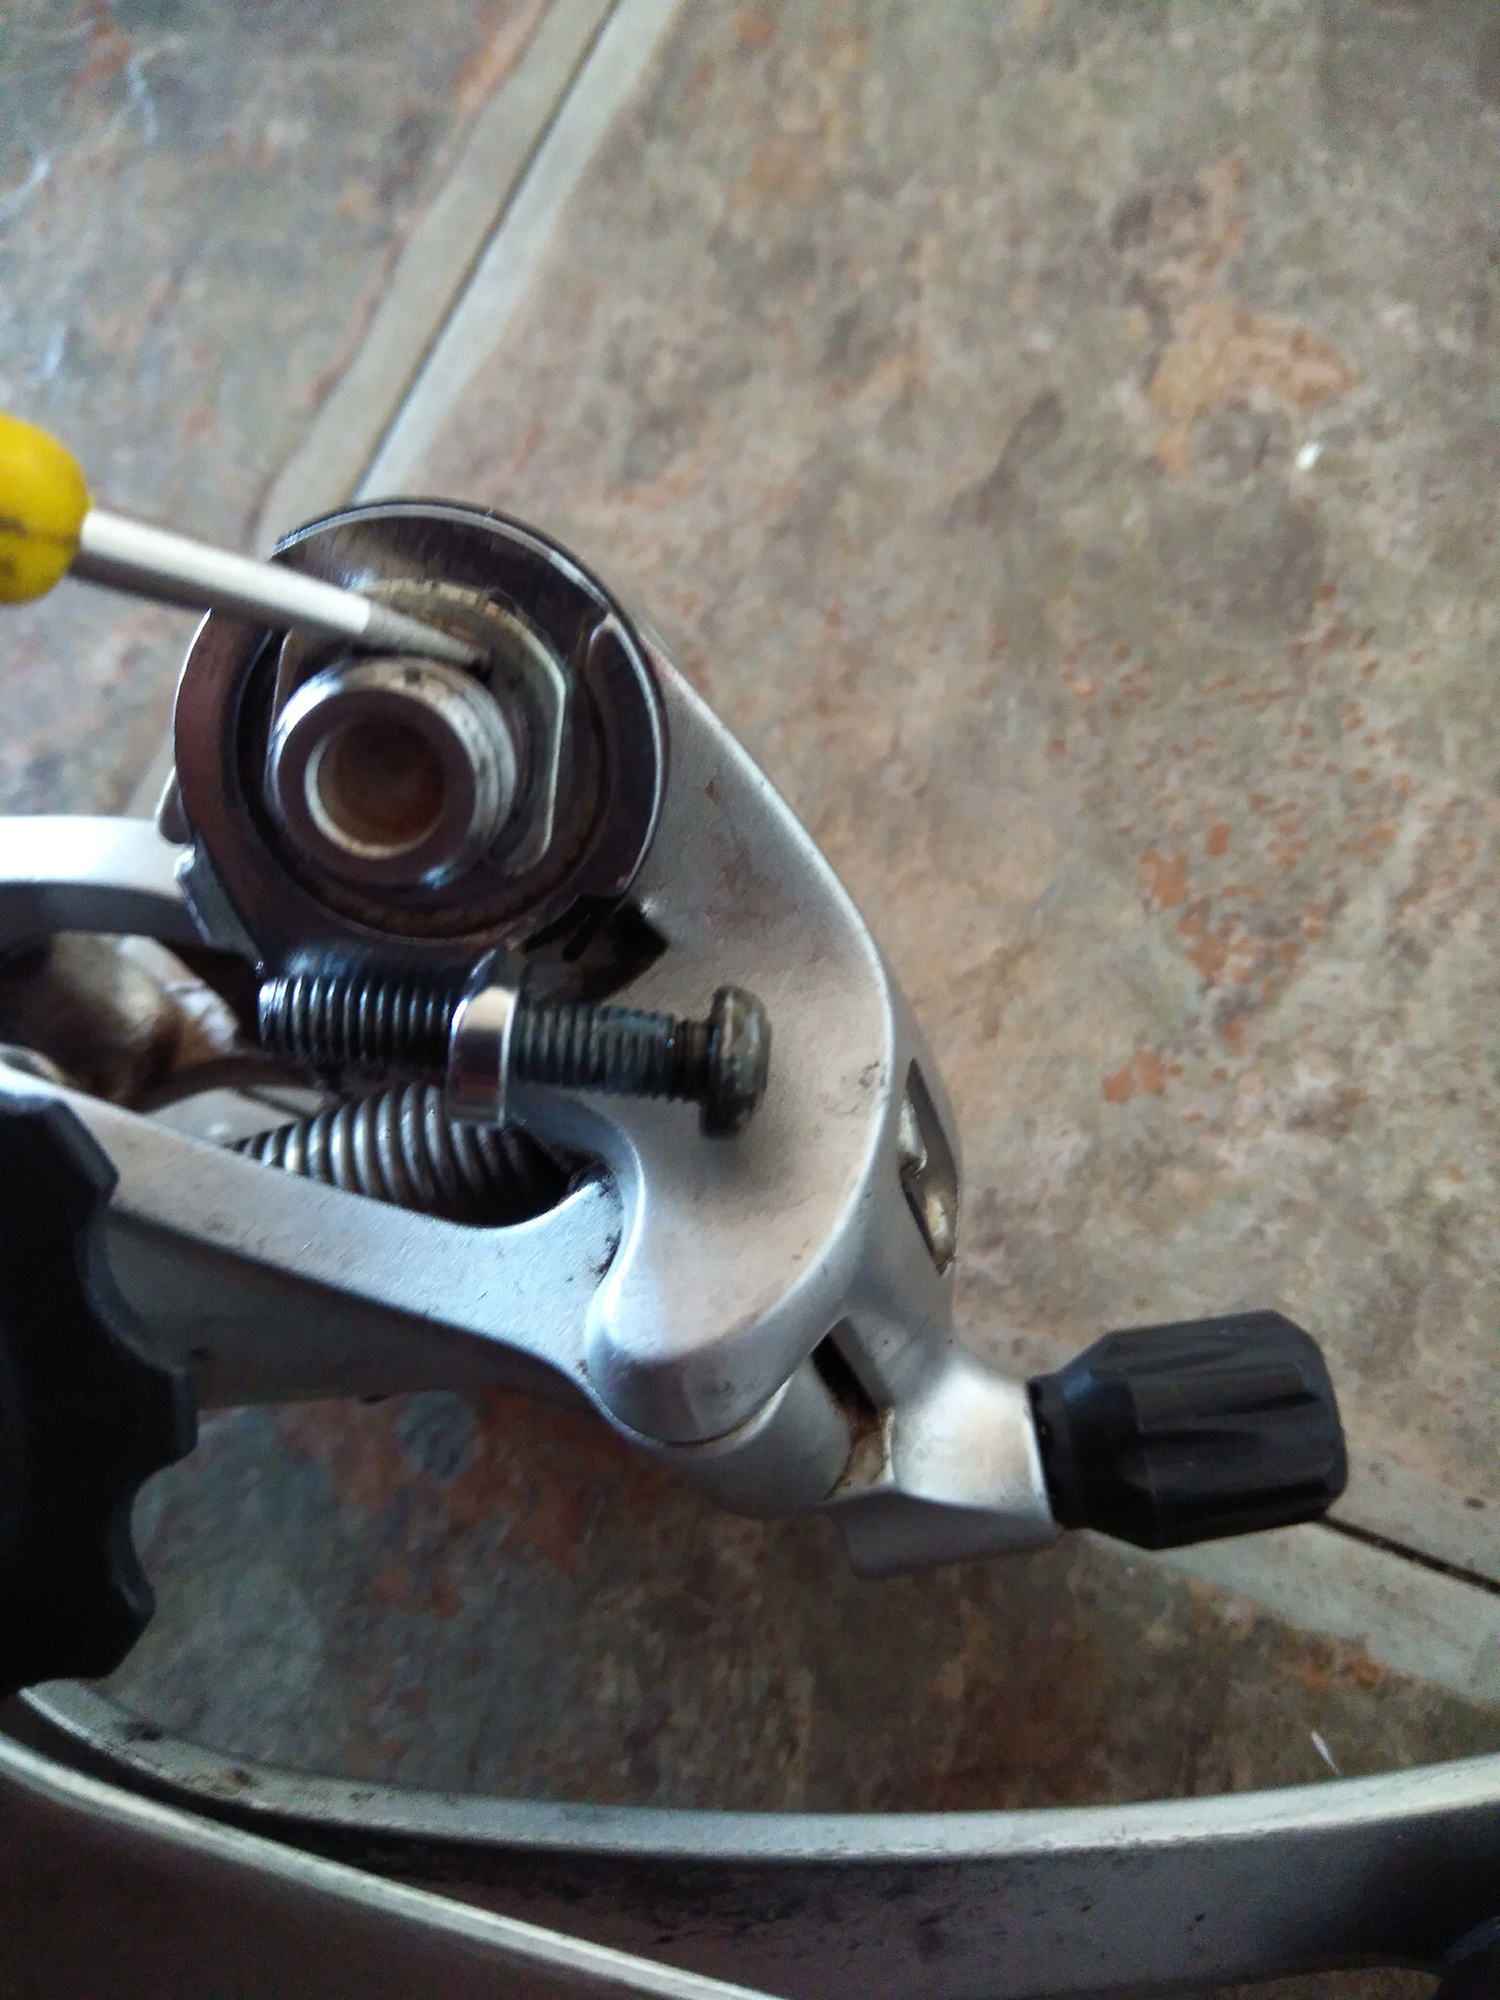
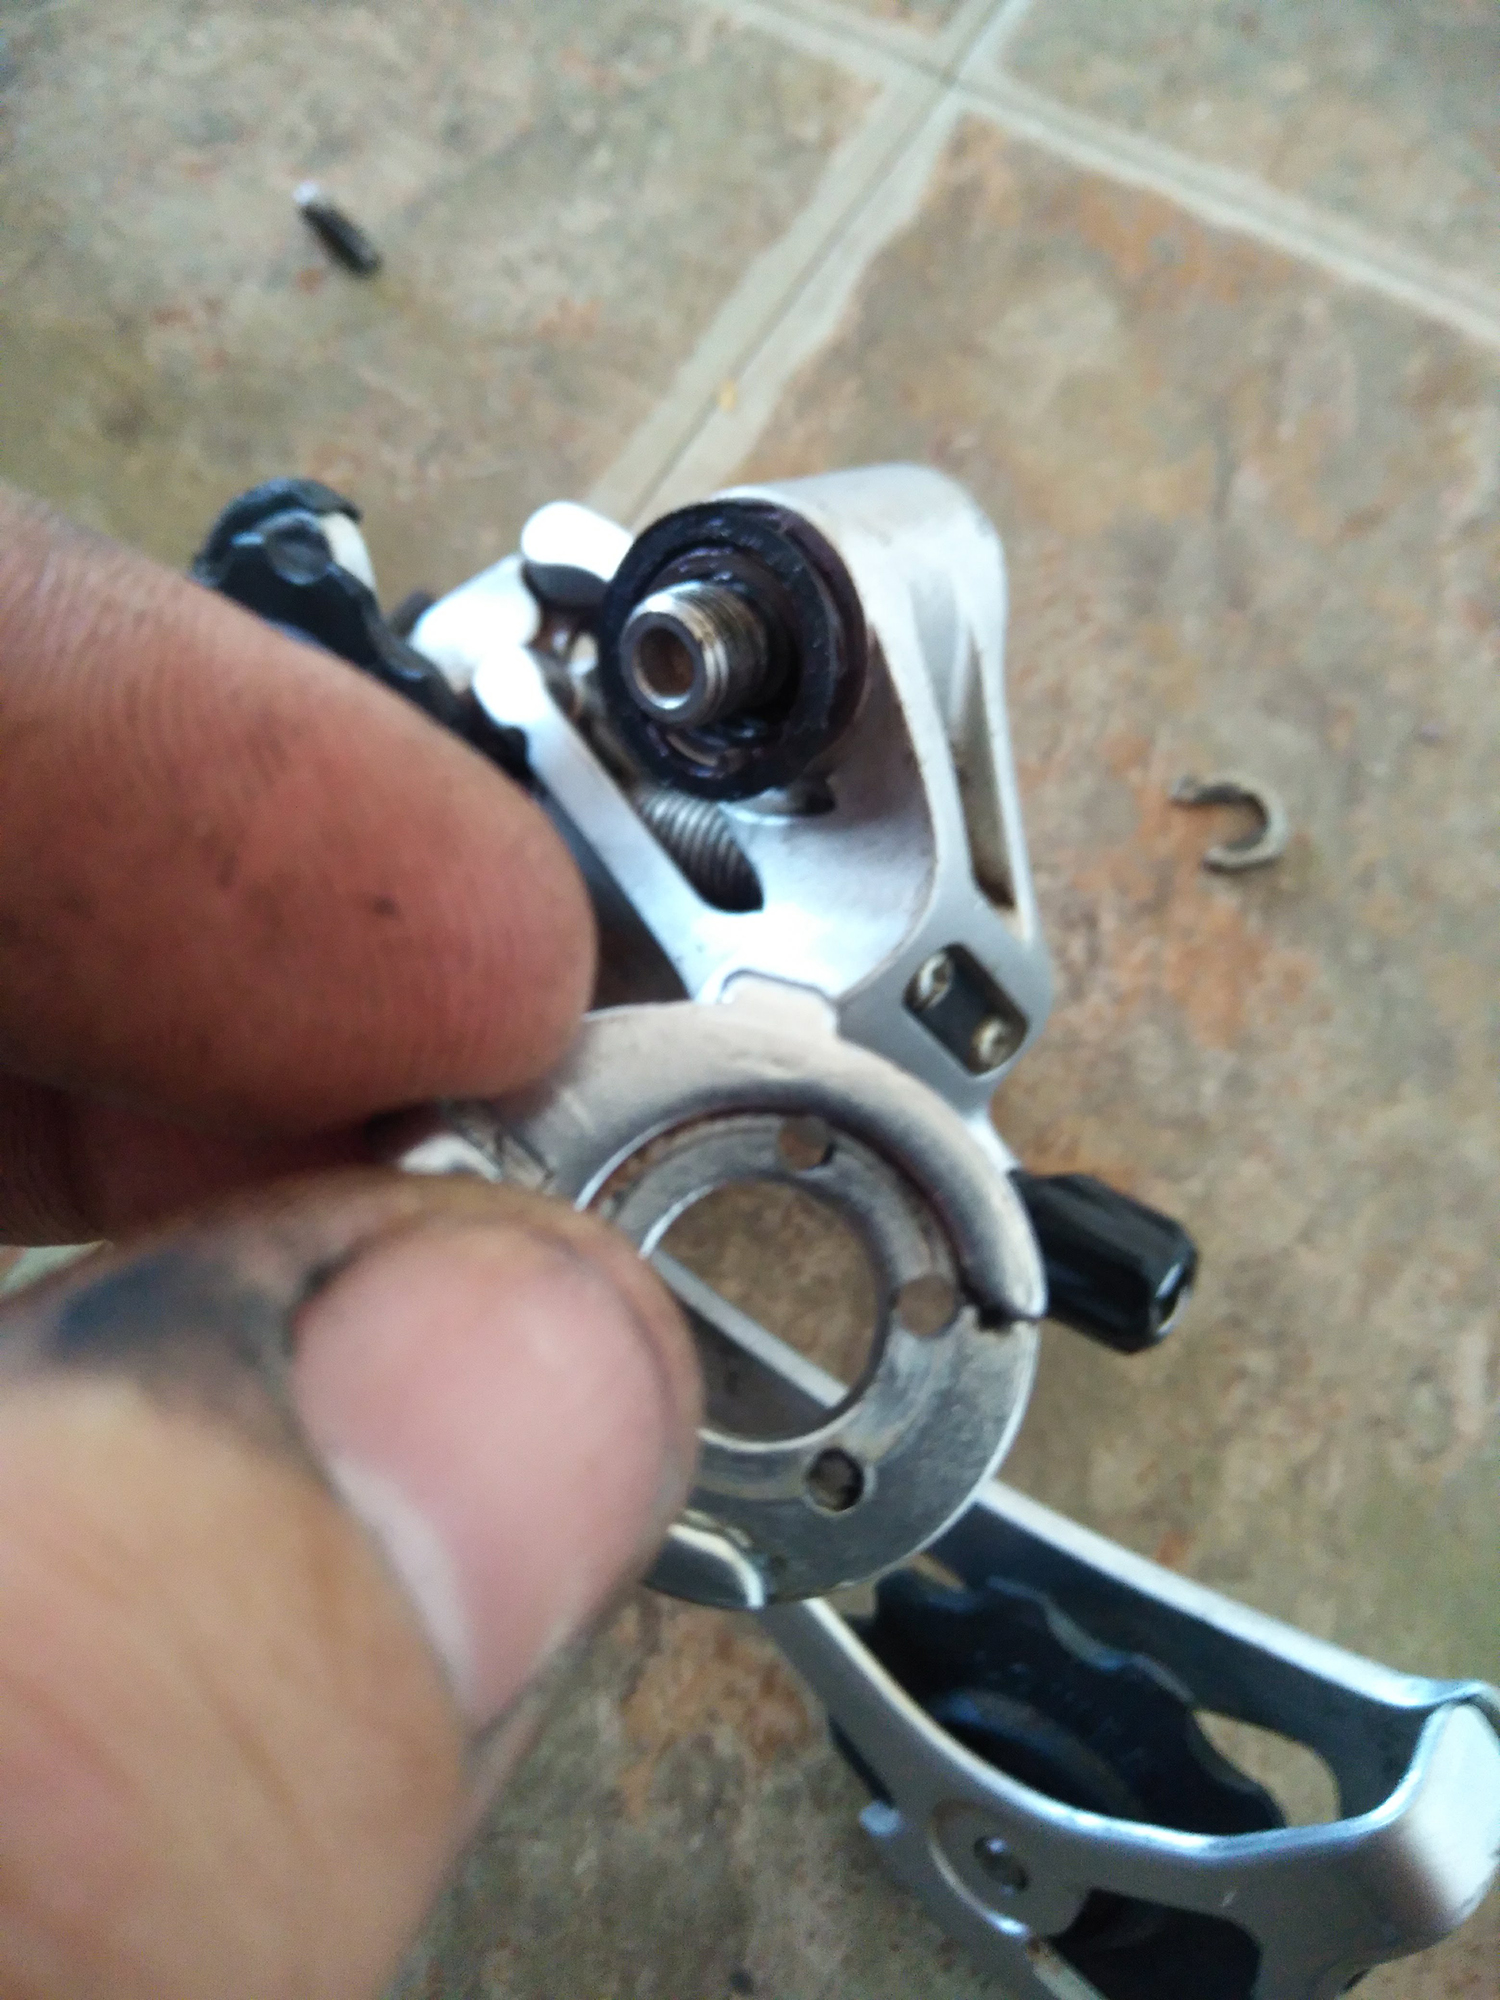
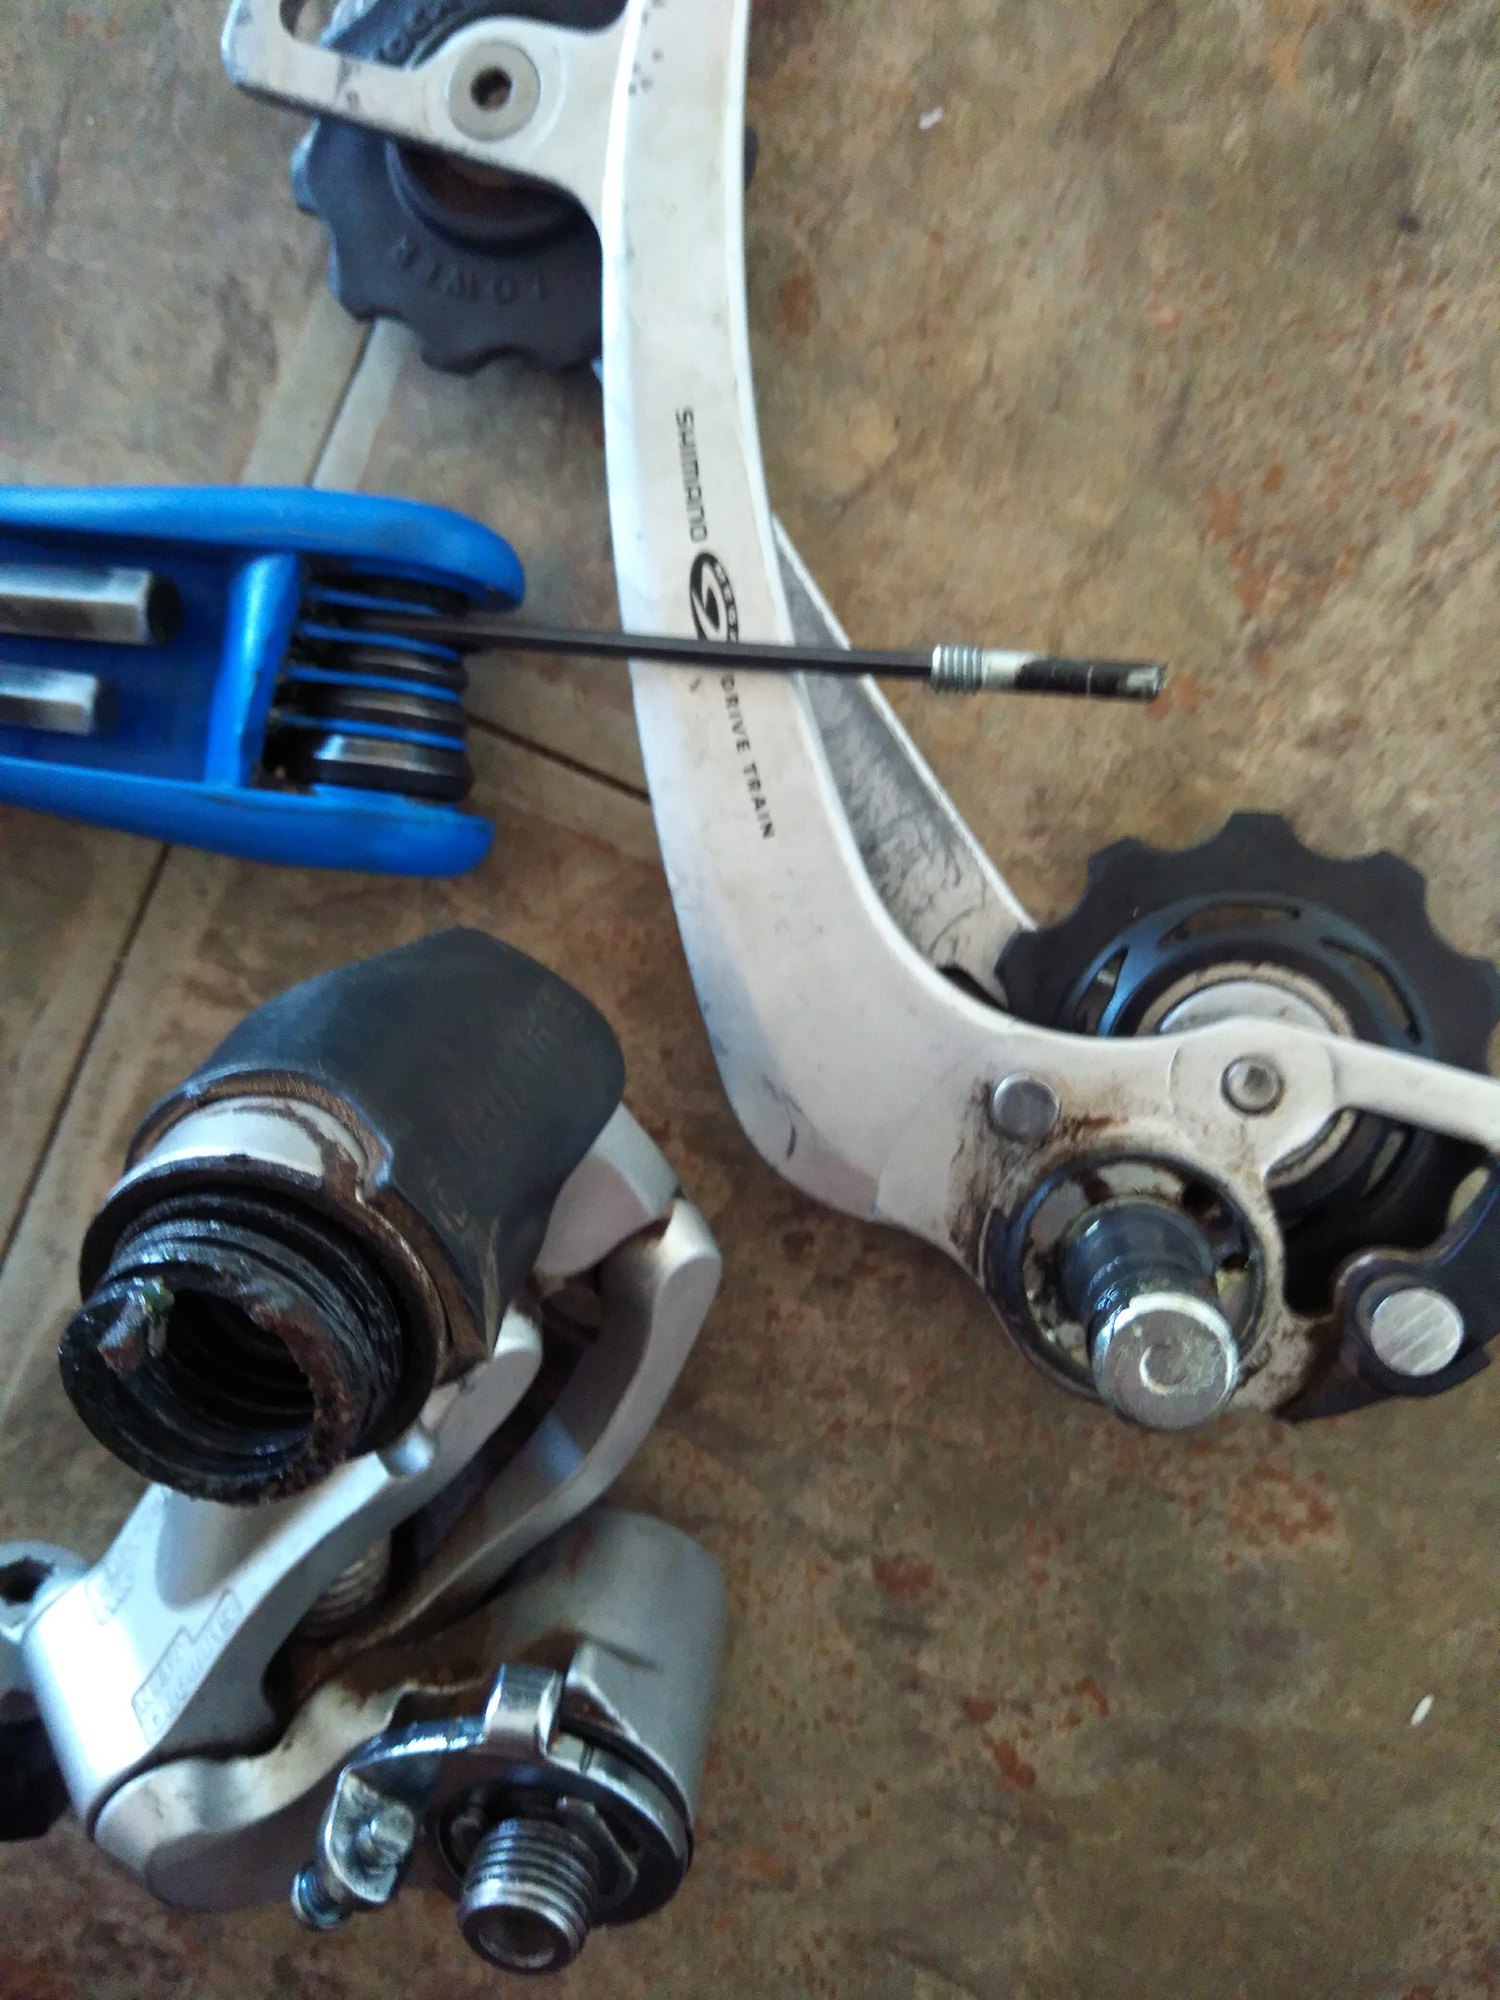
What I ended up doing was modifying a Shimano XT RD-M761 mech, increasing both the main pivot tension and the B tension springs. Some blogs will suggest the use of a longer B tension bolt, but I find this rarely works as it falls off the tab it’s meant to push against on the mech hanger (see pic below). Dismantling a higher-end derailleur is pretty easy: to remove the B pivot, pop off a circlip. To remove the main pivot, there is a hidden allen bolt on the knuckle. When removing the main pivot, pay attention to what hole the spring was engaged in, and make note. You will want to put it back together using the other hole. It is my understanding that these two settings were designed for cyclocross/pave use, though it is also plausible they were a longevity feature for when the spring started to wear out. At any rate, clean off all the pivots, remove any dirt and grease, then regrease things before assembly.

RD-M761 spring tension modification

RD-M761

Modifying the B tension involves drilling a small hole about ¼ rotation from the original. I tried it further, but found the spring was under too much tension to assemble. If you remove the B tension bolt, the tab it screws into can be put in the jaws of a vice. Punch a centre for your drill bit, either using a punch or a wood screw.

RD-M761

To reassemble the B pivot, insert the spring into the main body of the mech, engaging its hole, then put the plastic washer on, then engage the modified plate in the correct hole. Using either plumber’s grips or vise-grips hold the tab you had in the vice and rotate it until it gets past its stop, and push the assembly together: hold with one hand whilst pressing the circlip back in place.

RD-M761

Reassembling the main pivot is similar, but much easier since the cage acts as a lever, and you only have to push a little pin in place to hold it together.

FOLLOWUP 1:

After 1400km of commuting daily, this derailleur has died (30/4/18).

Though the initial modification worked, I had to make minor adjustments almost daily. It turned out that one of the main issues was that I had (previously, whilst chasing drivetrain noise) substituted the stock jockey/pulley wheels with Tacx cartridge wheels. These are great, but only as tension wheels as Shimano shifting needs that floating jockey wheel, which aftermarket products don’t seem to offer. I replaced the stock XT pulleys, and shifting returned to near perfection for a whole two days (about 40km). The modified B tension has broken – I assume the spring has sheared.

My planned solution is to get a Wolftooth Roadlink and, if I can, a short cage 105 5700 derailleur to match the shifters in exact generation. I worry that the road link will put more stress on the hanger, but if it brings a more reliable shift, then I will be pleased.

More soon.

Tobias Feltus:
Share

Shimano ST-5700 exploded view & throw modification (Part 4)

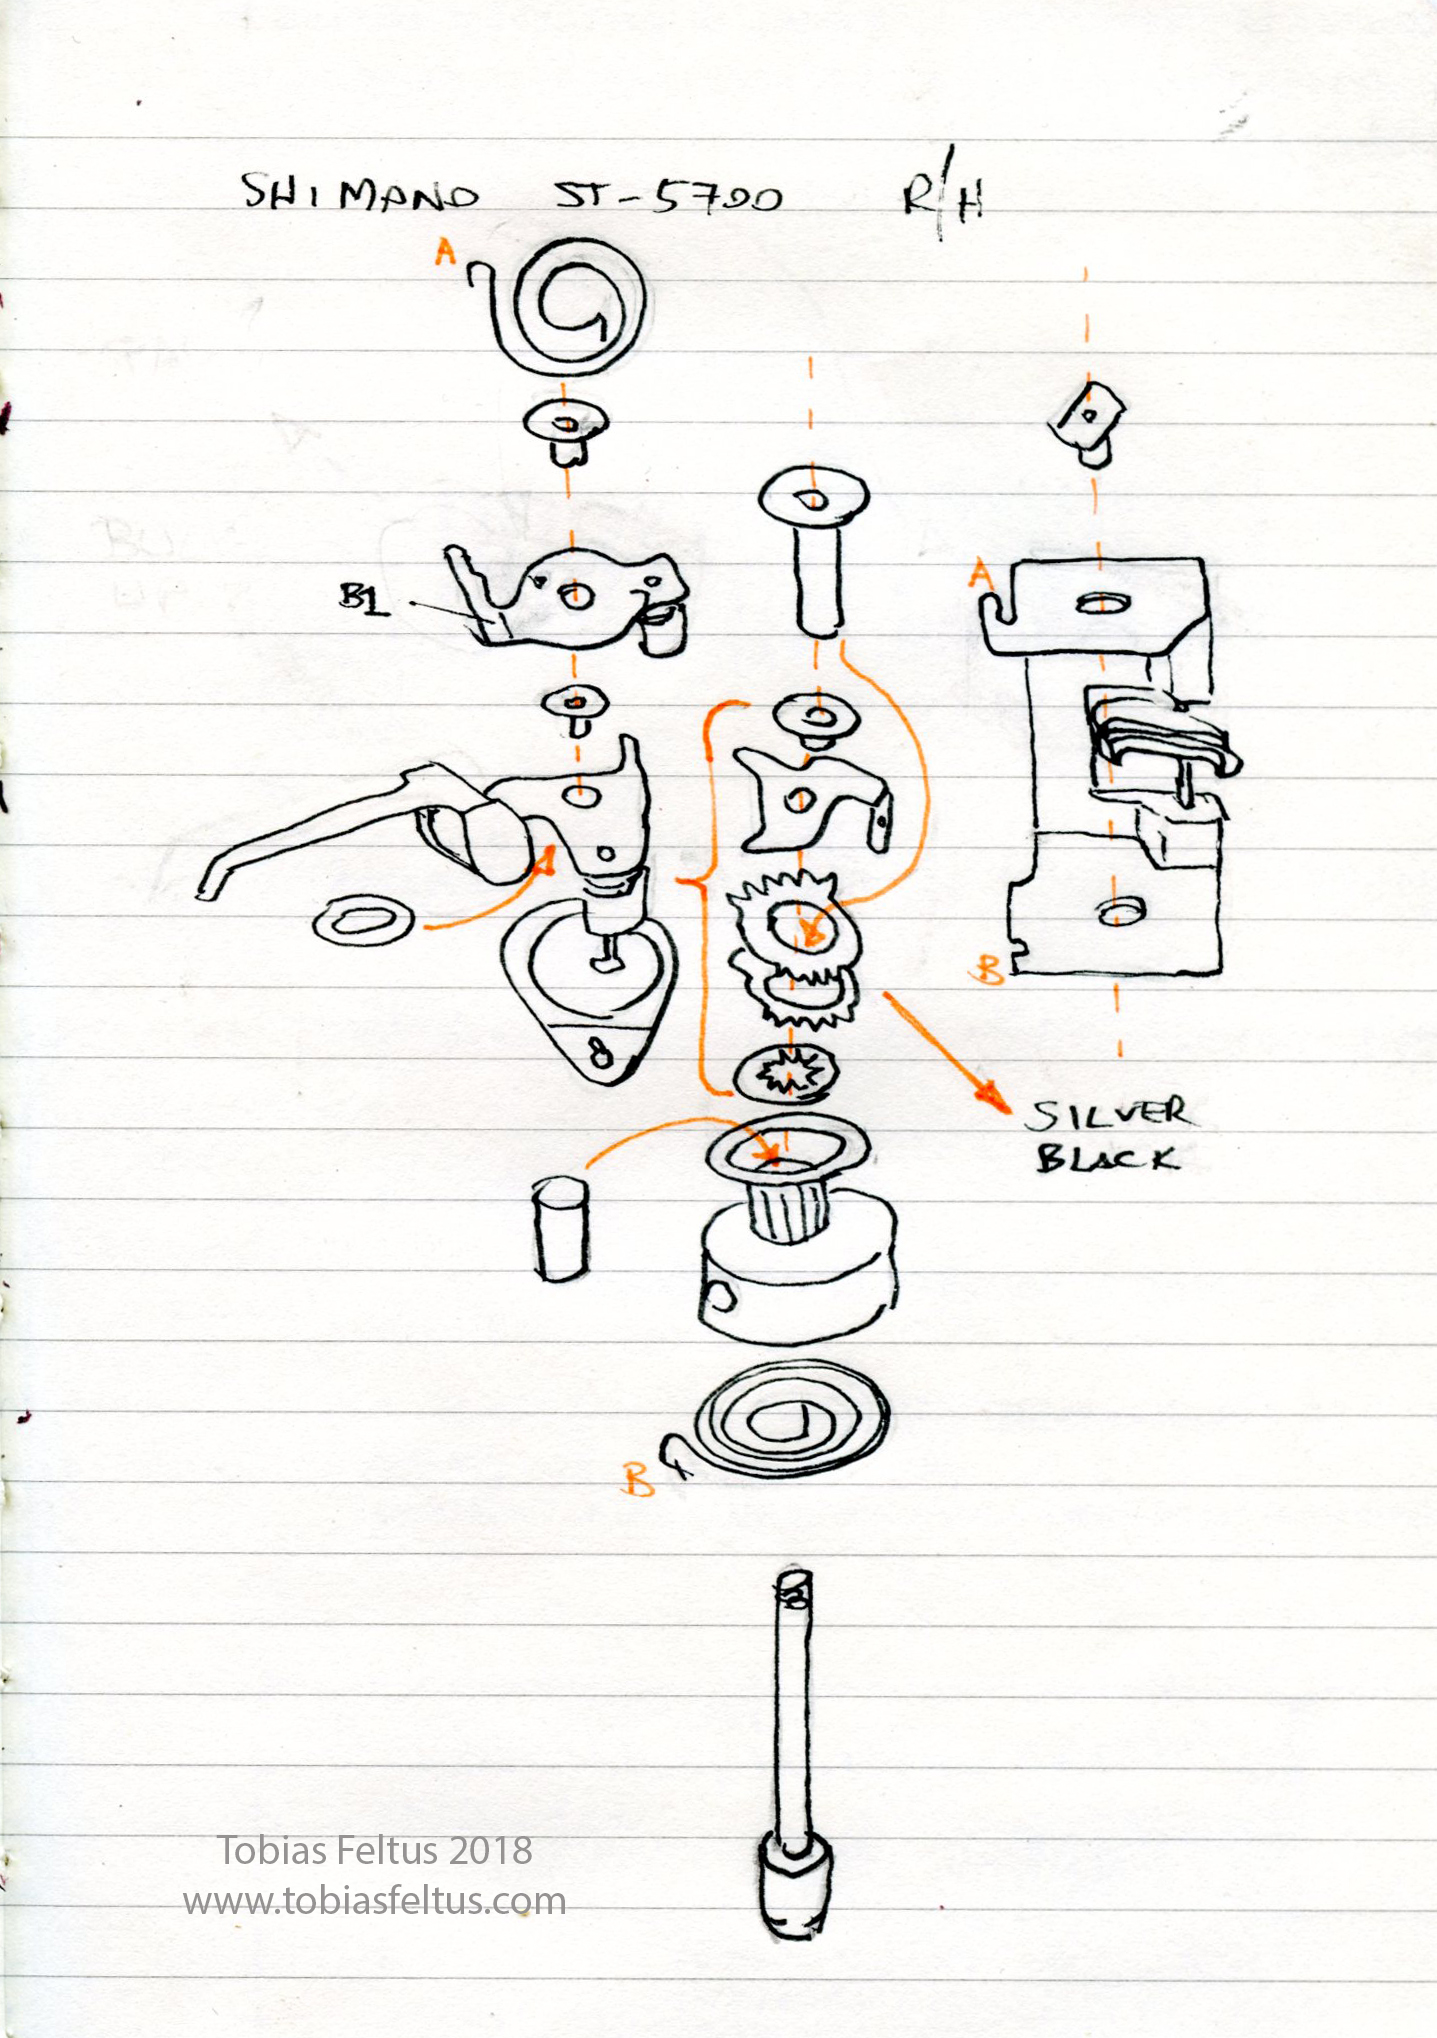
If you happen to have taken apart your shifter, here is an exploded view of how it goes back together. It’s not that hard, but it is really fiddly. The upper two plates interact with the shifter ratchets and ratchet plates: they are the business end. I took it all apart and cleaned it with alcohol, then reassembled it dry and lubed it with TriFlow. This is not an ideal lubricant for a wet climate, but I am currently building this for the desert. Fortunately none of the springs need to be under load when you slide everything together, and once everything is together and the springs are loaded, you can take the pivot bolt out, push the assembly into the composite frame, then reinsert the pivot.

ST-5700 exploded view

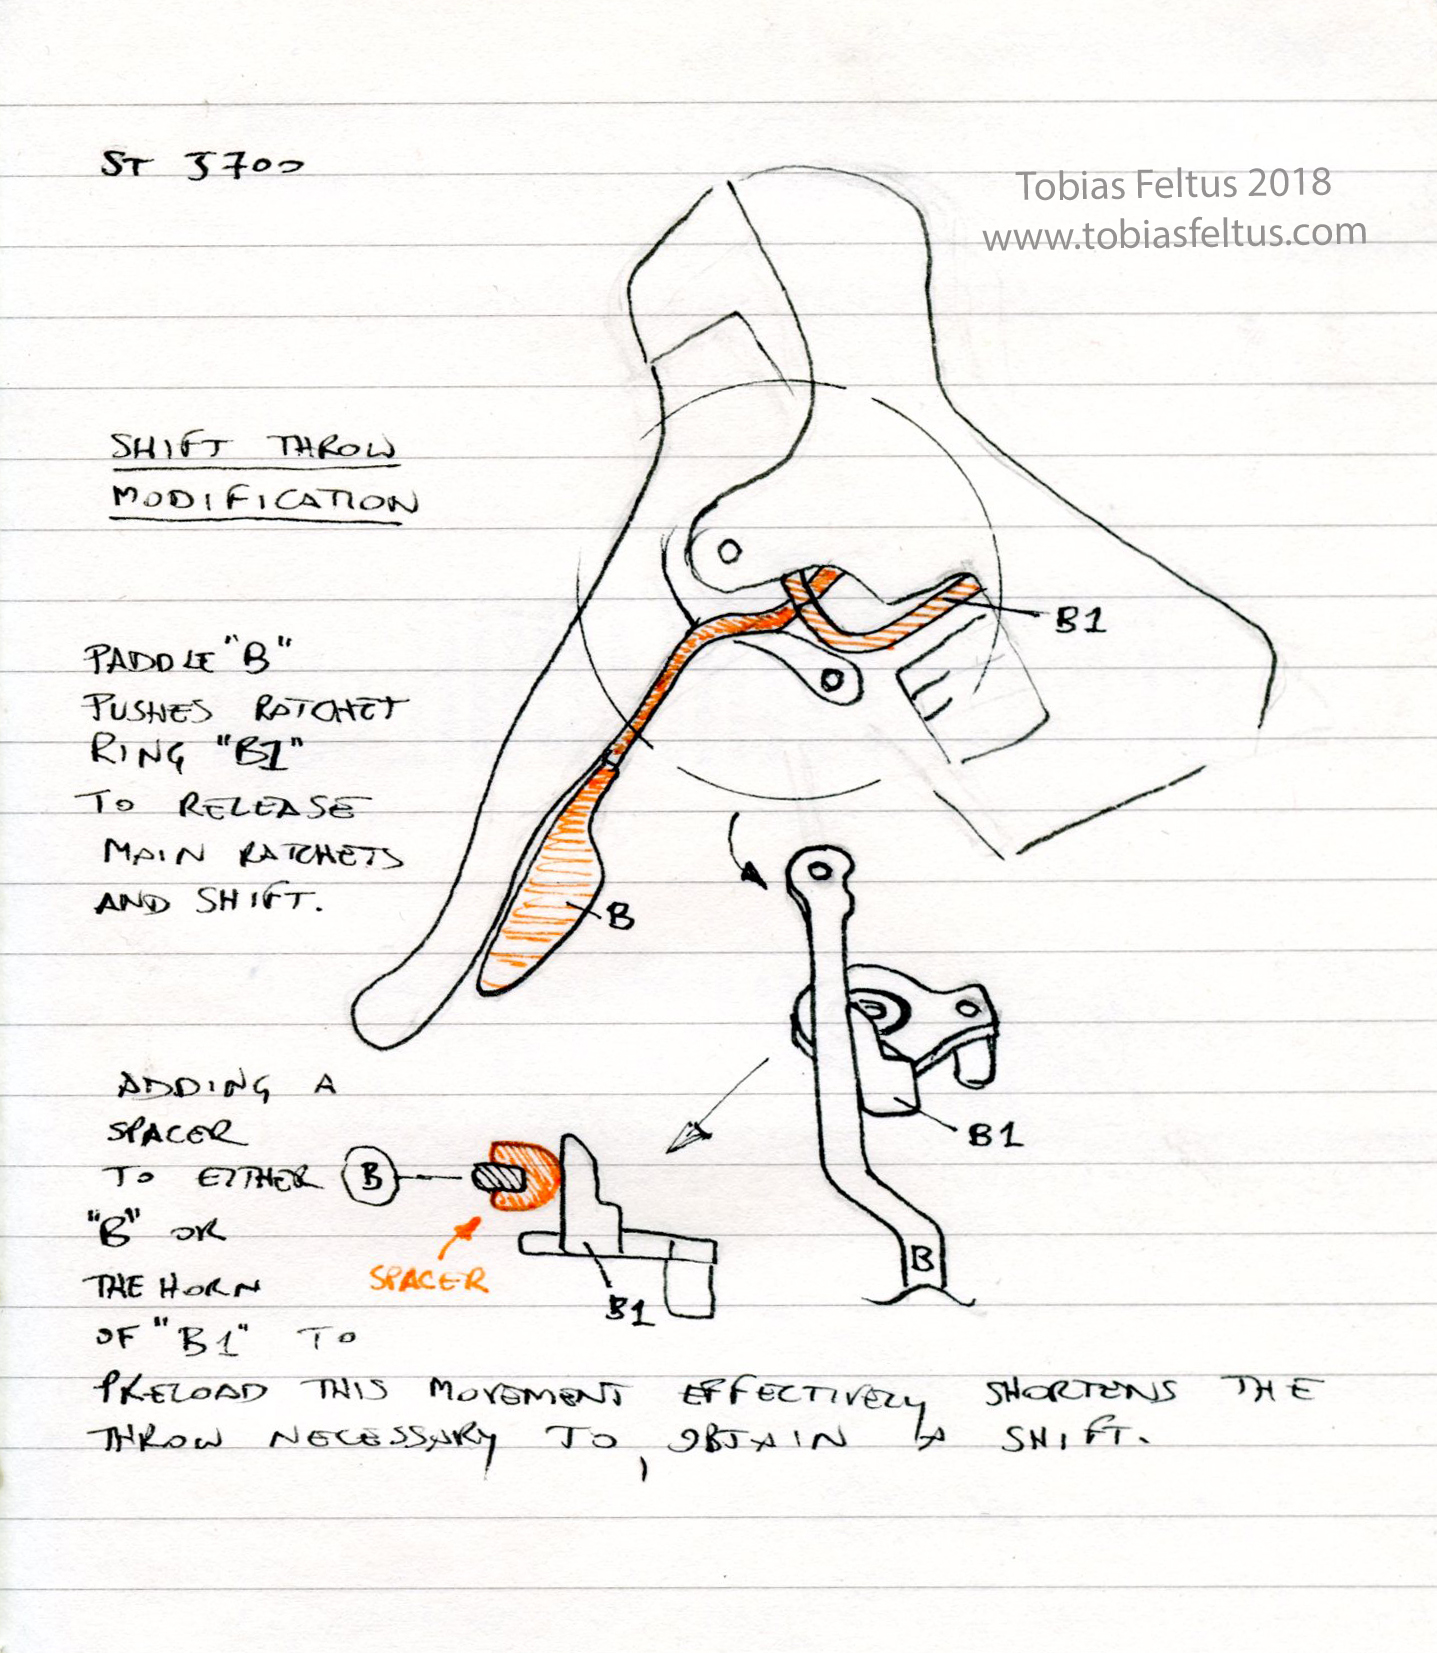
The one interesting thing about taking this apart is learning how easy it is to modify the shift lever throw of the smaller paddle. The throw is less of an issue for me on these as compared to the older style of shifter (with external shift cable).

ST-5700 throw modification

Tobias Feltus:
Share

Converting Shimano ST-5700 105 shifters to 1×10 (Part 3)

1x drivetrains should only have a shifter on the right-hand side, for the rear mech, in my opinion. I mean, otherwise you have pointless machinery cluttering your cockpit, right? On a mountain bike you just take one shifter pod off, but converting Shimano road levers to a 1x does involve removing a shift paddle, in my books. The internets would suggest that no one has ever tried this. Removing the shift paddle from the left hand shifter is actually remarkably simple, takes about 10 minutes, is reversible and leaves you with only a tiny bit of brake lever play.

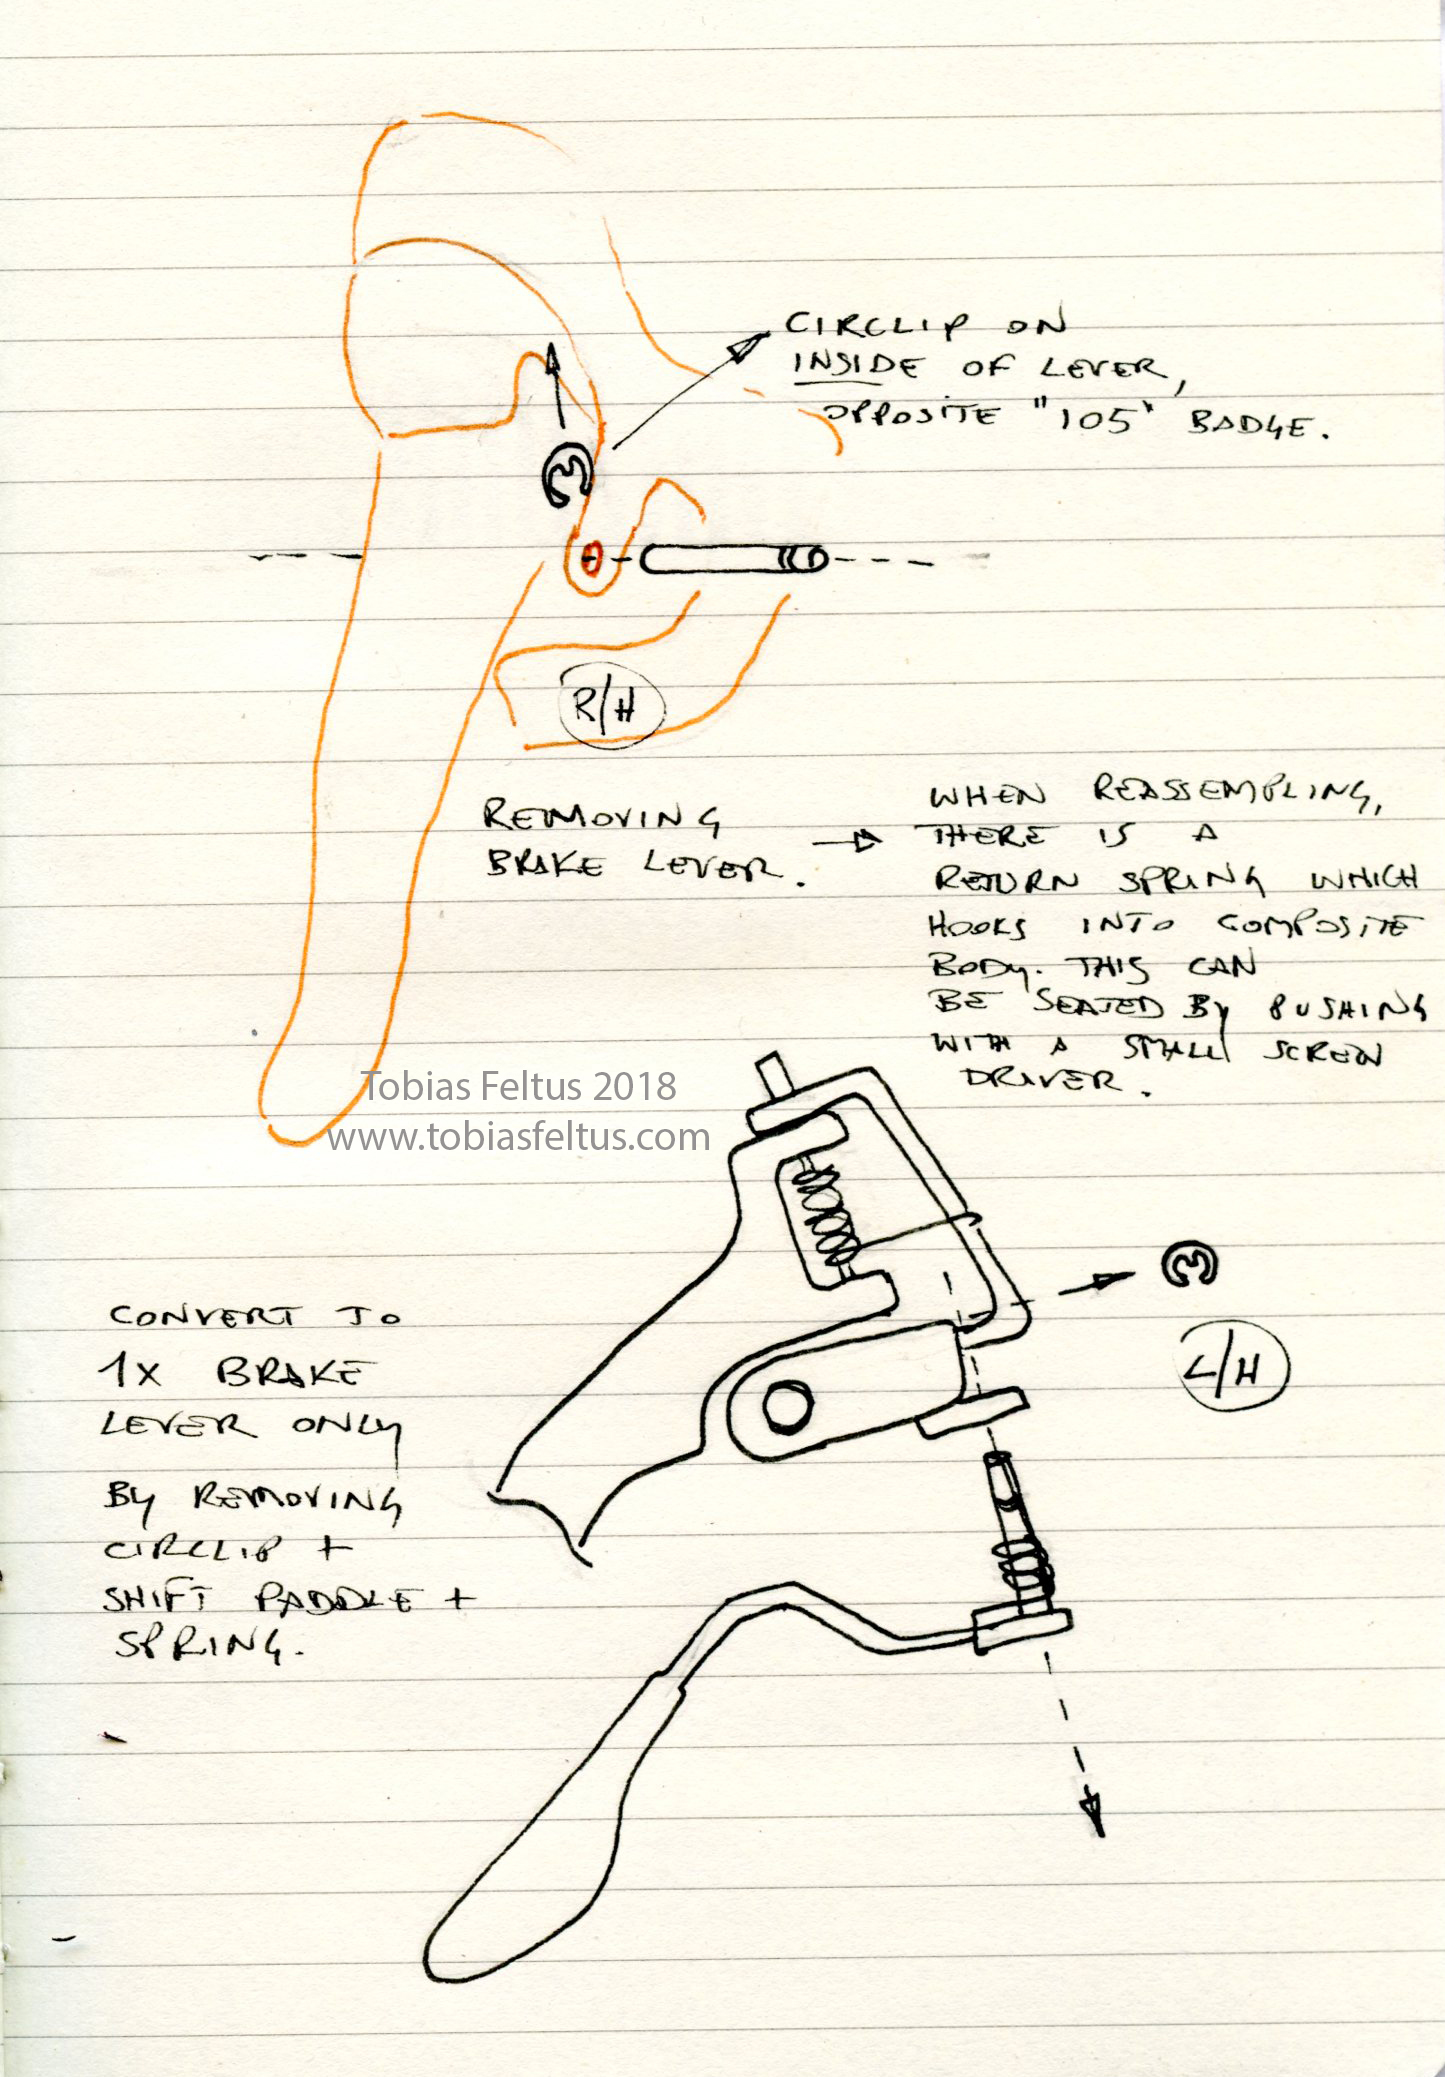
Removing ST-5700 brake lever

Remove brake lever assembly per Shimano’s instructions (see illustration), which involves moving a circlip from the inside end of the shift pivot pin: I used a flat object like a butter knife to raise the clip, then push or tap out the pivot pin. Removing the lower shift paddle involves the removal of another circlip, then it all slides out. Reassemble the brake lever, and the job is done. There is a lever-return spring which you may need to hook into its little hole on the composite frame, but I found this to be pretty easy with a small flat-blade screwdriver.


Tobias Feltus:
Share

1x drivetrains for road: selecting gearing (Part 2)

Selecting the gear ratios is the easy part. You go HERE and input what you are currently riding, then try and mimic this with a single cassette.


I am of the firm opinion that all bikes are sold with bigger (longer, greater gain ratio, or bigger Gear Inches) gears than the average strength rider can push. I know that I have never spun out a road bike with a 50/11, and the descents into Bartlett Lake are among the longest and fastest descents I’ve ridden, barely spinning out a 46/11 at over 40mph in an all-out effort. So I think it is fair to say that I don’t really need anything over 100 Gear Inches.


My CrossCheck had a 34/46 with an 11-32 cassette (8 speed), my new setup is a 40t Origin8 narrow-wide and a Sunrace 11-40 cassette. I dropped a couple of gear inches off the top end, and gained a couple at the lower end, based on how I use the gears. In detail, I had 29-84 gear inches and 39-114 gear inches: now I have chosen to have a single sweep from 27-99 gear inches. From riding, it seems like at the lower end of the ratios I have an rpm difference of around 5 between sprockets, and at the higher end it is around 10: this is vaguely comparable to a road setup and oddly similar ratio spacing to my previous setup, but its all on one shifter, simple and linear.

This is my gearing comparison HERE.

After a few commutes, my only comment is that the 40t is too close to the 36t in pedalling rpm, so I may opt for the 11-42 on my next build (the only difference is the biggest ring), sticking with a 40t chainring, rather than changing the tooth count on the chainring (this will probably be a gravel monster, SRAM equipped and with a power meter).

Tobias Feltus:
Share

Shimano 105 1x drivetrain considerations (Part 1)

Despite the fact that SRAM has been touting 1x drivetrains for a few years, killing off the MTB front mech and making road shifter compatible clutch rear mechs as well as selling left-hand levers which don’t have shifter internals, Shimano seems to have closed its eyes to this trend, as have all forum discussions on the topic. This has all become more pertinent now that, for the 2018 road season, team Aqua Blue Sport has signed up with 3T to be the first pro team (road) to race on a bike which is unable to use a front mech or rim brakes. This makes road 1x systems a very real present.


In my quest to run a drivetrain where I use all of my available gears efficiently/equally – and after choosing the gearing on our touring bikes which was both arduous and aimed at a specific task, I decided to try a road 1×10. I was given a pair of heavily used 105 ST-5700 shifters, which are what I consider to be 2nd generation 10 speed, or SLR-EV levers, which have a slightly different brake cable pull compared to old Shimano, SRAM and Campagnolo. I believe they have an improved ergonomic design compared to the older hoods, and it is nice to have all the cables under the bar tape. I am a little frustrated with the inferior braking performance with the majority of brakes on the market, despite the fact that Shimano launched this cable pull in 2008 with the Dura Ace 7900 series, there are very few fully compatible brake options. Seriously, 10 years later and I am not aware of a single third party brake lever which is labelled as being deliberately compatible with the cable pull of these levers.


My list of tasks were:

1: Select gear ratios that will not be compromising.

2: Remove the shift paddle from the L/H lever

3: Clean/lube shifter mechanism.


I’m going to break this up into separate posts.

Tobias Feltus:
Share

How much does rim width affect tyre width?

I’ve been wanting to move to actual tubeless rims on my MTB for ages. This past year I’ve been riding with a Stan’s No Tubes conversion kit, with the rubber rim strip sitting in my bead. Though this works, it is not ideal as it is still pretty hard to get a tyre to seat properly (I never got my front to seat without a wobble to it), and technically it is not as safe as a true tubeless rim. My front has been a UST tyre, my rear has been a non-tubeless Schwalbe. I’ve gone through two rears. The UST tyre has kept its fluid with little loss, and only one small Stanimal (coral-like creature made by tumbling liquid latex inside a tube for months). My rear just started weeping sealant through the sidewall, as well as loosing large chunks of tread, so it was time.

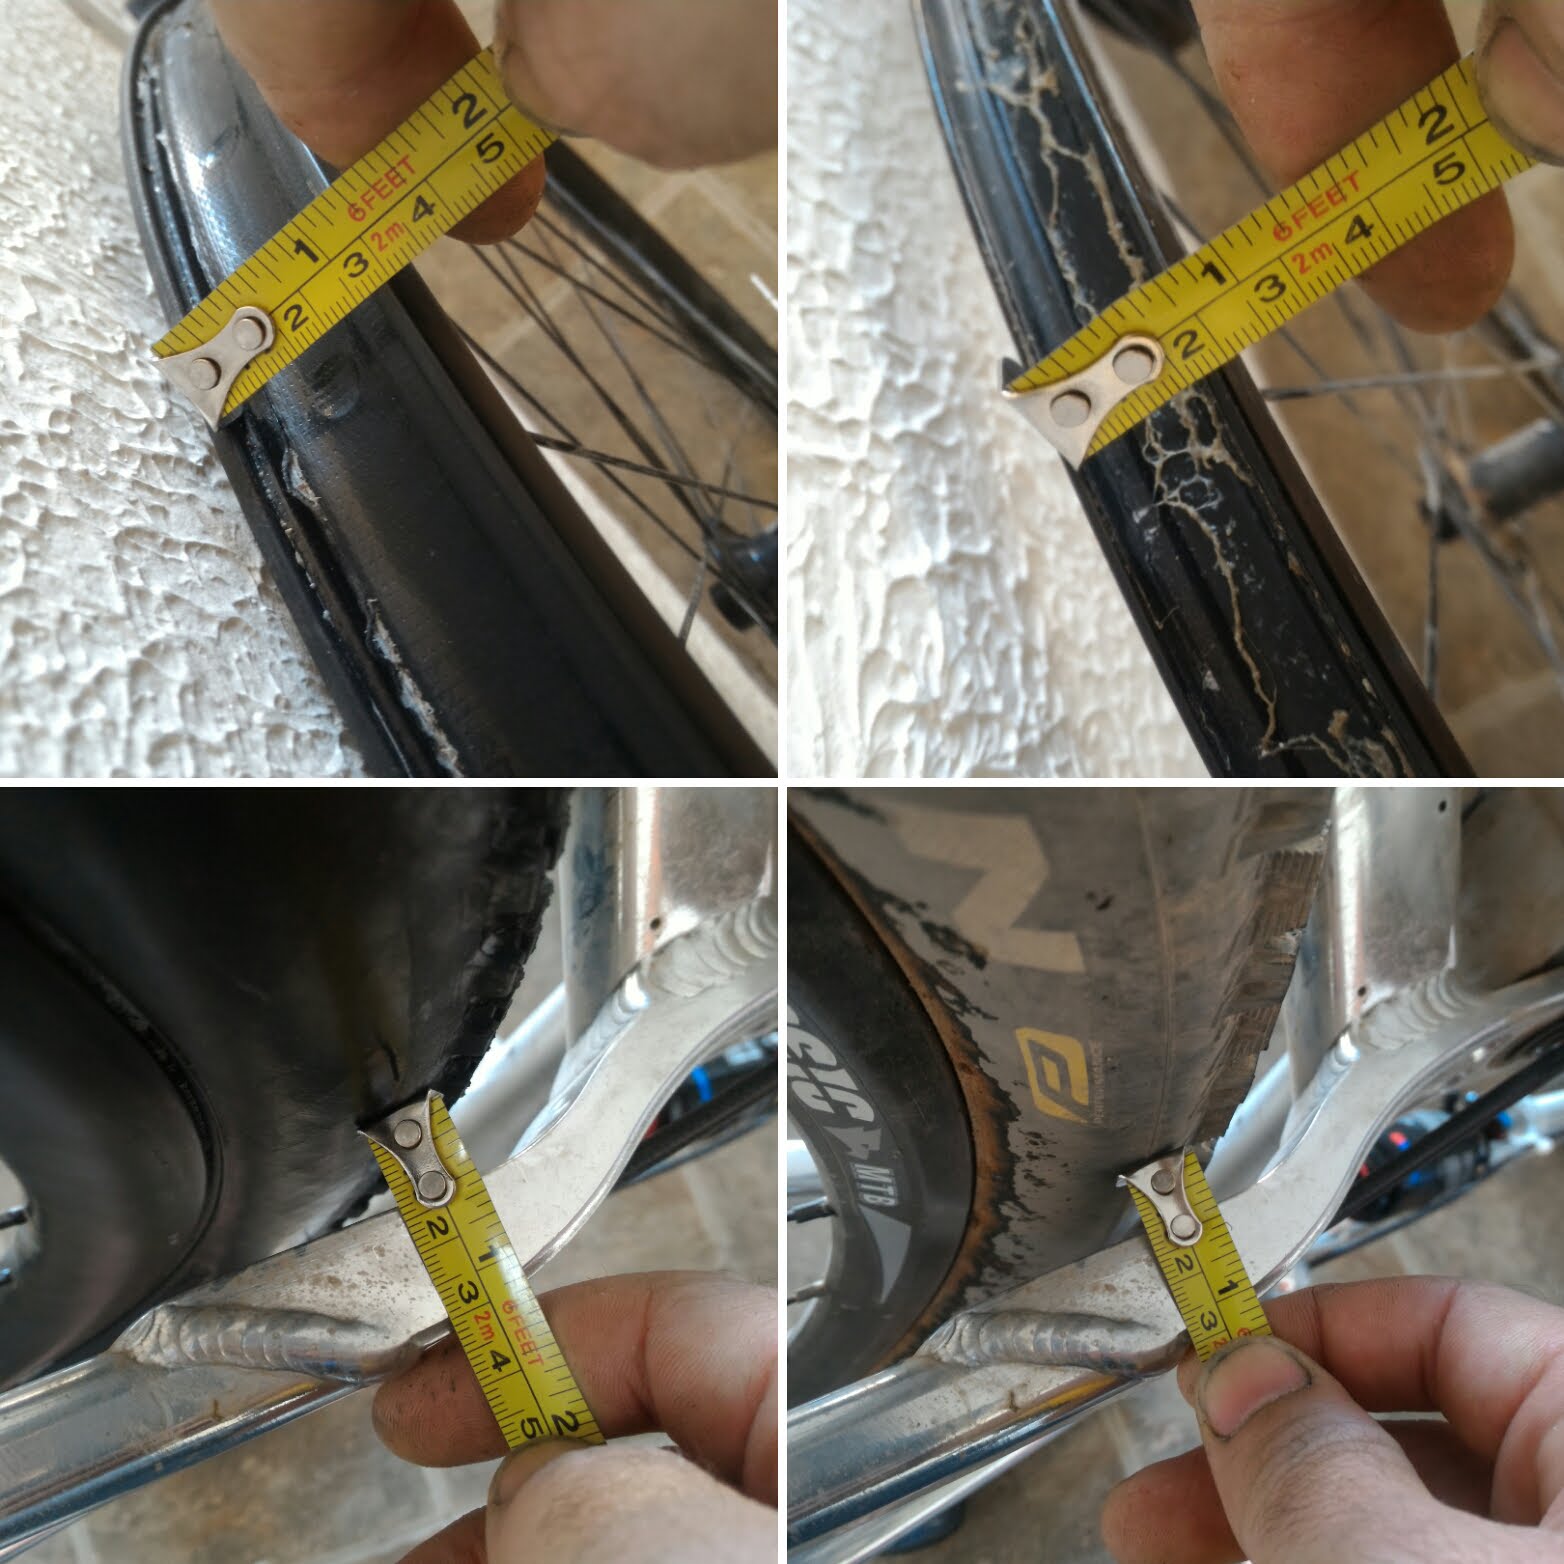
The wheels I’ve been riding on the Yeti are lightweight American Classic MTBs, 17mm wide bead on their older 225 hubs. I was planning on relacing these hubs to new rims, but I was offered a set of carbon rims on Hope Pro Evo2 hubs, so went for that instead. The new rims have 27mm bead seats, which is a significant jump. So how does this affect tyre width? oddly, not much. I would assume that there is some maths involved, but a change in tyre/brand as well as the lack of standards contributes to the fact that I went from a 2.25″ (57mm) tyre to a 2.1″ (52mm) tyre, widened my rim by 10mm and lost 4mm of tyre width, which is reflective of the ETRTO tyre width, and not the rim width. I guess there is a possibility that the width of a tyre will not be affected by the width of the rim, and that the latter only influences the shape of the tyre, but this is utterly counterintuitive.

The only attempt at making a tool to calculate how a tyre will fit in a frame on a given wheel was set out in THIS post by Wheel Fanatyk in 2013 and, as far as I am aware, the tool was never produced. Next time I change rear tyre I will stick with Maxxis and try a 2.25″, and it will probably fit the same as the Schwalbe did on the 17mm rim.

Tobias Feltus:
Share

Amazon’s counterfeit SRAM mount for Garmin.

I ordered a Garmin mount on Amazon. As per usual, it is very hard to figure out whether an item is sold by them, or by a marketplace listing. Turned out the item ordered came from China, something I only found out when it arrived.

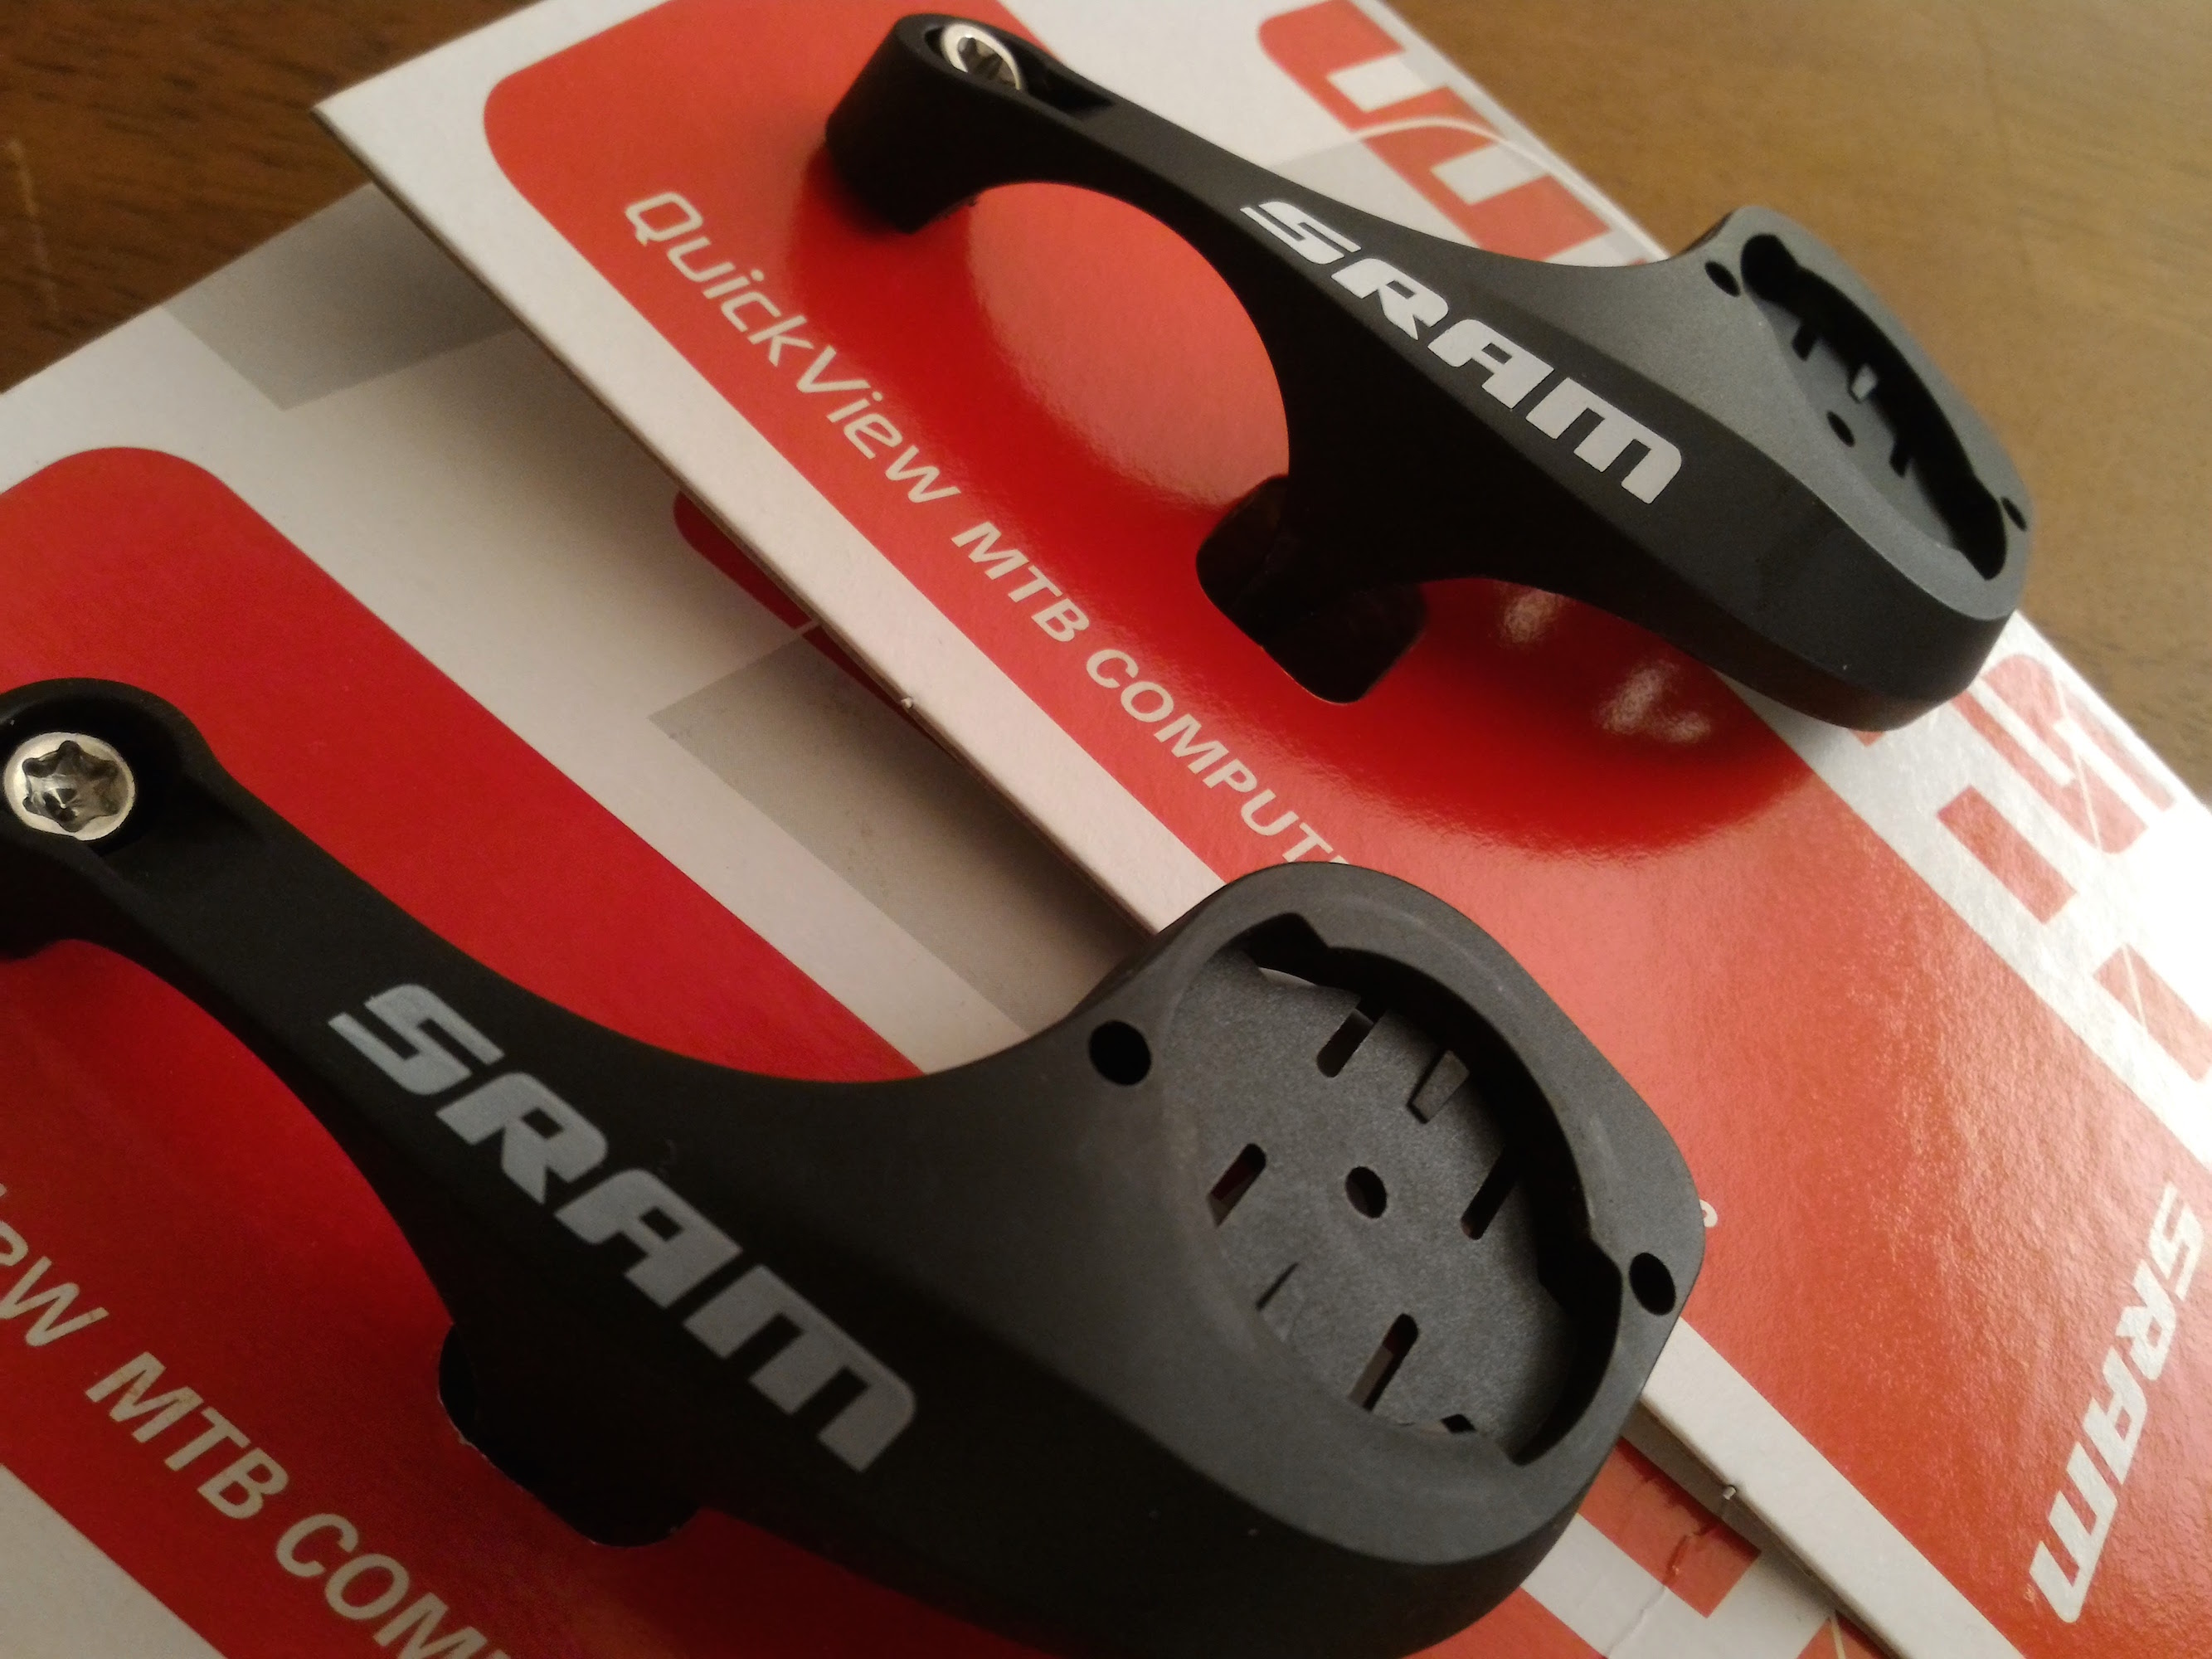
I clipped my Garmin Edge 1000 on the packaged mount and it felt sloppy. I decided there was no way this was a legitimate SRAM product, reported it as counterfeit and was instantly refunded, and the listing vanished. I finally got around to ordering a new mount, this time directly from SRAM through QBP. The copy is pretty accurate. Packaging is almost identical, and the screw in the genuine part looks inferior to the copy. However, the genuine mount holds the twist-lock Garmin snugly, the text printed on the mount is whiter and also slightly curved. In fact, I believe the only way to visually identify the fake is by the curvature to the SRAM print.

The mount ordered is the MTB version, which has a different angle designed to hold the Garmin over your stem, rather than out front. Though I like not having the device project forward from my bars, the position means that I’ve had to angle it more up – parallel with the ground – to be able to see it, and looking down is more involved than just glancing at the head unit with the original out front mount. It has its pros and cons, as does everything.

Tobias Feltus:
Share

Thoughts on gear for a BioArctic residency.

I am presently on a residency at ArsBioarctica in the Arctic of northern Finland. Before heading out, I spent several weeks deliberating what equipment to bring. Part of this was deciding whether I should plan to work on a specific project, or plan for anything and everything. Though my initial plan was to work with a (non-existent) direct-positive paper to use in a 4×5 camera, I ended up bringing my Leica M3 (with the Summar 50/2, Elmar 90/4 and Elmar 135/4), Nikon F90 (with the 85/1.8, Micro Nikkor 55/2.8 and 24/2.8) and my GH1 with a dumb K&F Nikon adapter and a Zhongyi Lens Turbo II, doubling up my use of the Nikkor glass. I packed rolls of Fuji Neopan 400 and Kodak Technical Pan. Additional gear includes the Fujifilm XP 50, Gopro 2, Gossen Digiflash, Tascam DR-100 and a couple of microphones (audio gear being pertinent to my collaborative efforts with Lauren for Sounding Out Spaces), a Leica micro tripod, a mini lighting stand and my beloved Gitzo Tatalux with a single clamp Slik head.

For the work that I have been doing here, the Micro Nikkor has been the most valuable piece of equipment: a task which the Leica would never have been able to perform without pointlessly complicated accessories. The F90 is an effortless camera to use, with a fantastic finder, and the Micro Nikkor 55/2.8 is an absolutely amazing tool for bridging the gap between the minute and the macro — photographing mountains or looking at lichens as though they were forests (I realise there is an issue with the definition of “macro”, since in photography it refers to getting close and intimate with small subjects, whereas the dictionary definition is indeed the opposite of micro). I also know from recent work with Tony Obr that it is very good at creating abstractions, despite its very nature being that of having been engineered for scientific reproduction. And again, I don’t know if this is a generational thing — the fact that the F90 was “the” camera of my mid teens — but I find its operation both in Aperture priority and Manual incredibly easy to control, or far easier to control than the F3 or Fujifilm S3. The F90 is also very practical for field work, seeing that it costs very little now (so scratching it is no biggie) and will take up bulk-loaded film with a straight-cut leader, with no faff.

My M3 is still a dream machine. I don’t use the Leica often enough for focussing to be as effortless as it used to be: I presently find it awkward to have to move the centre of the frame to a focus point then back, being more used to focusing on ground glass or a liveview LCD. I feel comfortable with the knowledge that the Summar will soften some detail without losing crisp lines. I love the way the camera feels in my hand, and the non-event that I experience when I release the shutter. The main joy, and the part that people who don’t shoot with rangefinders won’t know, is that the extra space around the 50mm brightlines in the finder mean that precise composition can be made in peripheral vision. This is something that is really hard to explain, but I often find that with an SLR you can spend quite a lot of time lining up a horizon with the top of your finder and still get it off. With a rangefinder, or in particular a Leica M, you can do a lot more looking around and composing of corners: thanks to the extra peripheral view in the finder: more intricate composition feels easier. I don’t imagine this would be of much use for landscapes (and I wouldn’t recommend using a silk-shutter rangefinder for landscapes if there is any chance that sun might go straight through the lens and burn a hole in your shutter), but for taking pictures of people close up something magical happens in the user-camera-subject interface. It is a truly pleasurable experience.
The Gossen Digiflash is a fantastic little lightmeter which can measure both incident and flash (and theoretically reflected light, but who measures that?). Its size and weight is pretty much unrivalled, and if you only work with one camera at a time, it is pretty much perfect. Its pitfall is that changing ISO is as hard as changing the time on your old Casio watch. Two button operation, and no up/down. For this reason I would like to acquire a Sekonic L308, however I feel that it is criminally expensive for a piece of gear that has been on the market for 25 years, with no model updates since 2005.

The Tascam DR-100 was a welcome upgrade from the diabolical Zoom H4n which was barely capable of recording anything other than its own digital preamp noise. Though it has many fewer functions, the Tascam has three hardware preamp levels and concentric rotating input level knobs which mean that gain levels can be adjusted during recording. I’ve been able to make clean recordings outdoors with its built in unidirectional mics using a simple Rycote windjammer, setting the levels by meter rather than headphones. Since we have not used the Rode NTG-2 on this residency, the DR-100 is a bit of overkill in size and functionality, so I may look into acquiring a DR-05 for Sounding Out Spaces missions.

I’ve also been using other Leicas here at the Lab: microscopes. There are a selection of Leica imaging units at our disposal, such as the DMLB, EZ4 HD and a few other scopes with an MC170 HD camera that can be moved amongst them. I started using them after my second outing in the Tundra where I discovered pink blooms of algae in the remaining patches of snow. I gathered a sample in a film canister, and took some images with the MC170, then found a 2.5x camera adapter and ended up perching my GH1 on top of the scopes to get higher quality images. I am really not impressed with the quality of the Leica sensors, nor the computer interface. They are slow and clunky, with high noise and a minute dynamic range. Shooting RAW with the GH1 gave a much better quality image for stills, and yielded some absolutely superb video footage of Tardigrades and Rotifers. The optics of the microscopes do also seem to yield a significant amount of chromatic aberration which became particularly marked when I was trying to capture a clear shot of a mosquito’s Labella. I spent many hours exploring the microscopic fauna of a square inch of arctic moss, discovering thousands of monsters, and yet I continue to drink the unfiltered water which — incidentally — is the best water I’ve ever drunk.

Tobias Feltus:
Share

Road Tubeless: probably not ready for market.

In 2016 I built two bikes for long distance touring. Iceland was our original plan, so durability was the first deciding factor in many decisions. I had decided that we should go tubeless, but this proved to be a problem. Here is my correspondence with WTB, the tubeless-ready rim manufacturer I chose.

ME:

I had wanted to go tubeless for touring, and there aren’t too many options when you are using rim brakes. I chose your ChrisCross i19. Every choice in the wheelsets (2 of) was meticulous and aimed at reliability, using DT Swiss Alpine III spokes, Deore rear and SP-Dynamo front hubs.

On the first day of our tour (also our honeymoon, from Budapest to Assisi) we both suffered rear blowouts. Blowouts as in we were going down a hill pretty fast, and the back tyres exploded off the rims with no warning. Skidding to a stop obviously damaged the rims and probably the tyres. Had the fronts blown, then we may have spent the rest of our honeymoon in hospital, but thankfully we were able to avert accident. I now have very little trust in tubeless and in WTB. The rims come with no information or limitations, and there are no warnings on the internet. The tyres are rated for 60-90psi, and we started with 60 rear and 40 front.

I consider the Chriscross i19 rims to be unfit for purpose, and cannot recommend that anyone use them.

The i19 caused considerable discomfort and worry for several days following the incident. I would also emphasise that I invested many hours of research into rim choice and tubeless for touring, which could have been averted had I gone with standard touring rims. Between research and build, the wheelsets are probably worth around 70 man-hours plus parts. Of further note is the fact that the i19 were pretty hard to set up as tubeless, as the bead well is of a shape that does not seal well with standard conical tubeless valves, and the join seems to leak (as in it is possibly not welded), and sealant still bubbles out of the rims during inflation with tubes, a couple of months after the tour! I also had to ream and remove loose material from many of the spoke holes.

Had I not been after a tubeless setup, I could have settled on one of many tried and trusted touring rims with eyelets, lower weight and RRP.

Aside from the time and money wasted, I feel that this product has caused us significant danger and distress and that we should be compensated. I look forward to hearing from you on this matter.

WTB:

Tobias, I’m very sorry to hear you are facing some issues with our ChrisCross rims. It is very unusual as these were strictly designed for tubeless usage, we sold load of these rims all around the world and we never received a similar claim for them.

We all here are riders, and do not sell products we do not fully trust in, so to identify what might cause your problems I will need more details from you.

Tobias, could you please confirm, what rim strip or tape you used and also what tyres you put on.

ME:

The rim tape used was Tesa 4289 (Stan’s Yellow), 25mm. Valves were RSP, which I ended up supplementing with a fatter o-ring on the inside to seal better. Sealant was Stan’s.

Tyres fitted were Vittoria Voyager Hyper (folding), 37-622. I had wanted to use Schwalbe Marathon Supremes, but there was no UK stock. Since one of my colleagues has been running the Voyager Hypers tubeless on his Stan’s Iron Cross with now issues, I figured the only issue would be pressure loss through the sidewalls.

WTB:

You are using our ChrisCross TCS rim. These rims require to use WTB TCS 24mm rim tape to provide optimum mounting, fit and seating of UST (Universal System Tubeless) or WTB TCS (Tubeless Compatible System) tyres for tubeless use or standard ERTRTO/ISO tyres for use with tube. It’s necessary to completely cover the spoke holes, inner rim well and rim joint to ensure a secure, uniform air-tight, tubeless performance.

You used Tesa 4289, which is not that wrong, but 25mm width, might caused you troubles to stick it properly and therefore your rim was leaking sealant through the join (We use sleeved joint (cold joint) for ChrisCross rims, as it is much stronger than the welded one and much lighter than pinned one). Here’s video manual, how to tape it properly. It is very simple process: https://vimeo.com/61829564. Once it’s done this way, your rim is perfectly airtight.

The second issue here are tyres.

TCS rims (including ChrisCross rims) are designed to be used tubeless with TCS or UST certified tyres, or with ETRTO/ISO certified tyres, but with tube. The main reason is, that TCS and UST standards has much tighter tolerances to guarantee perfect tyre/rim fit. By converting ISO/ETRTO standardized tyres to the tubeless you are risking that the tyre can burp of the rim (ETRTO/ISO standardized tyres have slightly bigger bead diameter and also different bead shape), which can cause serious injury as you pointed below.

You are using standard, tube type kevlar bead Vittoria tyres, which were not designed for Tubeless usage, but for tube usage. They might work with Stan’s rims, due to bigger diameter of the Stan’s rims, but it’s not guaranteed.

Simply put: Stan’s rims have a larger D1 dimension than allowed under ETRTO (which uses the UST dimension standards for tubeless, and which dimensions are in ETRTO). They use larger D1 diameter, as they wanted to allow to fit standard tube type kevlar bead tyres.

I’m sure this information will help you to get familiar with TCS or UST products. You are using very high end components on your bike, it would be a shame to return to the tubes (please just make sure your tyres are marked by TCS or UST logo). I understand your doubts, especially when your “tubeless’ start was that bad, but It seriously reduces the risk of puncture and flatting, when it’s used properly.

ME:

I didn’t have any problem getting the tape to seal. 0.5mm either side with something like 180 micron tape, double layered is really only the thickness of the tape over the recommended width. I think my issue with leaking was around the valve. I bought a pair of Roval valves, which are more similar to UST valves in shape, but got the wheels to seal well enough before I fitted them.

What you are suggesting about the rim’s bead seat diameter is plausible, however:

A: it is relatively standard practice to “ghetto” tubeless on mountain bikes, either using non-tubeless tyres on tubeless rims, or even non-tubeless rims and tyres. I’ve heard of burping, but never heard a report of a tyre fully blowing off a rim without a loss of pressure beforehand.

B: WTB rims come with no instructions, no warnings, no assembly guides, and there is no online help. This suggests that they have no limitations or compatibility issues.

C: TCS is a WTB specific system, and has a limited range mostly of MTB tyres. No supple road or touring tyre.

D: UST is a system that Mavic designed for MTB, and as such there are only a few tyres designed for the system, as far as I am aware they are all MTB tyres too.

So as a cyclocross/touring rim, I would expect the ChrisCross i19 to be compatible with any tyre that any other rim is comfortable with. The general understanding amongst the mechanics I work with is that Tubeless Ready tyres are more airtight and have a smoother bead, but otherwise are the same as their non-tubeless cousins, and therefore only a luxury, not a necessity.

If the tyres are indeed the reason for our problem, then I feel that the rims should have come with a clear warning that it is not recommended they be used tubeless with non UST/TCS tyres at risk of them causing danger and injury. This warning would have to be both on the rim and the website, as a pre-sales warning.

WTB:

Vittoria Voyager Hyper is not a tubeless tyre and should not be run that way on any TCS or UST rim. WTB does have the Exposure 30 and 34 tyres if you wish to run tubeless. Problem with non-TCS or non-UST tyres is that the beads are almost always too large in diameter. To add to the effect when running fully loaded bike on long descent you generate a tremendous amount of heat the rim that can cause an oversized tyre to blow off the rim.

This “ghetto” tubeless practice is wrong and very dangerous as you could see. Assuming that every non-standard part one puts on his bike and it will work perfectly is potentially going to get hurt him.

Following international standards is the only right way to guarantee the safety.

Tobias, all user manuals are here: http://www.wtb.com/pages/resources, including the info about Tube Type rims and TCS rims.

I’m just trying to show you, that we at WTB do whatever we can to keep our riders safe and the only way to do it is to follow standards, not just say it’s “tubeless ready” with no certain diameters and tolerances.

ME:

I understand your point of view, but I am sure you are aware of a plethora of guides from established and respected sources recommending tubeless setup with non-tubeless parts… for example https://youtu.be/mH1O2W7E_wQ

I still feel that the WTB site should have a very visible warning stating that the rims should not be used with non TCS or UST tyres. I have previously searched at length to find thais guide https://cdn.shopify.com/s/files/1/0202/9884/files/TCS_WTB_Rim_Users_Manual.pdf?842393167070827044

and even now that I have it, finding the relevant part of the text is not straightforward. I don’t think it clearly condemns the use of non TCS/UST tyres. It does mention the need for accurate spoke tension, but does not provide a guide chart. Before building I did attempt to find tension guides, and tried to contact WTB for this.

I understand that WTB tries to do what you can to keep riders safe, but when the site does not easily provide warnings, and parts don’t come with warnings before mechanics build, riders will probably be unaware that they are doing anything risky.

WTB:

Tobias, well, yes, there’s tons of videos or manuals, how to convert tube type rims to tubeless, but it does not mean it’s right. Tube type rims has different rim well profile, usually completely miss bead locks, so yes, there are ways how to convert that, but it’s wrong. As well as tube type rims are not designed for tubeless use, as we discussed previously.

Brands should follow international standards, that’s the only way how to guarantee perfect compatibility. Without that, you never know the diameters, tolerances, basically nothing. Unfortunately, not everybody does that. We do. So perhaps your question could be addressed to Vittoria too, why they do not put warnings on their tyres, that tube type should not be used tubeless.

Tobias, I do not want to sound bad, we have it very clear in the manuals, but we are also listening you, I agree with you we could make it more visible and easier to find. We’ll work on this with our marketing team and probably list this info next to each rim, not only to the resources section.


Conclusion:

Long gone is the time when the customer was always right.

Evidence would suggest that the tubeless trend is still not market-ready. Similarly to how tubular tyres may only be suitable for professional use (with tubs glued by experienced mechanics, not by me, not taped as they can apparently roll off a rim), tubeless appears to be a mixture of prayer and jerry-rigging.

I was hoping that—as a respectable American company—WTB would offer replacement rims since I still consider the danger and error to be their responsibility. Sadly however I was offered a series of explanations which are easily interpreted as accusations and excuses.

I spent several hours looking for the manuals on the WTB site. I am not joking. I could not find them at the time, through Google nor link clicking on the site.

In principle, tubeless tyres are the way forward. In practice I am still extremely skeptical. A friend and fellow mechanic had his road-tubeless tyre blow off a Stan’s rim shortly after my experience, and he was using Stan’s tape and a tubeless road tyre. Some people don’t have issues, but sadly I think these people are just lucky.

Furthering my stance, videos on tubeless conversion from

Park Tool https://youtu.be/MuEiBSAKWLI

MBR magazine https://youtu.be/mH1O2W7E_wQ

Glory Cycles https://youtu.be/-AqDCaHKTeQ

In fact, the only video or set of instructions which suggests strict compatibility is Hutchinson https://youtu.be/mBa88zZossE

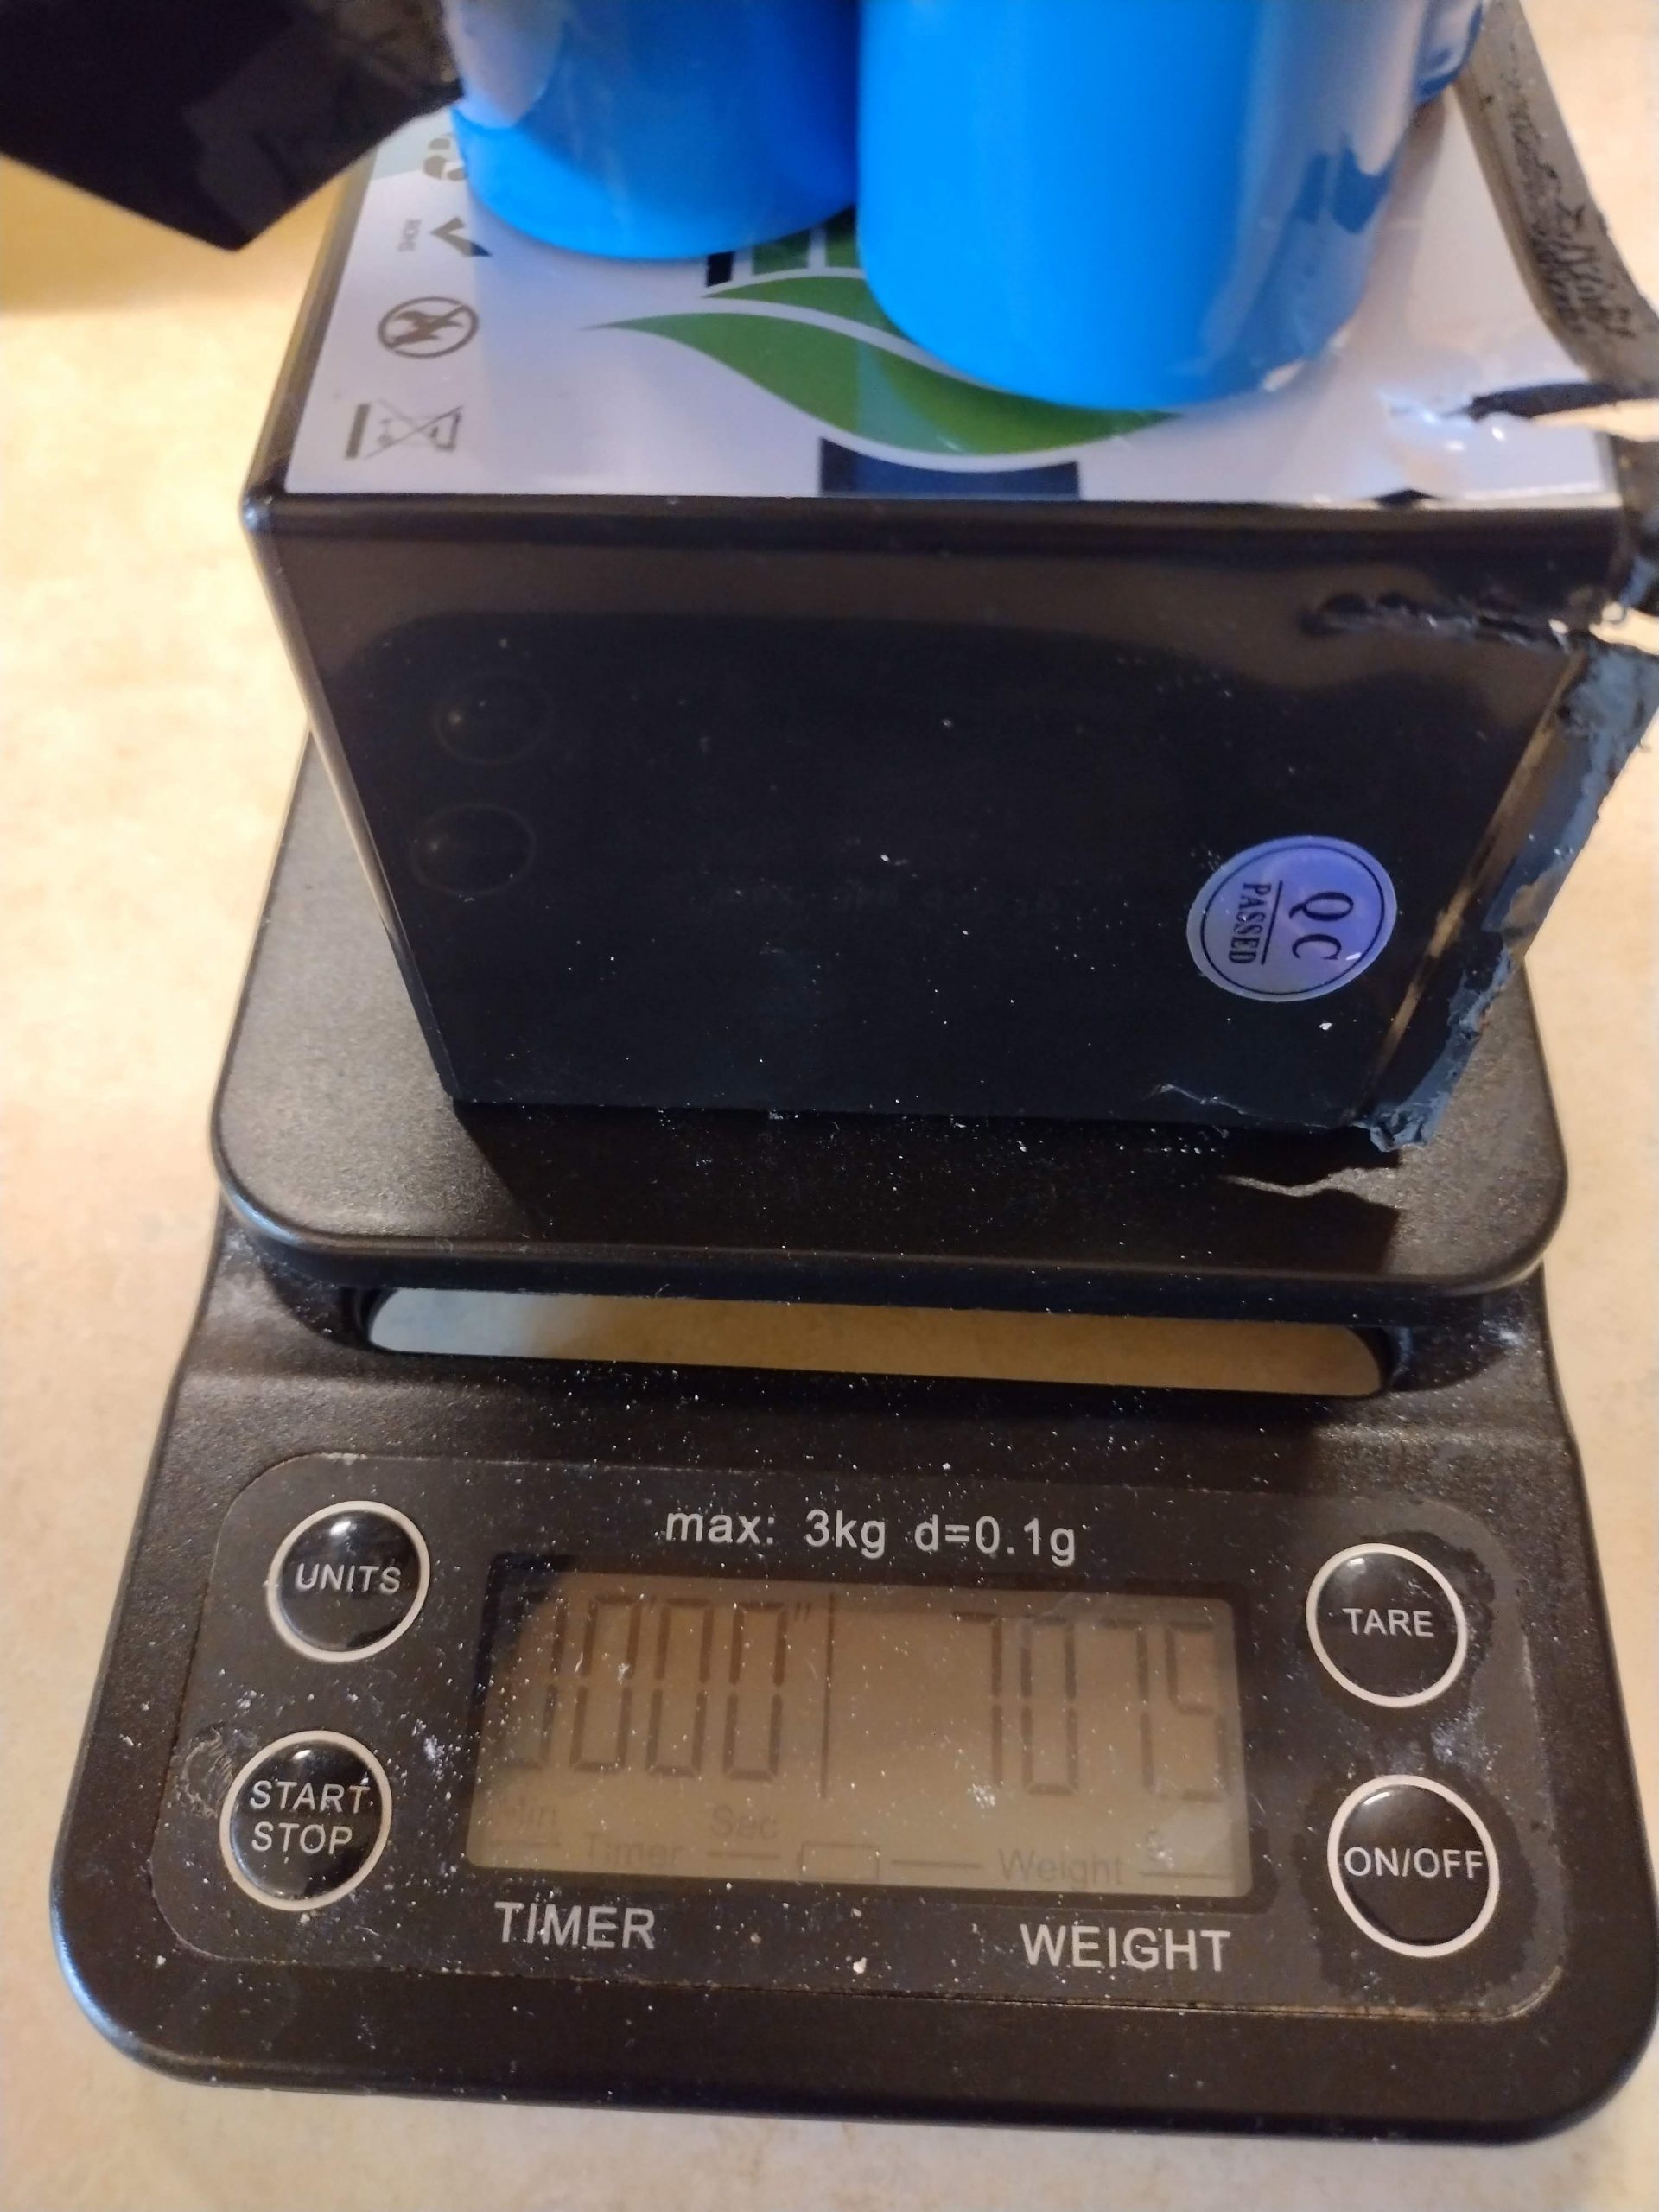
Tobias Feltus:
Share

New work – Illustrating Dr Bike

#drbike

Dr Bike online media 2016

In 2015 I embarked on a project at The Bike Station, to create an extension of Dr Bike, attempting to empower the general public and demystify the technicality of bicycle maintenance. Sound familiar? Demystification is something I have been into for a while, though I hadn’t really taken it into the realm of infographics before. The 2015 media was printed as 3 distinct Z-Cards which worked well, but lacked the media push to make them truly public.

This year we decided to revamp the Z-Cards adding a fourth, for symmetry. Professor Chris Oliver, Scotland’s premier hand surgeon and epic ambassador supreme of cycling social media and the link between science, medicine, politics and enjoyment, offered his support in writing material for the 4th pamphlet, in exchange for being able to share the media with his 17.3k Twitter followers. A pretty good deal all round.

Downloadable versions of the printed material are here: drbike1 drbike2 drbike3 drbike4 And on The Bike Station’s website. The printed material will be available from The Bike Station’s 15th birthday (and having recycled over 50 000 bikes), this coming Saturday 22/10/16.

Breaking these into around 40 Twitter friendly infographics has opened the possibility for the media to be expanded gradually, and my next additions will add a series on “family friendly” cycling – trainers vs balance bike, kid’s seats, trailers etc… And addressing different aspects of comfort on the bike, possibly with some tips from Douglas Shaw at Edinburgh Bike Fitting. Saddles, their differences and their comfort. Underlying physical imbalances. Ape-factor (relationship between upper body and lower body length) and how this can often leave you with a bike that is too big… I think there is a lot that can be put into writing and shared with #DrBike which will help people understand things that will help improve their experience of cycling and – in the long run – bring more active business to the industry.

Tobias Feltus:
Share

Where I am, or where I may be. Nothing artistic is explicit.

I’ve been thinking about why I have not been taking many pictures. I’ve been thinking about it for a couple of years, and I’ve been not taking many pictures for more than a couple of years. I worry that I will lose skill, and by skill I mean familiarity with equipment and fluidity of technique, and yet this worry is not working as an impetus to shoot more. And now, with the imminent relocation to Tempe (USA), I do also need to think about what equipment I may need, what I should take with me.

Today, after work, I was tending to some maintenance and thinking. Something earlier triggered a memory.

In 2012 I went to see a performance with Poppy and Maïté, Songs of Lear by Song of the Goat Theatre at Summerhall. The performance destroyed me! It took me through all emotions, leaving me in tears after having fallen in love and lost everything during the performance. I think I went back two more times, and told all my friends to go, none of whom ever commented. I went through the same experience each time, being dragged through emotions, leaving in tatters. I concluded that everything I did was devoid of meaning, because I could never evoke that kind of emotion in anyone. Nothing I could do would ever have that kind of power.

Shortly after that experience I went on to do my residency at Soup Lab, and produced Tray – an emotionally challenging residency, working on a narrative I had been wanting to develop for years (Struwwelpeter), which became quite a dark series, bordering on deep self-mockery.

Two years later Song of the Goat returned to Edinburgh with Return to the Voice. Naturally I had to go, and take Lauren. The performance was in St Giles Cathedral, I was excited and apprehensive. What I experienced was what I’m used to: I was not moved nor transported. It was a decent piece of method acting mixed with music. And as that it is reasonably unique, as I have never seen another production company which uses method acting in musical theatre. But there was nothing more. I had no emotional response. Another of Grzegorz Bral’s creations, and Monika Dryl was just a proficient performer. I didn’t fall in love. I didn’t cry.

And now I realise that the greatness I’d felt two years previous was tied directly to my emotional state. Yes it was a good piece of theatre, but feeling that nothing I could ever do can rival something that—in a different frame of mind—is nothing incredible, may actually be the reason why I have not been taking many photographs. Nothing artistic is explicit.

Tobias Feltus:
Share

Review: Alpkit Kowari

Going out on a long road ride is exceedingly good fun. Pedalling at pleasurable speeds is infinitely easier than it would be on a touring bike, however the touring bike does offer the convenience of being able to carry anything you might ever need on that day-ride (and no, a backpack is not an option for me, if it can be avoided). The usual solution to the problem is to use a small saddle bag to carry tools and emergency supplies, and to shove some food and spare clothing into your jersey pockets.

I went out for a lovely “two bridges” loop yesterday (100km, over the Forth Road Bridge and the Kinkardine Bridge, via the Kelpies, Bo’Ness and back) with almost empty jersey pockets. I managed to fit my rain jacket, tools, charger, a spare tube, a giant sandwich, some munchies and I even added a pack of wet wipes to it before leaving. The Alpkit Kowari is indeed the perfect size for day rides, and its made in the UK!

Emperor Sport

Emperor Sport

My only criticism is that the main strap, which wraps around it holding the bag onto the saddle rails, is a bit shorter than I’d like, making it very hard to fit the bag to the bike after its been packed. Apart from that, my stuff stayed dry, and the bag did not flap nor rattle, and certainly didn’t fall off. Thankfully I didn’t need any of the emergency supplies either.

Tobias Feltus:
Share

Review: Morgaw Forsage saddle.

Forsage
I don’t remember how I came across the Indiegogo campaign, but it excited me and unlike all the other fundraisers I’d seen. I got my wallet out. I received the saddle almost a year ago and, for one or another reason, never got round to testing it before yesterday.

The design appeals to my ethics of trying to keep things as simple as possible. It is minimalist in its engineering and its aesthetic. The thought that went into solving an issue was concise and the solution is simple. We are beginning to see more of this cottage-industry lead by users (Morgaw was started by retired professional riders), but usually this leads to goods which are not refined because they are not developed within a network of people who know what they are doing.

What makes Morgaw saddles different is the fact that they have an elastomer link between the rails and the shell, and that this elastomer block can be changed to suit rider weight. The shell is relatively ordinary, with a moulded fibre reinforced plastic shell and an in-mould bonded pad/cover. The elastomer blocks are bolted onto the base, and the interchangeable rails then bolt into the blocks. I have the aluminium rails (the carbon ones cost a little more), which make for a 200g saddle. Unlike many saddles, the rails sit perfectly horizontal with the top of the shell, which is something I rather like from an aesthetic standpoint. In fact, the whole stack height of the saddle is around 45mm, which is slimmer than most.

Forsage

There are a couple of potential issues: the oval rails mean that you probably can’t mount a Morgaw saddle on a seatpost which has side clamps, like those on Trek/Bontrager posts. During the Indiegogo campaign Morgaw was offering a seat post which did have side clamps designed for these rails and may have been compatible with other posts, however they are not currently offering these (and changing clamps would only be necessary on a bike which has a proprietary post, like many carbon offerings). The other issue is partly why I waited so long to test the saddle: the rails don’t accept the mounts for Ortlieb nor Rixen & Kaul equipped saddle bags, which meant that I didn’t want to take it on a long ride (almost no space between the rails and the shell). I was given an Alpkit Kowari for my birthday which uses straps rather than a clip, so I was able to take it out.

Forsage

I took it for a 5h (100km) ride with 700m of ascent, on my newly built 1977 (steel of course) Emperor Sport, fitted with 25c Continental Gatorskins at around 80psi. The ride was mostly on tarmac with many rough sections, but also included a reasonable amount of gravel and mud. My bum didn’t hurt in the slightest, and I was pleased to find the ride to be very compliant. The non-scientific nature of my test is highlighted by the fact that it was the maiden ride of the entire build, so my first time on the frame, and my first time on the Felt UH Carbon seat post.

The saddle is comfortable. The shape seems to fit similarly to a Fizik Arione, despite being wider and flatter. The flatness did worry me as I really didn’t get along well with a Bontrager Paradigm RL that I’d bought last summer, which seemed to have a less of a curve to it than the Arione. The shape of the nose on the Forsage does allow for a lot of fore/aft movement, which meant that I was able to comfortably slide forward and tuck in whilst trying to keep up with traffic on the A904, without feeling any discomfort.

Emperor Sport

Emperor Sport

The current price point of the Morgaw range (around £100) puts it in an area full of high end competition, though the competition which I find as exciting from a design and innovation perspective are the Brooks C17 and Fabric ALM, both of which cost roughly twice as much. I am glad that I supported Morgaw’s entry to the market (they are distributed in the UK by Ison), and thrilled that the saddle stands up to my hopes and expectations.

Tobias Feltus:
Share

The Program.

I don’t actually watch feature films that often. I seem to be hypercritical to the point that my suspension of disbelief can be thrown by a minor detail, and the film can loose me in an instant. But thanks to BA’s inflight entertainment, I chose to watch Mr Sherlock (pity, pity they couldn’t be bothered to get a script written, nor have a photograph made which looked vaguely authentic, when so much work went into the rest of the film. Spoilt by two rather important ‘features’), and Frears’ The Program.

Last year The Program (2015) was released, and I don’t recall hearing much of it. Frears was—I had thought—a respected director. My first perplexity was with the American spelling of the title of a British film, but I know, that is just one of my pedantic pet hates.

Frears would have been aware that in making a film about a hugely controversial person of recent history, who is the subject of many articles, books and documentaries, his own creation would be under strict scrutiny. He chose not to take the creative license of fully fictionalising the story ‘loosely based on the life of Lance Armstrong’, but rather went down the route of the docudrama.

My opinion of the film is that the writing is very poor, making the narrative feel rushed and compressed. It would have been more interesting to focus on a part of Armstrong’s life or career, and build characters well enough that some empathetic connection could be made: this seems to be a common shortcoming, as though it were impossible to direct the empathy of a viewer within a non-fiction narrative. Nonsense. Cinematography was half decent–the race footage was well crafted, though the use of two ‘artsy’ shots seemed out of place (one close wide-angle shot of the journalist under fire, one sunset backlit shot of Lance). Production design was very poor, with many inaccuracies which were clearly going to be shat on by the cycling community. Sound design was—let’s say—creative.

Three particulars which stood out for me were:

In the opening shot—an artsy slow-mo of Lance cycling up a hill—the chain noises were oddly in your face, synthetic and totally uncharacteristic of a racing bike. Lance was famed for his cadence and fluid pedal stroke, not a slow clickety-woosh, clickety-woosh. these sound effects were used consistently through the film, which could be viewed as a good or a bad thing.

So Lance gets cancer, then he pesters Dr Ferrari into making him a winning cyclist. I have no idea why everyone insisted on his name being Michela Ferrara. These scenes presented a shocking historical inaccuracy, as Lance was pedalling on a turbo trainer with Ferrari talking about what they would do: the bike on the turbo was shown clearly to have a Hollowtech II bottom bracket (detail shot), which Shimano launched in 2003, this scene would have happened around 1997-1998. The film chose to focus on Ferrari’s use of drugs to cheat a performance increase when he also found that Armstrong’s loss in muscle mass could be compensated for by using an increased cadence. Thanks to Ferrari’s insight, Armstrong was the first cyclist in the professional peloton to use a high cadence (over 90rpm) which is today’s norm. They did briefly touch upon USPS’ revolutionary team tactics (also standard today), but chose to leave these two important details in the shadows, rather than focusing on them, which could have been interesting.

An editing mistake which would have thrown anyone of a non-mechanical persuasion was the springboard of Armstrong’s first post-Ferrari stage win: he’s at the back of the peloton with the team car: the mechanic reaches round and (detail shot) tweaks the cable pull on his rear-mech, which then catapults Armstrong’s performance past everyone to the win. Really?

The film left me feeling much the same as I felt after seeing 127 Hours (2010): baffled by the lack of character development, and disappointed that the film didn’t even try to suspend my disbelief.

Tobias Feltus:
Share

Mechanical “doping”. Yea.

The new ‘thing’ that the UCI is into is ‘mechanical doping’. The term ‘doping’ is clearly used in the same fashion that one can be a ‘chocoholic’.  Let’s assume this part of the recent story is humorous.

The past couple of weeks have brought us rumours of the UCI having discovered the first electrically enhanced bicycle at a cyclocross race, and then videos of officials ‘scanning’ a bicycle with a tablet computer have also appeared. Now, the facts are few: all that we really know is that the UCI may have lost the most important races of the season from ASO, the body who owns the Tour de France and some of the other pivotal road cycling events on the calendar. This may call for some PR stunts, might it not?

Firstly, detection of large batteries, motors and planetary gear systems in a plastic bicycle would be easily accomplished with a DIY shop stud finder like THIS one for £40. Also, road race bikes weigh between 6.8kg and 7.5kg: so if a rider turned up to a race with a bike that weighed 7.8kg, this would be silly. If a rider turned up with a bike that weighed 8.5kg you would have to wonder what was going on. I mean, high end steel bikes in the 1980s weighed less than 8kgs, so using scales would also be a fast way of detecting a suspicious bicycle at a race. Understand, UCI?

Back to the alleged ‘doping’. THIS is the video in question, which seems to provide the speculation on Fabian Cancellara.

Going back to the weight, the motor unit and its battery (VIVAX) weighs “just” 1.8kg, which is light for an e-bike system, but would put most racing bikes over 8kg. If you read BikeRadar’s review of the Gruber system, they also mention how noisy it is, so there is a good likelihood that another rider would hear the motor. Carbon bikes sound like a bit of paper being flapped, and don’t produce a high-pitch whine.

If it weren’t for the BikeRadar article, I speculated that these units may not actually exist. Most of the images available online are not of photographic origin, suggesting they may be non-existent prototypes. Might I also add that the BikeRadar article does say that it cannot be installed in a carbon frame. I shall get to this later.

I don’t think the videos show anything erratic in sufficient clarity with regards to Cancellara’s hand movements, which the narrator is suggesting implicate that he is pressing a button to activate the motor. The video is of sub-PAL resolution. What the video does show with reasonable clarity is that Cancellara’s body movement does not change from the way he was pedalling previously: in the second clip (5:20) on the cobbles in Flanders he is bobbing quite a lot, suggesting he is fatigued but pushing. When he shifts gear he increases cadence, and moves forward. I think that if you had an additional 200w (the rumoured advantage of these systems) he would stop bobbing and take a more composed pedal stroke, and also drop gears to slow his cadence.

A historical point is that EPO allegedly gave riders 1% increase in endurance (a figure I recall from some documentary, though this article is suggesting much more), which over a 4 hour race could be significant. Both Pantani and Armstrong would take off like Cancellara in those videos, and we know that taking off in that way is not 1%, but rather something like 40% for a minute or two. So that kind of acceleration should be within the human athletic ability, and not made possible by blood transfusion or taking drugs.

Back to the motors, I am also curious about the structure of these things. The BikeRadar article suggests that the seat-tube motors can’t be installed in carbon frames, and I can assume that this is because they do not have smooth tubular interiors. The motor is held in by two 4mm bolts, screwed in from either side of the frame. So these are visible fixings (UCI?). Also, for that gear to not slip, the whole motor shaft would need to be held rock solid in relation to the bottom bracket spindle: holding it by two bolts would mean that it would tend to flip fore/aft. I would suggest that to be functional these motors would need to be fixed solidly to the frame within the bottom bracket shell. The lack of actual photographs of these drive systems suggests, to me, that they are a conceptual prototype and don’t actually exist. But this is also speculative and contradicted by the BikeRadar article. Also, most of the images of the motors show oddly angled gears which—to my understanding—would tend to push the motor up, and possibly slip, rather than pulling it in to keep it from slipping.

My conclusion is that I am extremely skeptical. I think there is a high probability that the UCI is trying to gain ‘good’ PR in light of the quarrels with ASO. I think the motors would be too noisy to ride in a group without competitors being aware of them. I think that the weight of 1.8kg is pretty high, and am doubtful that it could actually deliver sufficient power to make this weight increase viable in the hands of the cycling elite. I am skeptical that these motor systems work as they claim, as the fixing system looks delicate and subject to engagement issues, especially within the large, boxy, tapered tubes of Cancellara’s Specialized bike. And finally, I don’t think Fabian Cancellara would actually take this kind of a risk. Not that I am a fan, nor foe, but I just don’t see it within him.


Tobias Feltus:
Share

Testing shutters speeds with a dSLR

I’ve been using a method for testing shutter speeds is with a dSLR. This method only really works with really big shutters like the focal plane units in Graflex cameras. Extend the bellows (flip up the mirror if it’s an RB), take off the lens and any film back. stick your dslr on a tripod with its lens inside the bellows in the place of the lens board.

Point this assembly at something, turn off the lights and light that something and focus on it through the dSLR. Adjust your aperture on the dSLR to reflect the shutter speed that you are trying to test, and take a test shot with that speed on the dSLR. Then turn the dSLR’s shutter to 1″ and wind the Graflex’s shutter to that speed. Open shutter, fire Graflex’s shutter. Then compare.

I’ve found this method to be much easier than measuring an impulse and trying to compare microseconds to specific fractions of a second. On the dSLR you can look at a histogram approximate a percentage diffence in exposure. 10-20% is acceptable with black and white film.

Tobias Feltus:
Share

The Long Now and Close to Here…

I am having a show. New work loosely inspired by Star Wars, Cameo Cafe (Edinburgh), 6/12/15 to 16/01/16. The show is supported by New55.

I realise that my work is a study in calculated risks.

Following a theme and working to a deadline, shooting half the images outdoors in a particularly melancholy SCOTTISH AUTUMN, and choosing to work with 25 year old film, prototype New55, and WWII cameras and lenses has made this particularly obvious. And yet I always give myself handicaps. This is my way of making my work easier for myself. I am a perfectionist at heart, but find that the only way I can work freely is by working around issues and clawing back at chaos until I am satisfied that something is acceptable.

I love the fact that photography lets me touch upon the abstract with a means that can only mechanically reproduce a concrete reality. This is partly why I work with CHEMICAL rather than digital tools, as there are fewer opportunities to break the path of realism between subject and image. I choose to work with 4×5″ film and BIG BRIGHT LENSES because they are better at describing fiction than current designs, which are almost exclusively sold on the basis of sharpness and resolution. I had ten shots of New55 to produce eight images. I have one shot left.

I’ve been working with myself as my main subject for 20 years. This started due to availability of the model, and I have become interested in exploring my EGO AND INSECURITIES through the interpretation of abstract characters. This—in turn—feeds back as an excuse/motivation/inspiration to continue to produce work.

The long now and close to here… is loosely inspired by StarWars, seeking alien lands and faces within our nearby surroundings, and making FAMILIAR CHARACTERS out of close friends.

Notes:

I chose to shoot the landscapes on rolls of FP4 220, forgetting they are about 25 years old. The developer I’ve been using for the past few months is a bottle of Rodinal that’s been precipitating its Hydroquinone. I’m working mostly with a Graflex Speed Graphic and a Sinar Zoom back to shoot the 6x12cm landscapes, and I had packed a Kodak Aero Ektar, Zeiss Tessar 165/2.7 and a Dallmeyer 12”/4.5 Telephoto in my backpack.

A compact 35mm camera would have given me all the resolution I need, but the relationship of scale between subject and film makes a big difference to the perspective of an image: my head is about twice the height of a sheet of (4×5”) film, yet around seven times the height of a 35mm negative. Most digital cameras have far smaller sensors than the 35mm format. My old lenses are generally uncoated, which means that they don’t have treatments that limit reflections between the glass elements inside the lens. Modern lens coatings increase fine detail and line-sharpness, which is not particularly useful when I am trying to persuade you that a grassy hill is a desert landscape. There is also the matter of depth of field, and the quality of things which are outside of it and out of focus. This is commonly referred to as bokeh. The Aero Ektar was designed for aerial reconnaissance in WWII, so it was designed to photograph a flat plane focussed at infinity. When I use it for a portrait, its depth of field is so shallow that it is often hard to get a whole face in focus, which means that my painted backdrop and a single houseplant can make a convincing forest on Endor.

You may wonder why I wouldn’t just do it in post. Working with digital image processing may offer many possibilities, but none of them are risks. Manipulating an image leaves little to chance, and little chance of something unexpected happening. You pretty much need to have a clear and literal vision of how something will look before starting. I simply don’t have the time nor the mental clarity to work this way. With too many options and iterations, I struggle to declare something finished.

I haven’t worked with New55 since before the Kickstarter campaign was funded. Though I was intimately involved in the early stages of the research to produce the film, it has been an entirely new experience to just open a box, load film, and have a print and negative in a handful of minutes. This was our goal, and it is magic. I had ten shots of New55 and needed to make eight portraits for the show. I have one left. It reminds me of when I saw Andrzej Zulawski talk about the making of The Third Part of the Night [1971] here at the Cameo, and how he had to write ‘one take’ and ‘faster’ on each hand to make sure he could shoot the film.

I shot the Aberlady XT Class subs with a WWII German lens, though an American camera, onto British film.

This show is supported by New55 (www.new55.net)
and the Cameo Cinema, Edinburgh (@CameoCinema).

Tobias Feltus:
Share

Poppy and Ainslie

A while ago, as in a few years ago, I leant Ainslie a box of pocket watch parts which I had bought from Now and Then. A couple of years ago I gave him a light box. I haven’t seen Poppy in ages.

https://youtu.be/WoHbJj0_klw

I love how Ainslie’s work keeps leaning towards showing the process as a fundamental part of the visual.

Tobias Feltus:
Share

BAFTA

A few of you may know that I was the Production Designer on the 3rd series of the Ooglies, produced by Ko Lik Films for CBBC. Last night Ooglies won the BAFTA, which is fab, amazing, epic and swiiit!

If you are in the UK then you can watch Ooglies BBC iPlayer.

Ooglies BAFTA

Tobias Feltus:
Share

SHOTS 129

It’s always exciting to hear the post come through the door, and to find that I am in print, especially when it is such a fine publication as Shots magazine. The image was my homage to Neil Armstrong, shot on an SX-70 and Impossible Project’s Silver Shade (poor pod batch). As ever, Shots is a boost of inspiration, reminding me that I need to shoot more.

Shots 129

Shots Magazine issue 129

Tobias Feltus:
Share

The burning question: Can I use a Shimano road Bottom Bracket on a MTB?

Well, it was a burning question because I realised that my mountainbike’s bottom bracket had seized and I didn’t have a spare. Yes, I could have purchased a new one, but I had two perfectly good part-used road ones sitting on a shelf.

MTB vs Road Bottom Brackets

I had found some speculation on forums, and some disagreement about measurements. So I used my Vernier to measure the parts of an SLX vs a 105 Shimano Hollowtech II bottom bracket. What I knew was that the plastic internal dust-spacer was longer on the MTB one, and what I confirmed was that the Road bottom bracket has slightly wider cups. I have no idea why, to be honest. I would imagine that the bearings are identical, and according to common belief, the MTB units have “better” dust seals.

MTB vs Road Bottom Brackets

So this is the result of my measurements. My Genesis Altitude 10 has a 70mm BB shell, and BSA threaded road bikes have 68mm BB shells. So I was easily able to fit the Shimano 105 cups with the MTB dust-spacer on my Altitude – with the SLX BB I had one shell spacer driveside, with the road cups I have no shell spacer.

Interestingly this also means that if you were to have chainline issues on a road bike, you could use a MTB bottom bracket (cups, with a road dust spacer) and then be able to use 1mm worth of shell spacers to move the chainline by a smidgeon.

Secondly, this is interesting because CRC currently sells the XTR BB93 for £25.50 and the Dura Ace 9000 BB for £21 and – assuming they are pretty much identical – this offers some price and fitting leeway for affordable top-end components.

Original post 11/04/2015

A mini update on 20/5/2020, my colleague Ben successfully installed a Shimano MTB crankset on a frame with a 72mm BB shell using a Shimano road BB. This updates compatibility showing that there is leeway for at least 2mm within the (now older) Shimano BB/crank design.

Tobias Feltus:
Share

Langdon Quin

Langdon Quin

I took the portrait a few years ago now, so I can enjoy being a little bit removed from one of my images, and enjoy it serving its purpose.

Langdon has been a family friend since the beginning of time. I am told that his kids have like grown up and stuff, and are even tall and getting married, though I do find this hard to believe, as I’ve not seen them since they were probably about 10. But then again, Langdon has known me since I was probably about 10.

Technically, I don’t remember much about the shoot. Natural light, and shot on a Rolleicord. It is simply catalogued as part of my Portraits of Artists project.

The image is posted as part of this interview HERE.

Tobias Feltus:
Share

Black Forest

Last year I had the privilege of being published in a beautiful hardcover compiled by Russell Joslin and published by Candela Books: BLACK FOREST. The volume is one of the most beautiful books I own, and I am in it, along with friends like Ellen Rogers and artists who were among my early heroes like Witkin and Arno Rafael Minkkinen.

2015-01-21 09.51.132015-01-21 09.52.41

Tobias Feltus:
Share

Il Corpo Solitario

2014 was a good year for my bibliography. The first book to hit a shelf in Italy was Il Corpo Solitario: l’Autoscatto nella Fotografia Contemporanea (The Solitary Body: Self-portraiture in Contemporary Photography) written by Giorgio Bonomi, published by Rubbettino Editore. Here I’m represented as FeltusFeltus, and on the same page as Pierre et Gilles.

“Another couple of artists who work as four hands are the FeltusFeltus brothers. More than together they appear alone, alternating their roles behind and in front of the camera. They enjoy creating environments of a historical nature, as though taken from cult-films, and always with a refined and classic elegance.”

2015-01-21 09.48.362015-01-21 09.50.48

Tobias Feltus:
Share

Form or function.

A couple of weeks ago I was talking to Ross Hogg about the BAFTAs which Monkey Love Experiments had just lost. The conversation steered towards what is in essence the same discussion that architects and furniture designers often debate: whether form should religiously follow function or material attributes. Talking about a film the discussion becomes whether the technique chosen should complement the narrative (or the narrative influence the technique), or whether – as an animator – you just use your technique to tell any given story.

Ross’ work is very textural, and his approach is to start with a story, and then find the textures and techniques which will work to help the story to thrive. This allows his work to have a very intimate feel to it, even if the story is not personal. The thing that was amusing in our conversation was that he saw this as being the best approach, whereas I don’t see any problem with adapting a story to fit a technique. Problems arise when technique and product don’t have any logical link and – in fact – it would be more practical to make the product in a different way altogether. I think that Monkey Love Experiments is a good example of how techniques can be mixed to tell a story in a hyperreal manner. We were able to manipulate physical space through photography and editing, use live-action to tie the space and narrative down to known reality, and insert stop-motion animation into this setting, making Gandhi very alive.

In design, a good example of the marriage between form and function is what happened in the Bauhaus era with an example like Breuer’s B34 chair, a structure that could not have been made before the development of tubular steel and which expresses the material without any embellishment. Conversely unconnected designs are represented by most of what surrounds us today, as most products are decorative boxes styled by zeitgeist-trends to sell technology which an accountant and marketing manager have decided is what we are to be rationed, rather than what industry is capable of. Often what we think of as ‘good design’ today is something that is aesthetically neutral. Though Jonathan Ive’s Apple products look at home in Tadao Ando’s architecture, there is something infinitely more honest about making a statement with materials as the fabric of the design of a building. The design of electronic devices is ethically no different no steampunk styling.

I do get excited by hybrid workflows when they do add to what you are able to achieve. Around a year ago I commissioned Jared to make Lauren’s engagement ring: I knew he was the right person to take on the job because of his background working both with fine jewellery and with the machine-shop end of piercing jewellery. This was pertinent because the ring in question is a palladium cast of a cable-tie (or zip-tie) set with a diamond. It so happened that we were visiting his workshop when he was starting to experiment with an interesting workflow. He’d been commissioned to make a rather large ring, and had started building it in silver using traditional techniques, chasing, piercing and brazing from sheet material. But he was also experimenting with the jewellery package in Rhino 3d, and subsequently he had the ring ‘printed’ from wax: he was able to optimise the material thickness much more delicately than he had been able to in the traditionally made ring, which was exquisite when investment-cast: a technique that is more than 5000 years old. I think this is the first time that I have seen stereolithography (3d printing) used effectively as part of a process, rather than being used for the sake of its existence.

I have been asked if I had ever used stereolithography in any of my work, and I haven’t mainly because I have not seen a need for it, or a need that exceeded the tedium of creating a 3d model and getting the print made. Joseph and I had looked into it back in 2005 when we were working on Solo Duets, but found it to be more efficient to sculpt a portrait. Basically we wanted the puppet to be a portrait of Joseph, but at 1:6 scale. We’d even had a 3d mesh made of his face using what we were able to access, but I ended up just spending a couple of evenings sculpting a bit of clay, as computers of the era didn’t seem capable of handling the 6 million floating point mesh that we had of Joseph’s face, and we’d already wasted weeks on this approach. Materialise had been available as a stereolithographic facility for years, but for what we needed oldschool techniques were faster and probably offered finer detail. I didn’t understand at the time, however, why figurines from games (or films) like Final Fantasy and Toy Story weren’t printed directly from the models used to make the films, but rather seemed to be interpreted by sculptors and rarely looked like the film characters.

I seem to have ended up on a tangent involving animation and stereolithography. I would be curious to see the process used within filmmaking, but it would have to become a completely inherent part of the process. Most of the time you start with hand drawings or sculptures to develop a 3d model anyway, and this is why I don’t often see a point in making a 3d model in order to create a sculpture unless there were another reason to have the 3d model in its own right. For example it might be an interesting addition to the workflow of making a film to use Machinima as a storyboarding technique, with the intent of then printing puppets and using stop-motion to produce the final product. The occasionally arbitrary aspects of Machinima could add an interesting layer, either helping to homogenise conflict of opinion, or even helping work out the timing of movement, since the gaming engines all have physics of movement already built into them.

In conclusion, there never is an absolute right or wrong, but as I wrote yesterday it is often worth thinking about why you might chose to do something one or another way, and be ready to explain it. Most often it is good practice to chose to do something in a logical and complementing manner – and often the simplest approach will be the most rewarding. Occasionally it is worth looking at an approach that is a bit awkward but that will add an interesting quality to that which you are doing. Unless you are at the forefront of something completely outrageous like Memphis, it is rarely worth spending time on something which is destined to become outdated at short notice, unless you are comfortable adapting ahead of the trends you might be contributing to.

Tobias Feltus:
Share

Constructive Criticism and the path to being able to deal with stuff.

I’ve been banging on about how my Master’s ruined my career as a designer ever since I finished the degree (it left me over-qualified, too old and with no experience to get jobs in agencies), but rarely discuss the things that I did learn. And by learn, I am not talking about books read, nor theories learned. Not taught subjects, no. I mean the ability to adapt, to take on board, and to explain myself when misunderstood. Qualities which are transferrable.

In 1999 I moved to Edinburgh for my BA. I had already worked as a photographic and printmaking technician at Civitella Ranieri, and was reasonably adept at drawing, painting and sculpture. It was part of the way I had grown up, and I was generally very confident in what I did, as I had no reason not to be. The internet didn’t really exist, so my only pool of comparison and competition were my immediate friends or successful thises and thats who were published in books.

My painting tutor in first year was the first person to challenge my bubble. He basically forced me to unlearn and re-learn, punching a hole in my comfort zone. Initially this was damaging – of course – but it was also a necessary step for me to break from a linear approach to painting (starting with a fine line, moving from one side to the other, and then building up to darker hues) and allow me to loosen up, which then in turn let me learn to adapt and understand techniques or artists who I previously discounted as poppycock. One day I remember blocking in a large sheet of double-sided card with a big brush and runny acrylics, simplifying the geometry of the room we were in as a background for the still-life, when I abruptly came to the realisation that I understood Mondrian – an artist who’s work previously had been little more than wallpaper to my understanding, but which suddenly had opened out into vast cityscapes, simplified both in form and colour. Sadly I do still seem to need to understand to appreciate – life would be easier if this were not the case.

In 2nd year I was studying design, and most of my course was structured around developing briefs. We would be given a scenario, and a toolset, from which we would need to form a solution that we could then describe and justify. Had we been studying law, our solution would have been the defendant and evidence the toolset; the tutors were the prosecution and the rest of the class a jury. We would usually have an interim and final group critique for each brief, and a few of us rapidly adopted a routine that involved going to the pub after a crit to discuss who had “won” the crit, and continue discussing our various approaches. By winning, what we meant was who had given the best overall presentation, leaving the least number of holes that could be questioned or – if questioned – were answered promptly and eloquently. This process involves a lot of lateral thinking, simplifying your presentation, understanding why you make a series of decisions and – above all – feeling comfortable with the fact that being questioned or challenged is both a learning tool and part of the process of growing up. This is constructive criticism.

So what does this mean now? I instinctively circumnavigate a debate, without making it an argument. I comfortably explain why I continue to use analogue photographic equipment without really leaving anything to criticise… Last year I was working on the Ooglies (a stop-motion animated series for BBC kid’s TV), and as a head of department I had the director and producers above me, and a team below me. I had to be able to express how I wanted things to progress to my team, without explicitly forcing them to follow a blueprint as we had to move forward without having finalised a lot of details of the production. I also had to be able to receive instruction from above, work on things and be able to adapt to the changes they would ask me to make. Often you will find that clients, producers and directors are not visually eloquent. For example they would tell me A, I would bring them drawings of A, and they would then say “no, B”, to which I would have to adapt without feeling assaulted. In this kind of a situation everyone thinks they have the most stressful and important job of the team, and the way that I was able to keep things moving smoothly was to be able to adapt rapidly. To then adapt B to C without as much as rolling my eyes, after B had been built and was, I had thought, ready to go.

No, of course I’m not perfect, I’d be insane to even hazard the thought. Of course I still have opinions and feelings that get hurt and can make me angry, but without that initial experience of having to develop briefs and take peer and academic criticism on board, adapt and try again cyclically, I would not be suited to working in any aspect of the creative industries today.

Tobias Feltus:
Share

My old (design) site…

My old website comes from a time which feels so remote now. Web design now seems to be all about short content and being readable on a small phone, but when I branded my work as FeltusFecit a ‘cool’ site was still heavily steeped in Flash and Javascripts giving it automated animated functionality to create an alleged wow-factor. I remember the excitement of waiting minutes for a site to load, to view the amazing functionality which, amusingly, was not necessarily accompanied by any real content.

So my site was clever, as I developed it to look like a complicated flash site, but be fast and compatible with non-flash browsing. Nowadays, however, it tends to fall apart as mobile browsers don’t support a lot of the depreciated tags which I used liberally to construct and nest my slices and change content in iframes.

Have a look HERE.

Tobias Feltus:
Share

Ooglies (Updated)

In 2014 I worked with Kolik Films Two Ltd as the Production Designer on the new series of the Ooglies for the CBBC. This was the first time that I’d worked on such a large department, and it was quite a privilege to be in a directorial position as a head of department – something I am only used to when I have no one below me. My team was fantastic, and the series is an epic piece of children’s splatter-horror of the vegetable kind.

So, in mid March CBBC broadcast all 20 episodes of our Ooglies and – yes – it is amazing! Yes, I am saying that silly kid’s TV is amazing, but on the whole, it is. Non-verbal splatter-slapstick. How much better can you get?

Some of the specific things which I built are the takeaway box in the background of this image, the Toast Soldiers’ helicopter, Fish Finger’s butter-boat, Slippy Nana’s unicycle, Dr Whobarb’s cheese-grater Daleks… And the last thing I made was Parsnip’s hair-straightener crocodile. As the head of department I didn’t get much of a chance to make things, as most of my day was spent overseeing the logistical structure of how the series was going to be shot. We had around 6 animators working at all times in blackout ‘tents’, and building a staging system that everyone was happy with did take some fiddling.

Tobias Feltus:
Share

Moulton Tour d’Ecosse

Our cycling blog is a little out of date too, but it is HERE, and I shall add content soon. Promise.

In the near future a full article on our Moulton tour of Scotland (2013) will be published in The Moultoneer magazine.

Tobias Feltus:
Share

A new site.

Well, its not really a new site, but it kind of is. It was suffering from a state of eternal neglect, mainly because I find any aspect of html maintenance a bit tedious, and I couldn’t be bothered trying to make my method iOS compatible. Also, I am not trying to portray my time in a falsely focussed manner: I have always had many focuses, and I think that its time (just before I turn 36) that I allow my site to represent me in a more uncensored manner.

I am not a this, and I never want to be one of them.

Tobias Feltus:
Share

New55 Kickstarter

April was an interesting month indeed. The New55 Film project ran a Kickstarter campaign, and we got funded!

https://www.kickstarter.com/projects/bobcrowley/new55-film/posts/815387

Tobias Feltus:
Share

Monkey Love Experiments

Monkey Love Experiments from ainslie henderson on Vimeo.

Last summer, Ainslie, Will and I embarked on a rather ambitious film, Monkey Love Experiments. I built the sets as well as acting a leading role. The film mixes stop-motion animation and live-action to a very delicate and real degree.

Monkey Love Experiments won the Scottish BAFTA for best short animation in 2014, and was nominated for the BAFTA 2015.

(updated with full film 16/7/17)

Tobias Feltus:
Share

James – Moving On

March and april were taken up partly by the making of a new music video. Ainslie asked if I could build sets and props to build a coherent world made of yarn. At this point the video has been viewed somewhere near 400000 times, in three weeks.


Moving On from ainslie henderson on Vimeo.

Tobias Feltus:
Share

The meaning of life 3

I don’t recall when I wrote this, but I did. It is noted as my 3rd rationale for life, but I cannot remember what the second was. I shall post the first at some point too.

The Meaning of Life.

In my new reasoning, i have come to the conclusion that the meaning of life is none other than to move things. yes, the meaning of life is to move things. what do i mean? well, we start with the event of our parenting devices moving back and forth vigorously, followed bythe moving of sperm into another vestibule, where it mixes with the ovula, then food is moved, to fuel this growth. food is purchased by moving pieces of paper with numbers on them, which are moved to your parenting device in exchange for it moving other stuff. yes, work is, generally, an activity of moving stuff from place to place to then receive (thus being moved), a series of numbers represented by paper, which we then use to move more stuff to or from ourselves.


thus, that which makes us different from other animals is the fact that we are the only animals that in most circumstances use the moving of things to move things. most animals will move thing A themselves, rather than moving thing A by moving thing D in exchange for thing C which they then move to subject B so that he can use thing B to move thing A.


All we do in life, again, is move stuff. we move knowledge. we move food. we move money. we move ourselves. we move our things from one place to another. it is all rather silly. disorder is made by moving things. order is made by moving things. peace is made by moving things. war may be made by moving things a little more hastily.


and thus, by mathematical deduction, since i rather dislike moving things, i dislike the meaning of life. thus i dislike life. an odd conclusion, though i do see this kind of logic as being the kind of thing that could start a war, or maybe even a religion.

Tobias Feltus:
Share

Twothousandandfourteen.

It is the end of February 2014, and I have not posted anything on this blog for a year and a half. Embarrassing to say the least. So you might wonder what I have been up to, and I shall attempt to summarise this in simple bullet points, or links, or something.

I Am Tom Moody has done pretty well, it won a number of awards, but sadly we did just loose the BAFTA this year.

I Am Tom Moody from ainslie henderson on Vimeo.

I say that we didn’t win the BAFTA this year, because we totally did win it last year, with The Making of Longbird.

The Making of Longbird from Will Anderson on Vimeo.

I made another video for Poppy Ackroyd

Poppy Ackroyd – Aliquot (Official video by Tobias Feltus) from Poppy Ackroyd on Vimeo.

Then I went on a residency at The Soup Lab in Norwich, where I worked on a series of images based on Hoffmann’s Struwwelpeter. The show which came out of the residency was called Tray. I also experimented quite a lot with Harman’s Direct Positive paper.

Then I made a music video with Unkle Bob

Then I made a music video with John Lemke

And to be honest, that was the last time I charged the batteries for my GH1! But this means nothing, other than the fact that I have not felt compelled to use a digital camera since then.

I worked on a big project with Maja Borg, as part of her ‘Dream Team’ (with Sarah Cairncross and Ruth Paxton), which will become a film in the near future. I also built sets and acted in Monkey Love Experiments, a forthcoming release from Ainslie Henderson and Will Anderson. Despite all this, I have not used my studio space all year, mainly to do with a period of transition, moving to an actual studio which is not also my limited living space. I have collaborated on a number of shoots with Ian, in which I have been pushing towards freeing up my style – trying to be a bit more snapshotty.

In 2013 I also started volunteering at the Bike Station, and consequently become a bit obsessive about another kind of simple machine. But this one means that I am also getting a bit more exercise. A bit more to the point that I built up two Moultons and went on a 370 mile tour of the west coast of Scotland, which is documented in another blog HERE.

Tobias Feltus:
Share

Seven, with Poppy Ackroyd.

A few weeks ago I shot this video with Poppy and John at the Witespace Gallery, in Edinburgh.

Seven from Poppy Ackroyd on Vimeo.

I shot it with available light, with the GH1 mainly handheld, wide-open with the Nikkor AF-D 50/1.4. I think we ran through the track four times, to make sure I’d have enough redundancy to make a decent cut of the track.

As per my usual, I edited in Final Cut Express 4.0.1. I decided to transcode the AVCHD footage to AIC for simplicity, and since I’d exposed the footage pretty light, I didn’t feel I would loos any dynamic range in this conversion. I think I was right, even though the whites did display some banding, both before and after transcoding.

The colour grading was done using free filters. To do this, I make a new Sequence, and slap the edited sequence in the new sequence’s timeline, and do all of my grading on this encapsulation of the editable edit. Firstly I increased the exposure with Image Control/Brightness. Then I used CHV/Silk and Fog, radio-clicked for “silk”: I used this to subtly make a little bit of glow on the highlights, which made the footage look a bit more filmic. I then used CoreMelt’s Pigment RGB Levels and Curves to adjust the exposure curve. This is – so far – the closest I have found a video filter to work like Photoshop’s curves, though it is still limited. I then converted the image to B&W using TMTS Color’s Black & White, which gives you a good RGB mix in the monochrome conversion, so you can make skin tones look smooth.

I’m quite pleased with how the high-key look came out, using only available light and manual controls. If you use Final Cut, you might as well download these free plugins, as they do seem to perform pretty well.

And of course, look out for more from Poppy HERE.

Tobias Feltus:
Share

‘Here We Are’ in Rolling Stone Magazine!

Surely the best way to launch a new music video is, indeed, to have it on the Rolling Stone magazine’s site, complete with a review and praise.

Rolling Stone Magazine

You can read the article HERE, and read my English translation:

Intimate and minimalist, the video has something cyclical about it, which gives the impression of repetition of the same images played in a loop. And yet something de-rails, something unexpected happens, but you’ll only discover it by paying close attention: and thus Here We Are is the video for the single which marks the return of Gioele Valenti as Herself.

The mini-film created by Scottish [talent] Tobias Feltus serves well in understanding and appreciating the music of the Palermo-based solo artist, who seems to ride on well-trodden folk paths, enriched and occasionally interrupted by exciting canterburian echoes or gothic elements. This fourth album, simply titled Herself, sees collaborations with Amaury Cambuzat of Ulan Bator, Marco Campitelli from The Marigold and Aldo Ammirata.

As for the filmmaker behind the video Rolling Stone is premiering, Feltus is also a photographer and designer, known for his work with bands like Aereogramme and Lord Cut Glass under Chemikal Underground Records (the label of the ex-Delgados who have Mogwai and Arab Strap in their roster, and who launched Interpol). Aside from numerous exhibitions of photography in the UK and Europe, his resume also boasts the production of Solo Duets (2005), which was nominated for the Nastri d’Argento, won Best Animation at the Krakow Film Festival, and won Best Short Film at the Festival Du Cinema Italien at the Espace Pierre Cardin in Paris.

The video can also be watched on the Rolling Stone webpage.

Tobias Feltus:
Share

Using your hacked GH1 with Final Cut Express (and fighting colour shifts).

Working on the music video for Herself‘s Here We Are was the first time that I attempted to streamline my hacked GH1’s workflow. Since my struggles dragged out into several days of trial and error, I hope that my findings will be helpful to others.

I chose to shoot the video in AVCHD 1080p50 because my current firmware produces ridiculously heavy MJPGs which have an excellent dynamic range, but are not practical to work with as I can only get just over 3 minutes’ footage on an 8GB card: limitations which remind me of Super8. So, my AVCHD *.MTS files seem to have an average bitrate around 14mb/s, similar to the original settings. I also choose to work with Final Cut Express 4, as I own a copy and am content to make fun things with the pauper’s tools.

The camera was set up in front of tungsten lights, with a lovely Zeiss prime. No fancy CP or ZF glass but rather the cheapest prime on the market, the M42 Tessar 50/2.8. Frown? No, it is one of the sharpest pieces of glass out there, and can be picked up for the price of a couple of pints of beer. It was never favoured as it is not particularly bright, but if you don’t intend to shoot at a wide aperture, there is little point in spending a fortune on something only just as good. The video was shot at f5.6, focussed at 0.7m.

So, the first thing that you need to do is follow this link, and download Panasonic’s QuickTime plugin. This will allow all of your software to read the camera’s *.MTS files without the need to transcode them (so yea, don’t ‘log & transfer’ the footage in Final Cut Express). The plugin gets installed in YourDrive/Library/QuickTime (not your UserName’s Library). You will need to restart your machine before it becomes accessible. Copy the AVCHD folder from your card to a hard drive and call it something like “avchd archive”. The folder structure of AVCHD is a bit confusing, and is apparently a playlist of individual files, which only becomes handy when you have clip lengths that create files over the maximum file size limit of a FAT formatted card. So everything you should really need is contained in AVCHD/BDMV/STREAM, and all the files will have a *.MTS suffix.

Now, I decided to convert my *.MTS files to ProRes 422 HQ using Streamclip (which you can download for free
HERE)
. After editing I did find that I could now just use the *.MTS in Final Cut Express’s timeline, and I am not sure if there is a disadvantage to doing this. The reason why I started exploring these codecs is that my initial import, Logged and Transferred in Final Cut into its Apple Intermediate Codec, looked washed out and varied in tone when I exported the edit from Final Cut. ProRes is a Quicktime codec which you should be able to find on the internet; the main download from Apple (here) appears to require one of their ProApps to run, but I shall leave this detail to you, if you need it.

I found that editing the footage was smooth. Both the ProRes, Apple Intermediate Codec and raw *.MTS files will play smoothly without the need to be rendered. I did a tiny bit of grading before exporting, but found that no sharpening was needed, as it destroys that film-like quality that you can get with a good lens. The main issue I had was with the low quality of the native Apple Intermediate Codec which was perfectly good for HDV footage, but seems to loose a lot – especially in the shadows – with my current setup. Assuming that the quality of each of your clips is the same, I do the grading by making a new Sequence, and placing your edit on its timeline, then applying your filters to this new Sequence.

Apple Intermediate CodecProRes 422 HQProRes 422 HQ

ProRes 422 HQ

Ranting Addendum: I still feel that many of aspects of working in time-based editors (audio and video) are kept in a manner to preserve the talents of old practitioners, and keep their ‘secrets’ magical. For some reason I was unable to find any tutorial on exactly what I was trying to do, and colour grading in Final Cut Express bares almost no resemblance to how one works with an image in Photoshop or Aperture. To me the important thing here is to have a clear ‘vision’ of what you are after, as tinkering can be slow and clumsy. When you are happy, you then need to export a ‘Master’ file. Now, one often debated issue with any image editing is monitor calibration. Since the output of most of our media will be online or on a DVD and a TV or projector, using a “broadcast” calibrated monitor really should not be an issue, as each output device in the future will be different. Ideally you want your monitor calibrated, so that you are happy with the way that things look in a “correct” manner, and hope that future viewers’ displays are close enough to also be good. Forums are littered with ‘pros’ saying that only broadcast monitors can show the right colours, to which I raise some fingers. Of course they have an opinion, but what are ‘real’ colours? the only time they exist in digital photography is in the interfacing between display and print. There is no right and wrong. The LaCie display at the lab is calibrated to reflect the Epsilon’s print output accurately, and that is all that matters. I can’t get mine to match the lab’s, which also does not really matter, as final proofing is always sone on that display.

Now that my rant is over… Final output is, once again, a big issue. According to what I have found, there are differing gamma settings between Final Cut’s canvas and QuickTime, etc. I was able to get my ‘Master’ export to look like the Canvas by exporting it in ProRes 422 (again, an AIC export shifted drastically in colour), however it took a lot of work to figure out how to compress the ProRes file for web use with the same colours. I can’t reinforce how important it is to make multiple saves – at this stage – as something went wrong the other day and I did loose a lot of work on the grading of the video.

The solution I have come to is the following:
1. Calibrate your monitor – I used my Spyder 3, and went for a ‘normal’ setting of 2.2 Gamma and a white point of 5000k, as this is what I normally use for print output. Using this, do your grading visually in Final Cut Express. Despite the fact that calibration for web-output shouldn’t make any difference, it does give you an input colour profile to work with.
2. Export your Master as ProRes 422 HQ. I left the audio settings as AAC 44.2kHz 320kbs HQ. In the Filter field I set colorsync with my current monitor profile as the input, and sRGB as the output. This gave me a very close match.
3. Using QuickTime’s H.264 encoder just seemed to not work. I have the feeling that the encoder is designed for ‘normal’ colours, and hence that it will change anything else erratically. After several days of mucking around and being very frustrated, I found this blog which recommends using another QuickTime component called x264, which you can download here. Again, this gets installed in YourDrive/Library/QuickTime. So now you should be able to open your ProRes master in QuickTime Pro, and export ‘Quicktime as Quicktime movie’, setting the encoder to x264, and limit your bandwidth if needed. I found that this, finally, produced good colours. Remember to check in the Settings of the plugin that you have the correct framerate, I ticked the Add Gamma 2.2, and b-frame to Optimal, and Use 3rd Pass.

During the compression nightmares I wondered whether I should have spent the £35 and bought Compressor: economically it would have been the cheaper option, but now maybe I have written something that can help someone else save the cash. Never having used Compressor, I don’t know whether it would allow me to preview the output accurately and, most importantly, change what parts of the image are compressed most heavily. Despite the fact that digital video is now even spooled to us on our TV, h.264 compression is good, but its dynamic range is not really able to display colour gradients in a smooth manner. All of my work is subtle, and often dark: frustratingly I think this makes me more prone to noticing the rainbowing in gradients and the blocking of shadows which – probably – no one else will care about.

The video of Here We Are can be viewed HERE.

Tobias Feltus:
Share

Piazza Camera, kamra-e-faoree, or that which is kind of Polaroid and kind of darkroom.

A few years ago, my father bought me this curious camera at the street market in Pissignano (TR). He remembered having been photographed on a similar machine when he was a teen, maybe in Naples or Rome, but we were not clear on how they worked. Deduction showed a lightproof storage chamber, a long sleeve, a very crude shutter mechanism, what I thought to be a printing-out window at the top, and two vertical chemical trays in the bottom. What he remembered was that they were used by photographers to take street portraits of people, and hand them a print just minutes later. And hence its vague connection to Polaroid. But the similarity ends there.

My reason for writing this, is that I just stumbled upon this website, which has a wonderfully comprehensive study on the use of these cameras in Afghanistan. The site explains how they work, and also has an extensive collection of photographs taken with them, and of them in use today. It even has an eBook to download, which explains how to build one. It is hardly worth noting, but the authors of the website do specify that the Afghani street cameras have an internal focus mechanism (moving the paper negative to and from the lens), as opposed to having a bellows, like my camera, to focus in a more typical manner.

The use of the kamra-e-faoree is hardly practical – by our modern expectations – but nonetheless wonderful. In principle, a photograph is exposed onto silver-gelatine paper. The paper negative is then developed and fixed within the darkroom of the camera body, and placed on a stand at the front of the camera where it is re-photographed, to produce a positive (again on paper), which is developed, fixed and then rinsed in a bucket or fountain.

Though the Afghani cameras were predominantly used for ID photographs, the process they use is identical to that of the European tourist cameras: a system that I imagine has been in use worldwide, but seems to have slipped past most of our knowledge, and is not mentioned in any book that I have ever read on photography.

Somehow this process seems both more romantic and more practical than those predatory snappers who plague tourist traps with cameras, and hand you a card offering you prints the next day from their studio (though I don’t know if this still happens, as I have not been a tourist since the advent of digital photography).

Tobias Feltus:
Share

In print: Le Negatif

I am always pleased to find myself in print. Yes, I mean always, as even bad press is good press. And there is something particularly charming about being niched in publications that only publish film photography.


Open publication – Free publishingMore analog
Tobias Feltus:
Share

X-Synch on the Graflex RB Super D

I was puzzled that the internets seems to have no information on the Super D’s flash synch. I posted on Graflex.org looking for some insight, but ended up – eventually – investigating the system myself.

The result? Yes, you can use electronic flash on your Graflex RB Super D! How? well, simple. Using what some folk call “drop curtain”: what this meant was obscure to me too, but I worked it out. The shutter on the Super D gives you speeds from 1/30 to 1/1000, however there are two other speeds which you can obtain: if you lock your mirror down, and roll the shutter curtain to “O”, when you release the shutter, the mirror flips up exposing your film, then the shutter closes. At the lower spring tension you get approximately 1/5, and at high spring tension you can obtain 1/10. This is brilliant, isn’t it? Yes, but even more so when you consider that these two speeds can also be used with electronic flash, as the flash contacts close when the mirror completely clears the film gate!

However my bi-pole sync port was not working…

Disassembly:

To get at the mechanism, you need to remove the shutter plate (where you set the curtain aperture and flip the mirror). Before taking off the plate, I would suggest removing the back (remember there are a few hidden screws that you can only access with the back partly rotated), so that you can use a (white) pencil to mark the position of the upper lip of the shutter curtain on “O”. To remove the shutter plate only four screws need to be removed, but you also need to extract the pin that is on the mirror shaft. This took me a couple of weeks, and I ended up using a microjet torch (the variety that takes a butane lighter inside, and burns up to 1300c with a tiny sharp flame) to heat up the metal locally, just enough to be able to tap the pin out. The concentrated heat seems to not cause any problems, and with a few seconds was just enough to loosen its grip. Be careful and gentle – don’t force anything. Then remove the four screws (one may be flat-headed), and the shutter will close. Don’t panic.

Repair:

What you will find is that the actual mechanism of the Super D’s shutter is remarkably compact and simple, and that the flash contacts themselves are little platinum or silver tips like what one would expect inside a motorbike engine’s distributor or a relay. Give everything a wee clean. The leather will probably have a bit of greenish waxy oxide on it, and some dust. The flash contacts are very easy to adjust, but I would start by spraying some contact-cleaner or switch-cleaner into them, and maybe fiddling a bit of paper over the platinum points. The reason why my flash was not triggering had to do with the “thumb” at the bottom-right of the shutter mechanism. The thumb is the spring-loaded part which is meant to close the contacts when the mirror hits home (and the contact itself is on the small leaf-spring, bottom-centre of the picture to the right). Said this, it also appears to be held in place with a tin-plated screw which has oxidised over the past 65 years, and hence become a bit stiff. So unscrew that, use a dry brush to clear off the oxide, then I added some PTFE lubricant and reassembled the thumb. Check that all of the other moving parts are free. I added some PTFE to a couple of the other pivots, and cleaned the dry grease from the upper curtain roller bush. Make sure you did not get any lubricant on the flash contacts (or clean them again), and check that the gap is good: connect an ohmmeter to the contact prongs, and rotate the mechanism to make sure that the thumb is closing the circuit, and that it is opening again. If you need to adjust it, you bend the upper contact by a hair, using a screwdriver or something (it is very malleable/delicate). It is also worthy of note that the flash timing would be adjusted by the shape of the thumb, but it should be right, so don’t bend it.
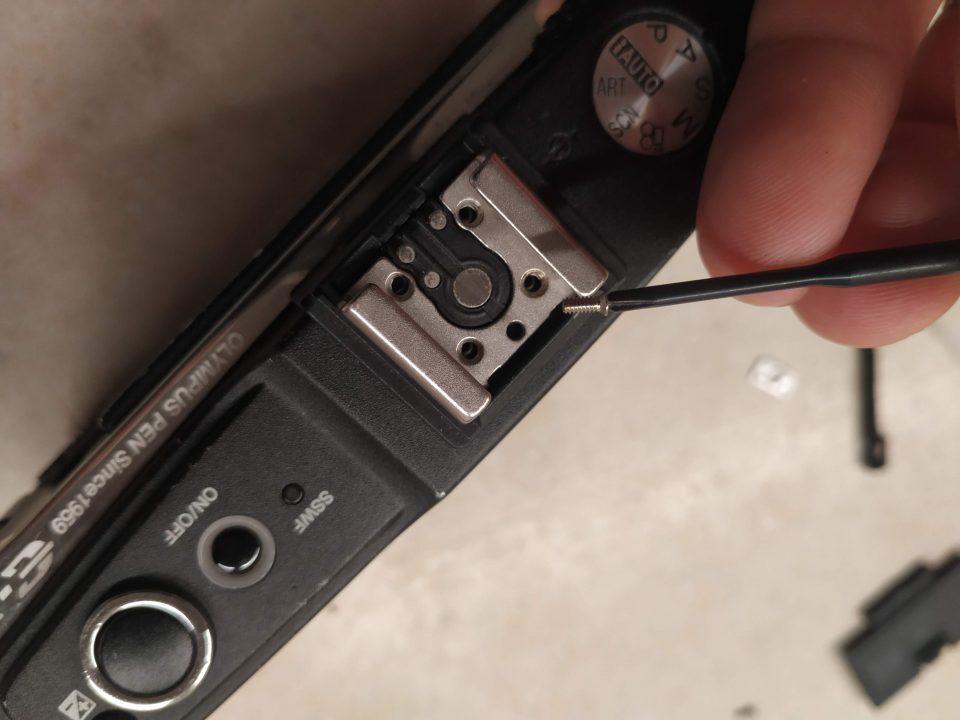
Reassembly:

Once you are satisfied that everything should work smoothly, rotate the curtain key until the “O” is centred in its window again, as you are likely to have wound the gears way past its correct positioning. Make sure it is centred, and not just visible. At the back of the camera, wind the curtain up until your pencil marks match. Try using something like masking tape on the ribbons to hold it, probably just above its marked position, so that you have enough play to mesh the gears. Place the shutter plate onto the two pivots, and wiggle it until your gears mesh, place two screws to hold it tight, then untape your curtain, and check that it holds with your pencil marks matched up. If they do, then try running the shutter at its different gaps to make sure they are all correct (as in they start with the gate closed, and end with the gate closed). Replace the other two screws, position the mirror lever and replace its pin (which may not be easy). Replace the rotating back.

If you are lucky, you may have some kind of a cable which plugs into the two-pronged flash port. I did not. So I had to make an adapter. I made the contacts out of a figure-8 connector, which i covered in heat-shrink tubing, soldered on a PC socket, and then caked the lot in Milliput® epoxy putty. I put cling-film in the socket first, so that I could get my putty out when it had cured (this works well), and then I filed and sanded it back. Some day I shall get round to painting it black too.

In conclusion, this solution makes the Super D one of the most ductile large-format portrait cameras, as you can look through the lens without the delay of then closing down the shutter to load film. Though the Super D has automatic diaphragming for its own three lenses, I only have one of these, and plan to modify the front standard to take brighter lenses like the Dallmeyer Pentac 8″ f2.9, and being able to use electronic flash with these lenses is quite an unusual privilege.

Tobias Feltus:
Share

Richard Learoyd: finding ways to trivialise the digital era.

Last week Sophie and I went to visit the newly reopened Scottish National Portrait Gallery. The new layout is accessible – more so than before – and reminds me of the McManus in Dundee, being of a similar period: a glorious building indeed, with one of the most spectacular foyers I know of.

The museum does, of course, have many of the usual suspects – many of the kinds of paintings that one would expect from a portrait gallery including one of the most striking paintings of Mary Queen of Scots, which you can get up close and intimate with. Some of my favourite pieces in the collection, however, are the early photographs: The John Muir-Wood salt-prints, Paul Strand’s photogravure and Archibald Burns‘ views of Edinburgh in the 1850s, counterposed with the humour of Catriona Grant’s Cows, and the imaginative use of photography in Calum Colvin‘s work (though I am not impressed with the inkjet-on-canvas that is on display, and cheekily described as a ‘Giclée’).

One piece, however, stole all of my attention. This giant photographic image – over a metre square – stood out and dominated. Initially I was simply excited by its scale and colours, so I got close, only to find that its detail was infinite, and it had a familiar metallic shimmer. The label said that it was by Richard Learoyd, and that it is a direct positive made on Cibacrhome (or Ilfocrhome) in a purpose built camera, and on loan from the artist.
It is such an alien experience to walk up to a print (as I often do), and not find any defects nor artefacts in the print itself: I am so used to seeing decay in a strand of hair, where a digital input or output device has been unable to describe a sharp diagonal. Or indeed noise in a gradient, as 8bit files are not particularly suited to describing the tonal range of such common graduated qualities of light.

Around the fingers of her right hand the depth of field is around 2cm, and within this area one strand of black hair stands out (though less distracting than that one pube in Weston’s Nude 1936) which is impeccable. Sharp as a scalpel. At this moment the image opened up to me, expanded and became infinite. Despite the fact that some digitophiles might argue that soon they will be able to reach this kind of detail as well (since an average print 1m square is a mere 139megapixels), I feel that Learoyd has created something that we may loose. What he has done, is build a camera that is more akin to a house than to a disposable camera. According to what I have read, he works from within the camera, standing inside it rather than looking through it. The image is exposed directly onto the Cibachrome, which makes a positive image without the disruption nor need of anything as intermediate as a negative. It represents a raw reality more purely than our eyes could possibly do on their own.

The only picture of his camera that I have found is here, which shows little more than its size and a hint of the size of the light-bank needed to expose such a mammoth of an image. Of course making images like this is not particularly practical, and hence why Learoy appears to be the only person making pictures of this kind.

I don’t think I have ever had such a gobsmacking experience with a photograph that I did not already know and love. The beauty of reality created by Learoyd is one-off and one of a kind. Nothing artificial has interpreted nor interfered with it. The relationship between scale of the the subject and lens, the chemistry and artistry in his process is one that no digital arrangement will ever truly mimic. And yet mimicry is seemingly one of the most important omissions in his process.

I highly recommend that, if you have the chance, you visit one of Learoyd’s images. I say visit, as I think it is a little more than just going to see a photograph: it is more like visiting a classic painting that you have known for years, but never seen in its physical state. And yet at the same time, it is more intimate, as you are entering a real world that you have never seen before.

Tobias Feltus:
Share

Wondering what I’ve been up to?

So this is my first post of the year, and I have nothing sensational to write. Actually, I never have anything sensational to write.

I have not been taking pictures, but rather dealing with other bits and pieces. In December I started writing a book, my ‘Beginner’s Guide to Photography’ (working title, of course), which started as a Christmas gift, and then expanded, gained illustrations, edits, and became something worthy of sharing, at some point. I have been talking with Rachel about publishing it through The Soup Lab, and possibly gaining some other affiliation to help it become more available. It starts like this:

For some, photography is a compulsion, an addiction; for others a hobby to talk geekishly about. For others again it is a profession that holds no more romance than sweeping a street, but this is of no less importance.


If a man is called to be a street sweeper, he should sweep streets even as Michelangelo painted, or Beethoven composed music, or Shakespeare wrote poetry. He should sweep streets so well that all the hosts of heaven and earth will pause to say, here lived a great street sweeper who did his job well.


– Martin Luther King Jr.


No matter what your approach, the camera is a tool. Like any other, the one you choose and how you use it can influence the outcome. 


My intent is to introduce principles that many other books treat in depth; to show that ‘complicated’ aspects of photography can be understood in a simple manner. After all, rules understood are rules to be broken: not something to be coveted as an intangible holy grail.
 

I also have been working on some pieces for Ainslie Henderson’s animated film: a couple of months ago I made him a pair of spectacles

… And today I just finished a Flying V

Sophie has started a blog, and we are in the preliminary stages of writing a new film with Will Anderson. Speaking of which, I shall also – at some point – share pictures of the show at Inverness Museum, which will still be up for another few weeks.

And, of course, I am also re-coding my (this) site, so that the image galleries pull images from flickr, and the whole thing is iOS compatible.

Tobias Feltus:
Share

Destruction of personal possessions as art or revenue?

My girlfriend sent me a link to the Telegraph with an article on Michael Landy’s ‘new’ ‘art’ project titled “Break Down”. I have liberally used commas as, honestly, I struggle to see this as neither a new process nor art.

I feel that the whole premise of the performance is clarified in the opening paragraph, where it states that the ’14-day artist’s “performance” [is] commissioned by Artangel’. It is my opinion that this kind of “performance” could only be made by a person with no personal effects (and I have met some artists of this nature), or with the promise of a large sum of money.

I do, generally, have great difficulty with conceptual (and) performance art, as I feel that they are often devoid of those aspects which give art its purpose: nominally those that give something to the spectator, and those which leave something to posterity. The kind of performance that Michael Landy has created leaves nothing, as everything is destroyed in the process, and gives nothing more than a voyeuristic sense of gratification that shall be short-lived. It is highly unlikely that someone would visit his ‘performance’ and then talk to friend in the pub later on about how sensational it was to see this man in a boiler suit placing his DVDs and art collection on a conveyor belt in a dusty room. The whole effort feels less grounded than dedicating an hour a day to religiously watching Big Brother on TV.

So what is the artist hoping to obtain from this inane destruction of personal property? It is not going to be documented in art-history as being a piece ‘destroyed by the artist’: we all know Umberto Boccioni’s futurist sculptures of which there are few in existence, however photographs remain of other delightful forms that the artist destroyed. No, we will not have an entry with a snapshot of a man’s flat, dated 2011, with ‘destroyed by the artist’ underneath, as it would not be of any interest.

I have a problem with destruction as it is: I struggle to throw away a blank piece of paper, as it has potential; I struggle to throw away a doodled piece of paper as it might be important. Though destroying things that can be replaced, like DVDs, is less problematic, their destruction still creates an inane hole in society: a waste of resources. Destroying other people’s art seems purely disrespectful of their time and effort, especially when the purpose of the act is purely that of destruction, even if the aim of this is for personal gain.


Tobias Feltus:
Share

The Making of Longbird: A Retrospective

Last night we were told of this wonderful review of our show at the Inverness Museum, written by Georgina Coburn.

WINNER of the Short Grand Prix at the Warsaw International Film Festival 2011, the Golden Dove and Audience Awards at the Leipzig Film Festival and nominated for a New Talent Award 2011 by BAFTA Scotland, Will Anderson’s animated docu-fiction The Making of Longbird is the centrepiece of an intriguingly multi-layered exhibition.

WILL Anderson, in collaboration with Tobias Feltus and Sophie Gackowski, has constructed artefacts and ephemera to conjure belief in the existence of a master turn-of-the-century Russian animator Vladislav Alexandravich Feltov, creating a fascinating “Retrospective” which explores artistic persona, collective memory and the nature of cinema.

When seeing each object the viewer begins to question the narrative labelling of each piece as part of a larger authenticated fiction in the museum/gallery space. There are many layers of enquiry here; a combination of historic fiction, artistry and playful deliberation that together with the choice of techniques and presentation of objects explores our relationship to still and moving images as repositories of human memory.

Tobias Feltus and Sophie Gackowski’s forged family photographs of the great Feltov utilise early photographic techniques pioneered in Scotland in the 1830’s, fixing shadows of identity in a series of cyanotype prints. The use of early photographic techniques presents an interesting counterpoint to Anderson’s dialogue of resurrecting the animated fragment (of a cinematic work of fiction) and “modernising” it for a contemporary audience. Use of digital techniques coupled with the deceptive simplicity of scissors and paper give Anderson’s work an immediacy and creative integrity that define him stylistically.

The notion of a “masterpiece”, authenticity, authorship and the artist as creator are interwoven with self consciousness and humour in Will Anderson’s presentation of himself and his creation, Longbird. What shines through is Anderson’s emerging talent as an artist and animator. The musician Martyn Bennett once said that in order to be pioneers we first need to acknowledge that we are heirs, and this ethos certainly resonates in Anderson’s intelligent, comic and imaginative film, evoking the inherent magic of early film and photography.

The opening sequence (Anderson’s creation: a fragment of Feltov’s masterpiece which has presumably survived the “Great Fire”) is incredibly fluid and beautifully realised, an almost kaleidoscopic vision flickering to life, marks of dust and time creating the illusion of aged celluloid. The way that Longbird picks up the edge of his own frame of reference in silhouette and curls in on himself is an apt metaphor for the explorations of the artist.

This curiosity is a major strength in terms of Anderson’s evolution as a unique creative voice. The angular morphing of imagery reminiscent of German Expressionist design and imitation of physical decay visualised in the projection itself, authenticate the film as belonging to another era. Sound also succeeds in placing the audience in another age with crackling cylinder, the audible clicking of a speeded-up projector and silent era piano accompaniment halfway between musical hall and cinema.

What follows Feltov’s Longbird is part documentary; “archival” footage of Feltov at work and the documentation of Anderson’s attempt to bring Longbird back to life with lively exchanges between the animated character and artist. Longbird makes his debut on “Chitter Internet Video” before being killed off by a cue from the script and a recreation of the famous fire that destroyed much of Feltov’s “original” work of genius. Also screening in the gallery space is an interview between Media critic Anslie Henderson, the artist and Longbird voiced in a thick Russian accent, the animator letting his creation out of the box.

Although many of the labels on objects are infused with the joke of fiction permeating the whole gallery space there is something quite poignant about the display of film equipment and memorabilia now seemingly rendered obsolete in a digital age. An 8mm editor and viewer, an invented “Feltotrope (c.1887) evoking early moving image viewing devices from the Victorian era and the presence of architectural drawings, photographs and seating from the old La Scala Cinema in Inverness, anchor this loss in living local memory.

Screening with Anderson’s “main feature” in the small gallery cinema are a series of animated films from Edinburgh College of Art graduates past and present, including Joseph Feltus’s wonderfully ambiguous Solo Duets, Jessica Cope’s The Owl House and the poetic simplicity of Adore by Michael Hughes. Solo Duets is particularly beguiling in its haunting use of waxen human figures and interior scenarios.

It is exciting to see these films by Scottish based animators in the IMAG gallery space and hopefully the venue will be able host further showcases of such work, bringing it to the attention of a wider public audience. It is also extremely encouraging to see Will Anderson’s exploration of craft, memory and perception at the heart of The Making of Longbird recognised both locally and internationally.
© Georgina Coburn, 2011

Originally posted on Northings.

Tobias Feltus:
Share

PocketWizards: How to buy them second-hand.

I was surprised to find that there are no instructions on the webbyweb for the purchase of second-hand flash triggers. I have been using a set of “cheap Chinese” radio triggers for years now, but they are on their last limbs, despite having given trouble from the very start. What kind of trouble? I think the very first shoot I took them on was with Aereogramme in the basement of the Classic Grand (Glasgow); I had three Metz 45 strobes, and had intended to light the hall so that I would have had nice sharp pictures. The band was all on edge, as it was before their gig and, well, so was I as only one of three receivers would trigger. In retrospect I wonder if the Chinese triggers were running an FCC frequency (see explanation below), or whether there was some strange RF interference in the basement, but it remains that the pictures came out shite because the gear failed.  Subsequently one receiver died completely, and the others have managed to destroy other gear, such as the beloved PC-cord for my Vivitar 283 which, of course, was the only flash I had in my bag when I was shooting the green bathroom shots for Violence Was Offered, which forced me to shoot it with on-camera flash.

The solution is one. New triggers. My friend Victor has been trying to persuade me to go with his design of optical slave which, accordingly, is very reliable even in daylight. My reluctance is twofold here:

With my Bowens optical slaves I find that the smallest obstacle, even indoors with white walls, can often mean that I can’t trigger a second flash, so I have little faith in optical slaves. And by smallest obstacle, I mean the actual light modifier.

I don’t fancy being caught out in yet another DIY project that is unreliable and unsightly just to save some money that, ultimately, is not saved, but rather just a waste of time. I am not an engineer, and my facilities are limited.

So I decided that maybe I should invest in a set of PocketWizards. Even the original Plus system would be good. Since I have already had problems with this plan, I thought it worth writing up a blog to someone else out.

Why PocketWizards? As far as I am aware, there is only one player on the market who is selling a radio trigger system worldwide which is compatible with itself and other devices. What do I mean? When I got the Chinese triggers a few years ago I had not even contemplated the fact that after I had purchased the bits that I had, I would not be able to add to the “system”, as I would never be able to find a compatible device with the original set I had bought. So they are out. Other “real” companies such as Bowens, Elinchrom, Quantum and a few others have released their own radio triggers, but often they are single band and compatible only with themselves. With the Quantums, if I recall, they made four frequencies, and you had to buy that one frequency for compatibility, which is limiting as they are incredibly hard to find. I hear of other newcomers such as Cactus, Radiopopper and Phottix; the latter seems to come in a CE version, but the first two are not even marketed in Europe, and I have no idea what their pedigree is, nor what their company security is. So in essence, Pocketwizards seem to be the best investment, as they are the most likely units to continue to work, and continue to be compatible over time, as well as being rumoured to be the most reliable manner to trigger a flash. They also have the great advantage that all of their models (I believe) are compatible with each other, so you can get an older Plus (separate Transmitter and Receiver units) and a newer Plus II (Transceiver model), and their 4 frequency bands will work together. This is a great advantage.

What to look out for: The stuff that no one else bothers publishing on the web! Radio frequencies are used differently across the globe, and certain bands are open for civil use in each region. Of course, my friends, the USA has its own bands, and Europe has others. Why does this matter? simply because if you use an American radio trigger in Europe, its frequencies are within the same band as our beloved mobile phones, so as you get a text, all your flashes will go off, and when you try and trigger your flash your neighbour might misunderstand his lover deep in conversation on how to carry on with their covert fling, rather than your flashes firing. Frustrating. And on a side-note, I think it is also illegal.
So where did I go wrong? I found, on eBay, a set of one Plus transmitter and two receivers at a good price: I pounced despite the seller not knowing whether they were the right version for Europe, and of course I could not establish this because there is nothing published online about how to distinguish the versions. So I wrote to PocketWizard, and got a rather prompt response:

“The quickest way to determine if a Plus radio is FCC or CE is by looking at the side near the power switch. CE radios have a large CE icon, whereas FCC radios have a small FCC logo or a string of text that starts with FCC. All of our radios, including the FlexTT5, MiniTT1, MultiMAX, and other receivers and transmitters have one of these symbols on the side or bottom of the radio.”

I wish that this was information that was simply published on their site. And to clarify, FCC is the USA system, and CE is the European system. I believe the classifications may also be legal in other parts of the world, but this does not interest me right now.

In conclusion, I am still triggerless and hope that, eventually, I will either find a set of CE Pocketwizards at a good price, or be blessed with the opportunity to be able to afford them new.

*UPDATE*

The other day I got Calumet’s catalogue, and in it I discovered that they now have their own Pocketwizard clone, the Calumet Pro Wireless Transceiver. To further this, I find that there are possibly other clones, including the new Interfit Titan Pro and the Phottix Atlas. The thing is, I have no idea whether they are truly compatible. My worry about buying anything other than a PW has been the product longevity, but if one of the cheaper units is compatible with PWs, then it becomes a viable option and, at £150 for a pair, the Calumet Pro Wireless Transceiver costs half as much as a Pocketwizard Plus II (though Amazon.co.uk is listing CE PW Plus II units at £99.99, all of a sudden, as well). So I called Calumet to confirm that these units are compatible, and the chap claimed that their unit will work with a PW, but that its range is inferior. As for the other units, all I can see is that they look the same, and some reviews claim they are the same hardware branded differently, which would suggest that the Phottix is the ‘original’ which Interfit and Calumet have re-branded.

My Calumet Tranceivers arrived yesterday, and I have not yet had the chance to actually use them, however I have already found some very good things about them. Boxed, they come with good quality accessories, including a gold-plated PC cord, a cold-shoe for placing the unit between the camera and a hotshoe flash (Which I assume would also isolate a high-voltage trigger from the camera), and the overall build quality is indeed superb. As for their range, one thing I am sure of is that their range is far greater than a wireless-N network: My flat is small, but has several walls, and even a new N router is not strong enough to have the internet across the whole flat, so I have two routers doing this. However the trigger is perfectly happy to trigger a flash through all of these walls, and without the antennae even pointing upwards. So far, this is fantastic, as I shall never need to trigger a flash through several walls, and the old triggers often would not fire in the same room. Another important feature which Calumet does not bother  to specify is that they can handle a sync voltage of up to 400v, meaning that they should be safe with pretty much any electronic flash of any age.

I have now placed an order for a twin set of Calumet Pro Wireless Tranceivers, and I shall update this blog once I have tested them thoroughly. I think, however, that the conclusion is not to buy used PocketWizards, however I have, at least, put in writing how one can establish the frequency of a PocketWizard.

Tobias Feltus:
Share

Stop Press: FLUSTER magazine

Tobias Feltus was born in the USA of two figurative painters, Lani Irwin and Alan Feltus, he grew up in Assisi (Italy), in a countryside bubble, and have been living in Edinburgh (UK) for the past 12 years.
He likes to cook and eat good food, drink good wine, and smoke fine tobacco. He obsess over cameras, seek the perfect lens, feel for the best squeeze, and attempt to be (intellectually) rich.

What is photography for you?

An infatuation. Not in that I take snapshots, but that most things in life are compared and reflected to and in my photography. As my parents are painters, and I grew up surrounded by other painters, I have often debated photography’s merit in juxtaposition to painting and fine-art. Painting is inherently abstract, but can be honed to a representational canon, whereas photography is inherently and mechanically a direct representation of a reality, and thus I find its abstraction far more interesting.


Photography is a tool with which to create an image, a process that involves a manipulated reality traveling through a choice of glass and mechanical means, to a chemical reaction. I see this as a rather pure process, and am uncomfortable with upsetting this very purity. For years I stuck to Cartier-Bresson’s ethic of showing the whole frame without cropping, and I do this as often as I can, though sometimes I will be distracted by some other aspect in an image and have to resort to a crop. Photography is a means to challenge myself, to push myself into places where I am uncomfortable. To show aspects of my body that I cannot by other means. And also its intricate technicalities are a perpetual challenge, which keep me on my toes.

Which aspects of your pictures make them stand out as yours, what is your signature?

I think that which both limits and defines my style is my mental database of aesthetics. Having grown up surrounded by centuries worth of Italian painting, and books of Flemish painters as well as more recent masters like Balthus and Lempicka, my sense of composition and colour is inherent. My bookshelf shows my interest and admiration of many photographers whom I am unable to emulate: Bourdin, Saudek, Witkin, Araki, Terry Richardson, Moon, Lachappelle… Somehow these serve as a spark to push me forward, however that which results is arguably a failure, and yet always mine. Amusingly, to me, one of my defining qualities in today’s climate is my faithful dedication to analogue, or photochemical, processes. For some reason it has become a standard that photographers work with the latest equipment, after a good century of professionals and artists using whichever means suited them best. So I still do use the means that suits me best; the means that gives me the quality I am after. And this does mean that for some things I need a specific lens and a specific format, and cannot be limited to a half-frame sensor and an overly-corrected plastic-barrelled lens with a small aperture that has a ‘professional’ price tag.

How would you define your style?

In a way I feel that the best way to define my style is to roughly reference what Viviana Siviero wrote in an article in EspoArte back in 2005 (paraphrased & translated): by applying the infinite possibilities available to him and resigning himself to the outlines of a blank canvas, he coined a sort of post-divisionism, implemented with a contemporary medium by using the inherent grain of film.

How do you approach someone for a photograph? How do you set up your work? Do you always ask?

I rarely do. Almost all of my work is a self portrait, or a portrait of someone else who is close to me in life. My family. My girlfriend. Occasionally a friend. But very seldom do I reach out and approach someone with whom I am not already in close confidence.

Tell us a story about one of the people you have photographed that made you want to take their picture.

I met Rebekka in 2001 when she was maybe just 20 and was a dancer in a strip-bar. It was an odd period, as I had befriended her flatmate, April, who was an older dancer. It was an outlet to a part of society I had never been in contact with before. So a decade passed, and we had lost touch, and then she appeared on Facebook commenting on a mutual friend’s post. I was surprised to see that she had moved to London and was working as a Dominatrix, and in talking found that she periodically came up to Edinburgh, so I suggested we work together some time. Since all of her work related pictures were stereotypically fetish orientated, and hence harsh and shiny, I thought it would be interesting to make her look soft and lost in a large space. The shoot was comfortable, as she was more dressed than I, despite my clothes and her nudity. It is fascinating how some individuals can appear this way. And yet I did succeed in representing her in an innocent manner.

Tell us a story about one of your pictures? What is your favourite shot and why?

How can one have a favourite of one’s own work? I find it terribly difficult to distance the memories and smells associated with a person or a shoot from their aesthetic. So what shall I write about? My first self-portrait? OK. It was probably 1998 and I had bought an old, circa 1880s, 5×7” wooden camera. It came with no shutter and a plate back. I had modified the back building a spring mechanism, and added a single speed pneumatic shutter to the lens it came with, which was a Poloxer, apparently some kind of Tessar-type eastern-block lens. I set up in my mum’s studio in the evening, and since my air line was rather short, the solution to taking a picture of myself was to shoot a mirror with the camera in front of me. I did not have one mirror large enough, so I put one on a chair, and another at the foot of the chair. Then I put another beside me, and one near my head. My artificial lighting at the time was a hand full of clip-on lamps with tungsten bulbs, so I set them all up. My exposure was something shocking like 10”, as I was using FP4 and the lens was not bright. It seemed logical to put a seagull skull in my mouth. I exposed one frame, and turned the darkslide around. No one had come to bother me, so I nervously (as I was very prudish at the time) took my clothes off, and decided to put a boar skull in front of my modesty (a skull which I had found in a river as a child). I held the bulb and squeezed whilst I counted off the seconds. I got away with it, and my nudity was only apparent by the mirror near my chair.

What’s the biggest challenge you’ve had to face to get a great picture?

Living within myself. I tend to be very self-critical, and fail to validate my work on my own, on any grounds other than technical achievement. Yes, sometimes working with other people can be hard, including my brother Joseph with whom I work a lot. And sometimes I push myself into odd scenarios or uncomfortable situations. But regardless of this, most often it is the most challenging situations that feel the most rewarding afterwards.
“Nothing touches a work of art so little as words of criticism: they always result in more or less fortunate misunderstandings, Things aren’t all so tangible and sayable as people would usually have us believe; most experiences are unsayable, they happen in a space that no word has ever entered, and more unsayable than all other things are works of art, those mysterious existences, whose life endures beside our own small, transitory life.” – Rainer Maria Rilke, from Letters to a Young Poet.

When did you start taking pictures?

When I was 10 or 11 my dad came back from a visit with his old friend Emmet Gowin with a box of Kodalith, a pinhole camera made from a 35mm film canister, and a Pentax ME Super, which sparked the beginning of the disease. Despite my having a Masters degree in design, I sit surrounded by cameras of various formats and age.

What’s the message of your photos, what do you want to communicate or accomplish through your work?

I don’t wish to impose any meaning nor interpretation of my own upon a viewer. If someone is moved, then I have accomplished something. I do not set out with a moral or a meaning to convey, but rather, occasionally, an emotion or a story which, occasionally, becomes the title, but little more.
“Like all of my canvases, these are works of fictive imagination rather than records of perceived reality. They do not represent any “true” thing — if they are any good, they are true things — nor do they teach any lesson, argue any point of view, or tell any linear story; they are meant to be fiction, not to illustrate it.” – James McGarrell, in an exhibition catalogue.
The only ethical tool that I use within my work to do this is that technical honesty which I mentioned above. I do not have any secrets within my technique, which I emphasise with my occasional “making of” video or blog.

What’s the question you wish I had asked? …and what is the answer?

What next? I am not sure. The past year and a half has been testing on many levels. I feel that I have reached the age of 32 without having an adult perspective on life, nor much of a career. I know that I have a fat CV when it comes to exhibitions and film festivals, but I forget this five minutes after revising it. I always have ten thousand projects on the go, several cameras dismantled and mid-renovation (today I started stripping 4×5 Ensign Reflex, as I wish to work with such a machine, but cannot afford a working example). I do intend to attempt to make some income from modifying and renovating Graflex cameras, and I am also involved in the development of new large-format instant negative film (like the old Polaroid Type 55). And whilst tinkering with these projects I am slowly making it through my fridge of film. I recently started collaborating with my girlfriend, whose background is much more literary than mine and I can see that there are a lot of interesting images to come from this, and possibly our differences will also unshackle me from one or more of my innate restraints. Maybe I shall start producing some work that is completely unlike anything I have done to date. And this prospect is very exciting indeed.

Tobias Feltus:
Share

Hassy and Diana get close.

I was wondering: is it reasonable to compare the Diana F+ to the Hasselblad 500c, or is this another foley comparison like the Barbie Videogirl versus Canon 7d? I am not sure either. The thought of writing a comparison came to mind after my posing for Victor Albrow’s series on hair, where I sat in front of his Hasselblad H2-39 and failed to understand how it was thirteen times better than my 500c + Imacon Flextight Precision II, a combo which even contains the same brands of technology. Yes my Precision II takes a while to get its 50megapixel out of a 6×6 negative, but my 500c does expose its negative at the instant that I release the shutter, whereas the H2 seems to take over ¼ of a second to do this crucial task. Curious indeed.

So, the other evening Sophie and I decided to take some pictures, and I decided to compare the Diana F+ that I had bought her to my 500c. The Diana had its 55mm+Macro lens, and I had 31mm of extension tubes behind my Planar 80/2.8. The focusing distance is rather similar as is the field of view (though this is something that only became apparent after developing).

The comparison may seem ludicrous as the Hasselblad has been one of the staples of professional photography for over 40 years, whereas the Diana is considered a “toy” camera, and has been for almost as long. However, in a day and age where most professional photography is executed with digital cameras the two analogue machines live on an analogous playing field as artistic tools, and their market values are not too far apart now either, despite the Hasselblad’s myriad of features compared to the Diana, even if one is just counting things like different shutter speeds as a feature, the Diana has a cult status which the Hasselblad seems to lack. Though in this test the only feature that gave an advantage to one camera over the other was simply the fact that the reflex meant that we could actually see what the Hasselblad was focusing on and framing, an issue that could easily be overcome with something like the Leica BOOWU macro stand (a set of legs that distance the lens from its focal point, with four legs providing a field of view). So in practice what did this mean? In framing, the Diana was guestimated, using a piece of card, 15cm long, to gauge focus; whereas with the Hasselblad there was a frustrating dance of breathing and moving back and forth to find the focal point and hope to hold it long enough to release the shutter. So in practical terms the Hasselblad was slower to use, but had a greater likelihood of being in focus. From a creative point of view I would argue that they were on par, however, as their pros and cons weighed out equally.

So do I have a conclusion? Of course there cannot be a logically technical conclusion, however I can be firm in the knowledge that I do prefer my 500c to what I saw in the H2, and that I also believe the Diana F+ to be better value for money than the current top of the line Danish / Swedish / German / Japanese machine.

Tobias Feltus:
Share

SHOTS no. 113 cover image

Two days ago the postman brought me a delightful surprise: I opened the envelope to find that an image from Two Gentlemen was on the cover of SHOTS magazine. Leafing through it I then found myself as the strongman in Heimischer Zirkus posed next to Ellen Rogers. What a delight indeed.

The cover of SHOTS no. 113

Inside SHOTS no. 113

I am intrigued by the fact that many of us portray ourselves in a different light to that by which our friends may see us. I am not the macho strongman, in the slightest, and I doubt if Ellen is the bold seductress that she presents. It is also curious, on another page, to see Ed Fox, dark and obscure, and as far removed from his colourful nudes as I could possibly imagine him.

It is an honour to be in the magazine, it is our first magazine cover, and I am thrilled to be in such good company.

www.shotsmag.com

Tobias Feltus:
Share

Instax 100 with a manual twist.

A few months back I got round to hacking an Istax 100 to pieces and reassembling it with manual focus, shutter and aperture. Despite having posted almost nothing, I have got a lot of interest on Flickr, then Georg (Polapix) made his own version from my notes, and I thought I might as well write a wee bit about it.

a PhotoBooth snap of myself with the beast

I had originally wished to keep as much of the original Instax as possible, and just replace the shutter and exposure unit. I failed at this whilst trying to identify the flash trigger. I think the flash uses an IGBT chip, or is rather overly sophisticated for the camera. Also the flash control board seems to be combined with exposure and shutter control. Odd design, as usually even on digital compacts, from my experience, the flash board has been separate. Even in a Nikon SB600 the inverter board is separate from the control board. So, yea, trying to identify the trigger I ended up loosing all of the electronics within the Instax, blowing a couple of components.

But all was not lost. The barrel was not rigid enough to move the weight of the tiny Vaskar 105mm anyway, so it is best to have it glued in rigid.

I believe the Instax 100 is a simpler chassis design than the later models, from what I gather. So, the microswitch which I have
drawn in my diagram is at the bottom and back of the camera, on the lowest gear in the drive mechanism. it fits into a cam to break contact. what I have written as “shutter switch” I then re-wired through the bus to the PWR button, the red one, on the back of the door, as the eject, as I thought there was less of a chance of me hitting it by accident. Again, I identified the bus contacts by ohmmeter, and just use the lower circuit board to for the bus contacts. So the red button initiates contact, and the cam closes the circuit, continues its cycle, then breaks the circuit once the film is ejected. I would recommend that you don’t solder onto the bus contacts, as I did, as things are too small, and a bump later shorted this out and ejected half a pack of film. So look for larger solder points on the board, if you plan to use this switch. obviously using the existing shutter button would be easiest, as it is large and already has wires coming off of it. After I blew the main circuit board i just cut all of the wires connecting the boards to the battery, to avoid any issues. The diagram and notes are in this scan of my Moleskine. The camera is a bit of a hassle to use, as it is a clunky machine with a rather small viewfinder, however it can be used with studio lights, and does produce images. Below is one example.

And here are a few more images of the camera in parts:

Tobias Feltus:
Share

Venere d’Urbino

Oddly the wall in my studio/livingroom was painted with this Titian-esque background around a year and a half ago, specifically with the intent to work with the reclined Venus paintings from the 15-1600s. I don’t really even remember who  I had in mind, at the time, to model for the shot, but I do know that it never happened. The backdrop has been used for a myriad of purposes, and been a landscape that I have been Lost in and represented Loss with, amongst other things.

So finally I find the right woman. Someone with whom I not only can communicate, but who also enjoys working with me. And by pure chance, also has the right body to become a reclined Venus. We set up in mid afternoon, building an unstable bed of tables and camera cases and pillows and rugs, curtains and lights. I found that I was unable to shoot the Titian composition the right way round because of the lighting, so I opted to just flip the negative. Getting the pose right did take many hours: we ended up eating around midnight, and shot a couple of poses. I did some tests with FP100c45 using the Tessar 165/2.7, but realised that it was not sharp at the edges at this focal distance (about 4m), so I got out the Aero Ektar. My new Gitzo tripod made such a difference too. I shot this on Kodak EPP readlyload, and rated it at 200ISO and cross processed it in my Hunt c41 kit.


Tobias Feltus:
Share

New55 Project experiments (or shall we call me N55 North?)

Bob Crowley and I have been working on the New55 project for well over a year now. I forget even when it started. His blog has been visited heavily by eager fans of Polaroid Type 55, and criticised widely by some less-grateful citizens of the photographic community.

So how far have we got? Bob made the initial jump, by creating a first monobath reagent. He chose Kodak’s HC-110 as a developer base, as it has a long lifespan. He was using Ammonia and Ammonium Thiosulphate to boost pH and fix, but I got poor results from his mixture, and could not stand the smell, even with a respirator and ventilation (yes, my workshop is also the kitchen, so this mean the window and balcony door being open). So now that we knew it was possible to process a 4×5″ B&W neg in one pass, I moved on in my own direction. My first aim was to make the soup odourless, so I moved towards Sodium Thiosulphate and Sodium Hydroxide. My 8th mixture is what I started calling Reagent 4 beta 8, but now it is just R4. In under 5 minutes at 20c I was able to obtain negatives from Efke PL25, rated at 25ISO, that had a density and balance that is close to the delicacy that we like in T55. I was pleased.

The next step that Bob had been making over in Boston at the N55 “labs” at Soundwave Research were in assembling prototypes of pod-developed film to be field processed in a Polaroid 545 back. So I tried to figure out what the minimum amount of water needed to dissolve the solid chemicals in R4 was (not easy for a trial and error chemist like myself), and then added some Methylcellulose to the mixture to thicken it. I had made up about 2 35mm film canisters of reagent, and popped them in the film fridge. My first test was rather spartan, taping black paper and scraps together in a changing bag.

So what we have here is a control image developed in HC-110 dil-B as per normal, then a similar exposure (I was exposing 4 sheets at a time for tests) from my kitchen window in R4(b8), followed by a composite of my first p/n pod processed test (using fixed-out MGIV paper as a receiver), and finally the test that I did last night: the goop has been in the fridge for over a month, but my getting a heat sealer meant I could make pods, so I had to give it a shot, and it seems to work just fine. I taped things together in the changing bag, and using electrical tape as a light seal means that it has a tendency to buckle and thus break even contact between the surfaces. Oh well. But it proves the validity of my R4 even as a pod processed p/n. I can’t tell if the apparent contrast is to do with the concentrated chemicals, or just the fact that the chemicals were ‘mottled’ on the surface of the film, thus developing unevenly. The image was stable when I peeled it apart, but of course the anti-halation was still there, so i popped it in some fix to clear this, which is also less hassle than the Sodium Sulphate to clear T55 goop.

Now to order some Shanghai 4×5, get some receiver from Bob (via the 20×24 studio scraps corner), and some other bits, and I am curious to try and work with an all-raw chemicals mixture too.

Tobias Feltus:
Share

Graflex RB Super D: converting the back to take “standard” accessories.

Finally, after a couple of years lusting after one, I have a Super D (thanks to Bob Crowley and his find). It is in very good condition, in fact, almost new, and hardly used if at all. The only issues were need for a bit of lube in the shutter, and some minor cosmetic issues (like the leather coming loose on the lens door, due to retraction). However the Graflex standard back is not too useful today, or at least, it is not much use to me, as I want to use some Polaroid, and a Grafmatic sheet loader. The normal approach to this adaptation seems to be along the lines of what Bob did with his, involving taking a Grafloc back, cutting it down, and gluing it into the RB’s back. But I saw little point in this as Grafloc backs are expensive, to me, and also there is little need for a springback on a reflex camera.

The differences that I found in the Graflex back are:

the accessories are 6.5mm wider than the international standard

the accessories do not have a light trap lip sticking out, but rather a recess in them.

So, I had to shim the whole plane of the mount up by 1mm to create a groove to accept the light trap, and move in the tongue sliders. For most accessories they are fine the way that they come, however my Polaroid 545 back has two slots in either side, so I had to cut my sliders into the typical two-eared shape. I did this with a dremel and files.

But from the start, clean everything up, and the edge of the tray needs filing back by about 1mm so that it sits flush with the new raised level.

I then cut a piece of 1mm black styrene that I had to fit, and cut out the slot for the light trap. Then I glued this in with contact adhesive. The component has no structural value nor requirements. Then I drilled out and countersunk all of the necessary holes, including four new ones to move the lower screws that hold the slider supports in place. They had to be moved 3mm in, so I moved them diagonally to avoid weakening the frame. The slider bar supports are made of mahogany with brass inserts. To move them in the necessary 3mm I cut thin strips of 3mm plywood and glued these into the existing rebate with aliphatic resin, but any good PVA will do the trick. Then I primed and painted the brass tray with the new plastic shim, and the enhanced supports.

Re-glue the felt onto the base of the tray (cutting 4 new holes where the new screws go), and reassemble the base and rotating components. Screw the slider supports back in using the same screws, and reassemble the whole caboodle.

The last thing to do is to shim the ground glass and fresnel assembly. I just used two thin strips of the same 1mm styrene, as this was the only change in the focal distance made.

And now I have a Super D which can take all manner of film holders, including Fidelity double darkslides, as they are grooved on the side so they can be gripped by the sliders.

Tobias Feltus:
Share

Monobath R4, Lani Irwin and Alan Feltus

I have been experimenting with monobath processing for a few months now, as part of a research project with Bob. His R3 used Ammonia and Ammonium Thiosulphate, but I found the odour levels too much to work with, so I developed my own R4, which is currently in its 8th incarnation, and is odourless by using Sodium Hydroxide and Sodium Thiosulphate. Since I am no chemist, the whole process has been rather fun, and involved my adding more of one and less of another component until I started to get results that I like. Since the aim has been to get close to the ease and quality of Polaroid Type 55, I made adjustments to my monobath until I got similar midtones.

The other evening, just before my parents left Edinburgh, I took a few shots comparing T55 to Efke PL25 in my R4, and the results are most pleasing.

On the left you see the Polaroid Type 55, and on the right my monobath test, then below the FP100c45 and the DTR positives from the T55. I think the slight difference in density is more due to the 1/3 stop speed difference of the stock, as I was unable to adjust exposure that little on my Pacemaker.

These were shot with the Dallmeyer Pentac 8″ f2.9 (interesting lens).

My current monobath uses HC110, boosted in PH, buffered and fixed, also with a buffer. the PL25 was processed for 5′ at 20c, but the process terminates before that time.

Tobias Feltus:
Share

A Moat Drive Shift

I first saw a “tilt/shift” video with Sandbox, probably soon after it appeared on the web. As much as I loved the effect, I was curious how it would look if the same kind of thing were done with, well, an actually tilted lens. So when I stuck my GH1 to the back of my Speed Graphic, I thought it might be time to try.

Despite the diabolical March weather today, with sun, rain, snow, sun, sleet, and terrifying winds, I had to do it, as there were some men in yellow with a JCB working on a hole in the road.

As usual, I am not too pleased with the image quality. Maybe I had the sharpening too high in-camera, maybe it is to do with the uncoated optics, I am not sure. most of my work, as you know, is of humans, and these lenses are very pretty for that kind of thing. maybe not as suited for work that wishes to be crisp and saturated. Also I was shooting through windows, to avoid getting sucked out by the wind.

Tobias Feltus:
Share

Retouched Beauty.

Rasmus called me a few weeks ago, as he had a uni project to make a 2:20 documentary, and he wanted me to talk about retouching. I think the piece works decently, and it is poignant, today, to point out to people that “photoshopping” has been a part of photography since at least as early as 1852, and before that, beauty was tweaked by painters and sculptors for millennia.


Retouched Beauty from Rasmus Clarck Sørensen on Vimeo.

Tobias Feltus:
Share

Published in THIAPS’ hardcover Unlimited Grain Portraits.

It is both a pleasure and an honour to have been invited to be included in The International Analogue Photographic Society’s first book. It just came out today, so I have yet to get my greasy little hands on a copy.

The Blurb shop offers it both in paperback and hardbound, at a negligible price difference, as well as having a preview that you can thumb through. And the fun thing is that it was only a couple of weeks ago that I was in the lab to make the Fibre prints that I wanted to scan for the book.

Tobias Feltus:
Share

Being Human: my wee cameo

Back in the warmer months my sister in law, Liz Krause, was working as the costume supervisor on Series 3 of the BBC’s drama, and they needed a moustache for a flashback to 1933. It was a good day out, and my first time in Cardiff, and we all got to watch my silly face on TV this past weekend.

Tobias Feltus:
Share

Plates to Pixels: First Place

What a pleasure to receive an email from Russell Joslin pointing out that we had reached 1st place in the Plates to Pixels ‘Self Image’ juried competition. What an honour, especially amongst so much good work.

“The Feltus Brothers’ elaborately conceived sets are like looking at a whole life with humor and quirky sensibility. Kelly Flynn’s painted body photographs are sharp and clever. Like the Feltus brothers, she is physically in the image, but the photograph is not a window into her innermost self, but instead a smart twist on the idea of self-portraiture.
~Jennifer Schwartz”

View the Plates to Pixels ‘Self Image’ galleryHERE

Tobias Feltus:
Share

Solo Duets wins the Oscar Signorini!

Solo Duets just Won, well, last night, the First Prize for Traditional Animated Short Film, Premio Oscar Signorini XXVII Edition, Milan, Italy.

I am impressed that Solo Duets is continuing to travel, of its own accord, more than five years after its first public screening in Edinburgh. The animated short was a very in-house production, written and directed by my brother, Joseph Feltus, and I produced it, sculpted the portraits, and dealt with a lot of the technical aspects of the production design, lighting and photography.

Tobias Feltus:
Share

Making of Gamma 2.9

I decided to make a new “making of” video, this time I think I made it a little more pretty, though I am still using the on-camera audio of the GH1, and editing in iMovie ’09, simply because it is a fast way to do things, and syncing audio would be difficult. Anyway, I hope that you enjoy the video. What I hope to do with this, or these, is remove the magic from creating an image, or rather, remove the fear that someone might have from creating a good image when faced with a mental image. Part of the suggestion for this kind of lighting comes from my (late) grandmother, and the two studio shots I have of her:

Anne Winter - examples of photomanipulation from the 1930s

And it is still good to remember that a 57 year old Hasselblad 500c is as capable of anything currently on the market.


Gamma 2 (making of) from Tobias Feltus on Vimeo.

Tobias Feltus:
Share

Making of Potatoheart

I forgot to post my “making of” video for Potatoheart, for some unknown reason. Please do accept my apologies, and enjoy the odd ramble here. I promise to make future videos a little more sophisticated.

Tobias Feltus:
Share

Polanegs

So, a few of us have been experimenting with what I call Polanegs, or rather the extraction of a useable negative from Fuji FP-100c instant packfilm. I really like the odd quality that I am getting now, so here is my process, which is a slight evolution of Bob’s process which was an evolution on my advancements from this.
So, you shoot your “polaroids”, and set aside the discarded back to dry. I just set them out, then stack them. It is important to leave the processing “gunk” on the surface, as this helps to protect the emulsion during the processing.
Then, get yourself a sheet of glass and some tape.

Then tear off the papery bits from the top and bottom, and lay the emulsion down on the glass, and tape each one down completely around the edge. the idea is to form a watertight seal around the edge, but covering as little of the black side of the neg as possible.

Then to the wet area, in my case the bathroom. I use “Thick Bleach” as I found that the gel quality to it seems to destroy the black coating much faster than normal bleach, plus it does not run as much, and thus is less of a threat to clothing. But at this stage, of course, wear some form of protective clothing, and maybe a glove or two.

Now, onto each, I kind of squeegy a bit of bleach over each image, trying to keep an even coating a couple of millimetres thick, or whatever Archimedes dictates.

I then tend to wipe it around a little, to make sure the black is dissolved. We still have not figured out what the black is, and also do not know why bleach seems to be the only thing that dissolves it. But we have tried lots of chemicals, and this is the only one that seems to work.

It seems to only take a few, maybe 30, seconds to do its work, meaning that it can now be washed off. I just use the shower head and COLD water. Hot water is likely to soften the tape, which we don’t want.

Now, peel off the tape, and de-gunk the emulsion side, and remove the remaining bits of paper. I do this with a piece of cotton wool and hot water. The emulsion seems to be surprisingly robust.

And you will be left with something like this… At which stage, either use PhotoFlo or just plain dishwashing soap, a couple of drops in a small tray of water, and then hang them up to dry.

And then Scan… Muck about with standard profiles, I think this started as a Konica negative profile, and tweak it a bit, and then you may get something pleasing indeed.
Tobias Feltus:
Share

Arte Mondadori (old press 2009)

Arte (Mondadori) February 2009 pp. 124-128

They take photographs built like paintings. Caravaggio-esque references and light in scenes that seem film sets.
Sons of the painters Alan Feltus and Lani Irwin, Tobias (1979) and Joseph (1982) Feltus were raised on art from birth. Surrounding the brushes, paints and canvases of their par- ents – figurative painters close in sensitivity to Balthus and Casorati – finds its ideal ground- ing when, in the mid eighties, the family moves from Washington to Assisi, where Italian art forces its way into their lives. Leonardo, Beato Angelico, Piero della Francesca, Filippo Lippi, Paolo Uccello, Caravaggio are constant presences in an education that culminates in opportunity, after the earthquake in 1997, to spend a month in the rescue site for the fragments of the Giotto frescoes of the Basilica of St. Francis in Assisi. Tobias, at the age of eleven, had already been given his first camera, a Pentax, with which he had started teaching himself through experimentation.
The overdose of art, breathed inside and out of the walls of his home, almost pushed Tobias towards complete rejection. “When it came to choosing what direction to take my studies in, I chose Design”, he explains. “I had the desire to create something that was not only pretty, but also useful”. He graduated from Edinburgh College of Art, Joseph following shortly behind having studied Animation. “I was intrigued by the idea of being able to con- trol every frame of a film with the same precision of a painter on canvas”, Joseph says. Their first real collaboration with Solo Duets [2005] marks the beginning of the brothers? ongoing artistic collaboration, and evidence of Tobias? destiny as an artist. When the group is joined by the playwright Caroline Bliemel and costume designer Elizabeth Krause, the Feltus? work becomes increasingly complex, varied and narrative.
Metaphysical mannequins and Papier-mâché warriors
From seventeenth century lighting to metaphysical mannequins, from the women of Tamara de Lempicka to Leonardo da Vinci, from neorealist cinema to the carnality of Fellini, from the silences of Bergman to the sumptuous decadence of Visconti, thousands of suggestions find their way into their images that are created with infinite patience and a spasmatic attention to detail. Images for which the creation of the set, the choice of light- ing, costumes and the pose of the subject take hours upon hours of work, with the exact purpose of reaching the refined quality of painting though the mechanical means of the camera. “We never need the camera to capture the moment”, Joseph explains, “but rather it is imagined and built with precise intentions”. Firstly, to communicate emotions and feel- ings. They are always the stars of their work, the Feltus brothers, who alternate roles in front and behind the lens, together with their two partners. Because they believe that art has to be a bit autobiographical. Ultimately no emotion is more familiar to us other than ones that we feel ourselves.
There is not a specific division of roles between Tobias and Joseph. Ideas are born and developed from either of their suggestions. If anything the difficulty is in the beginning, in finding the right soil for one?s idea to be allowed to germinate by the other. But when this happens, once the lights are decided upon, costumes and background, they don?t even need to speak any longer, their common genes allow them to work in a synchronous man- ner. And the action is ended with the shutter release, because they work exclusively with film. Digital could almost not exist for them, if not purely as a challenge to surpass its ef- fects in-camera. They love the organicity of film, its true essence as an entity, the same way they don?t love the potentially endless possibilities that digital could offer, which could push them to feel that a piece is never finished. A touch of arrogance, maybe, as is their
Arte (Mondadori) February 2009 pp. 124-128
desire to keep their work as directors separate from that as photographers. They don?t want that their short films – which are highly acclaimed in film festivals worldwide – get con- fused with video-art. They are something else, they explain, something that is a whole in itself, with a script and a plot. They are only now debuting with a video created purpose- fully for a gallery. It is on show in London, together with their latest series of photographs Heimischer Zirkus, inspired by the nineteenth century circus.

Written by Alessandra Redaelli, Published in Arte, February 2009 Translated by Tobias Feltus

Tobias Feltus:
Share

Espoarte article (old press from 2006)

FELTUS FELTUS by Viviana Siviero, EspoArte No. 38 p. 40-41

The birth of a collective is always marked by the breath of destiny: the sum of two entities break loose from the union, that dance together in search of their most eloquent expression. Feltus Feltus are brothers, accidentally born under the same roof, in an affectionate nest animated by the haphazard air of art. Their products are a collection of various series of photographic images created with the use of traditional instruments, and animated short movies that can easily be considered films. Both represent a locomotive of the collective, continuously searching for a democratic and equal manner to allow their diversities to coexist.

Americans by birth, cosmopolitans by adoption, they breathed the air of Italian renaissance throughout their childhood. Tobias is more tied to photography and design, whereas Joseph to pondering and animation; their roles alternate in dominance during collaboration. In some manner their photographs evoke familiar yet unavoidable visions in the realm of art: Simone Martini, Filippo Lippi, but above all Paolo Uccello and Piero Della Francesca, who were focused on the struggle to overcome the limits of the newly discovered perspective. Most experiences in modern art give the feeling that they contain the DNA of a movement, almost disconnecting themselves from the lessons of classicisms for fear of getting labeled as a copy. Feltus Feltus are not afraid of quoting, succeeding in spontaneously pausing at the point of a suggestion, attractive and respecting.

That which issues forth is an autonomous world in which, from the shadows, elements take shape in the recognition of the psyche of the observer, on a subconscious level; an alterity suspended between dream and nightmare, metaphysics and somnambulism, in which the boundaries of reality lose their geography. Before the shot, the body is obliged, by he who is behind the mechanical eye, to take the “perfect position” through the calvary of tension: all that appears to our eye, even if it doesn’t seem so, is bodily, worked with double exposure and black drop-out. The bodies need to be totally controllable, and the two agents alternate the roles of director and victim. We are far from the narcissistic world where it is the subject to impose his own hedonism; it is the end result that is in control, which is obtained through an uncomfortable game. Both their film and photography is treated as if they were paintings: the fact that the tool used is a camera does not preclude bordering with other worlds, as it was for Cartier-Bresson who, graphically handicapped, made instant paintings with his camera. Feltus Feltus, applying the infinite possibilities that are open to them by the submersion in the outlines of blank paper, they coined a sort of post-divisionism, implemented with a contemporary medium by using the inherent grain of the film.

The search for a democratic synthesis that respects their differences has brought them to shots that suggest the magic of early stereoscopy, the first attempts of the mechanical eye to represent the tridimensionality of our vision, thought the pairing of two nearly identical images; Feltus Feltus (“instances”, 2005 series), alternating shots, freezing different instances of the same scene: the resulting images are like monozygote twins, they are identical in everything and yet cannot coincide. From single shot they pass on to video, and the level of difficulty increases: while the shots describe a single moment, concentrating on a lifetime the moving image has the duty to maintain the power of an instant for the period of all of the instances of which the film is made, as if each fleeting frame was one of the many undefined brush strokes that compose a painting.

“Solo Duets” ( directed by Joseph Feltus, built upon miniature portraits sculpted by Tobias Feltus, duration: 8.52 minutes ) creates a private and irresistible fascination, an incursion into a meta-reality where a melancholic soul mirrors himself in two distant ages, and thanks to a deep reflection, becomes tridimensional beings, distinct but simultaneous. A reflection on penitence, expressed via crepuscular scenes, nullified by the absence of light, but that also appear to come out of a hallucination. Dialogues are trusted to looks, to movements that are sometimes awkward, sometimes imperceptible, and to the music of a piano, an ambiguous element that contains, in its definition, a couple of opposites. The obliged parallel with the Brothers Quay is surprising, they also being American only by birth, also brothers (twins), also in love with surreal and disquieting universes and attracted by the aesthetic of sad-souled hollow doll heads. Once again Feltus Feltus surprise us with with a reference that is an evocative suggestion, but not a copy. The repeated entities recognize each other only to mutually compare themselves, in the musical presence of a piano that puts them to the test, making their failure obvious and irretrievable, a parable wonderfully expressed by the slow movement of the two bodies blindfolded: a now blind old man, guiding a young man who is still blind, in the direction of emptiness.

Written by Viviana Siviero (published in Espoarte No. 38 p. 40-41). Translated by Tobias Feltus

Tobias Feltus:
Share

Speed Graphic 1: The beginning of an overhaul.

So my plan, at present, is to strip SG1 down, and see if I can rebuild her into a modern machine, or rather, a machine that is better than anything currently made. I do not intend to re-invent the camera, nor re-design the Speed Graphic, but there are a few issues that I do wish to address and improve. So I am also not planning to restore the camera, but rather re-build her. And my hope is that, if I get it right, I shall be able to rebuild these for other people, in a similar manner to the way that the Byrons are marvels of a camera built out of a completely obsolete Polaroid Pathfinder. SG1, however, is a late (circa 1945 – all black) Anniversary Speed Graphic.

This all should be possible, in my mind, since I do have degrees in furniture design, and have a fair amount of experience working with wood, metal and cameras.

First off, I removed almost every screw from the carcass and bed, then proceeded to the removal of the leather and animal skin glue. Yes, the glue used is probably a rabbit skin, and it is likely that this is also what holds the finger joints together. Thus it is removed with hot water, and no solvent.

But first, to get the leather off and cause as little distortion of it as possible (to make a pattern, later), I used a dental tool to nudge it off the surface of the Honduras Mahogany (kind of extinct).

This is the leather sitting on the balcony next to the carcass.

And this is the desk with the parts of the machine dismantled.

The carcass after I removed the glue…

And this is it laying with the bed, now also de-gunked, out to dry.

The next stage shall be repairing the actual timber, and re-finishing it in a cellulose lacquer.

Tobias Feltus:
Share

Making of with Atzi Muramatsu

www.myspace.com/lipyncforalullaby

Tobias Feltus:
Share

An interview with FeltusFeltus ( Krause Bliemel )

Going back a couple of years, but still a good insight into my work.

Tobias Feltus:
Share

Making of: Potatoheart

So, in response to Rachel Rayn’s request that I make more how to videos, I made a little one for you to enjoy, on the making of the potatoheart.

Tobias Feltus:
Share

Why I like the Aero Ektar.

I know that the Aero Ektar is not the most ductile lens, but so far it seems to be the biggest piece of opitcal magic that I have ever played with, and its wide availability makes this pretty democratic. So in 90″, this is why I like it:

Tobias Feltus:
Share

Why I like old lenses…

I had to have a wee stab, a wee stab at those who think that one lens can do all. That the newest glass is the best ever made…

Tobias Feltus:
Share

GH1 firmware hacking.

I guess I waited for a pile of other folk to test this, before I went for it. But even now, even after Philip Bloom did his tests, I still have little understanding of what the numbers mean.

So what have I gained? I no longer have a recording time limit imposed by EU regulations, but rather one imposed by the FAT filing system max file size of 2gb. Bumping up the bitrate of the video recording has had a massive impact both on the dynamic range of the image, as well as the file size, so I am now limited to a few minutes in the hefty MJPG format, however I can also capture the full range of greys on a Kodak grey card with little effort. Here is an example:

And here is another wee thing showing what the increased range can do. Annoyingly I spent many hours trying to export this without loosing my shadows, and failed with all codecs. So the raw footage is still far superior even than Final Cut’s Intermediate Codec can handle (what does one do with footage from a RED?)

Music is by Lipsync for a Lullaby: www.myspace.com/lipsyncforalullaby

So, in essence, yes, it is a rather amazing thing to be able to turn footage that was already miles superior to that of the Sony HVR A1e into footage that seems to out-do my copy of Final Cut Express 4.

More shall follow….

Tobias Feltus:
Share

New interview by Claudio Parantela (01 September 2009)

Find the original interview, and the rest of Claudio’s blog and interviews HERE

q)Please introduce yourself.

A: Bonjour, ich heisse Tobias Feltus. Not that I speak either language, but this combination sounds better than either of the languages that I do speak.

q) Where do you live and work?

A: I live between Edinburgh and Assisi. My black & white darkroom is in Italy, and my colour work is done in the UK.

q) How would you describe your work to someone who has never seen it?

A: I generally avoid this situation by making an odd face and handing them a card. I make photographs. No, I don’t do weddings. But I guess if you are reading thus far, that you already know what my work looks like, therefore I could describe my work as a kind of instant painting, a sort of post-divisionism, implemented with a contemporary medium by using the inherent grain of photographic film.

q) How did you start in the arts? How/when did you realize you were an artist?

A: I never did. Personally I am not keen on the label because of how dire I find the art world. But I was born of two American figurative painters, Alan Feltus and Lani Irwin. Thus I grew up amongst artists and other creatives in an eclectic environment where I learned that there is nothing unusual, and the fabric of the world need not remain mysterious. Bones, insects, taxidermy, art, erotica and design are all constituents of what I have been from the very beginning. My dad gave me a Pentax ME Super when I was about 10, and I had my first darkroom then too where I played with pinhole cameras following notes given to me by Emmet Gowin… But I had been painting and sculpting as soon as I could hold the weight of my head. I never decided anything. I am simply caught up, handicapped and bound to the plight of the creative class.

q) What are your favorite art materials and why?

A: I am not really that picky, I don’t think. I am a big fan of fiber based bromide paper. I love a good fountain pen. A simple watercolour set. A block of clay… Or is it the tool that I am more dedicated to? A sharp scalpel. My collection of old dental tools. My Leica M3 or my Hasselblad 500c. I like to use things that do not cause me grief nor stress, thus my preference for simple and mechanical tools. I struggle to use matrix metering and auto-focus, in preference for a rangefinder, guestimation, and a handheld meter.

q) What/who influences you most?

A: Probably myself. I am my worse enemy; I am the thing and person who stops me from working the most. But that is not the answer you are looking for. I like to take small parts from many places, and rarely appreciate the whole of one object, person or place.

q) Describe a typical day of art making for you.

A: I am not sure if there is such a thing. My routine generally involves breakfast and correspondence or paperwork in the morning, followed by struggling or procrastinating in the afternoon. But routines and habits are best broken, so I do this as often as possible.

q) Do you have goals, specific things you want to achieve with your art or in your career as an artist?

A: I would like, one day, to be known and respected by many people whom I do not know. I would like to be one of the names listed here in someone elses interview. But the irony is that I do not want this for some selfish satisfaction or greed, but rather as a form of validation, of repeted validation of my work, as I am rarely able to judge what I do on any grounds that are not purely technical.

q) What contemporary artists or developments in art interest you?

A: The last books I looked at were of Guy Bourdin, Jan Saudek, Sarah Moon, Joel-Peter Witkin, Pierre et Gilles, a book of erotic photography from the 1850s to 1890s, and then of course yesterday’s accidental visit to the Ugolino di Prete Ilario frescoes in Orvieto (as well as the Pozzo di S. Patrizio). But as I said, I take small pieces from each. I am utterly fascinated by Terry Richardson, even though I know my work will never look like his. I am incapable. Maybe in his case it is my reaction and fascination with his work which interests me. I love the colour and magic of David Lachappelle, which is again something I am unable to achieve… And looking at my books I can see his close relationship to Saudek, Pierre et Gilles and Bourdin. I have been a long time lover of Cartier-Bresson, and more recently of Diane Arbus, finding the differences in their ways of representing life fascinating, as well as their photographs beautiful. Erwin Olaf excites me, as does Gregory Crewdson. But I am also teased by old Fellini, Buster Keaton, Wertmuller’s Love and Anarchy, Giotto’s perspective, Balthus’ space, Bernini’s marble skin and Emin’s uncensored honesty.

q) How long does it typically take you to finish a piece?

A: This is almost an unfair question. The time it takes to finish a single piece varies greatly, but so does the time inbetween shoots, and the time between the shoot and the need to finish a print for a show. So sometimes a piece may take years, even though the frame was exposed in a fraction of a second. Sometimes a shoot will last less than an hour, and sometimes a shoot will last several weeks, with trial an error, change and evolution. My general rule of thumb is that everything takes twice as long as I would expect, plus one.

q) Do you enjoy selling your pieces, or are you emotionally attached to them?

A: I love the idea of selling things, though I still struggle to not feel that receiving money is like receiving a favour. I really have never grown up. One thing, however, is that I cannot deal with limitation. If I were a painter, I would have no problem selling my work. But as a photographer, I cannot deal with the idea of limiting an edition. So at present I have been making two artist’s proofs at each printing session, and if colour, I intend to destroy the print file so that a subsequent print would be different in size and grading.

q) Is music important to you? If so, what are some things you’re listening to now?

A: I go through fases. Right now I am listening to nothing. Sometimes I listen to Vivaldi, earlier today it was Tegan & Sara followed by Antony and the Johnsons. Sometimes CocoRosie, and sometimes just shuffle and skip skip skip.

q) Books?

A: Yes, I own many, though most are picture books. Being somewhat dyslexic I am a bit slow at reading, so often only read novels when I am traveling. Most recently read some Angela Carter fairy tales, A. L. Kennedy short stories, Boy Racers by Alan Bissett, and I am currently reading How to Paint a Dead Man by Sarah Hall. Sarah is a friend, and I love how she can write fiction in the way that my memory remembers things, rather than the Hollywood approach of action followed by action.

q) What theories or beliefs do you have regarding creativity or the creative process?

A: I do believe that Picasso’s “It took me four years to paint like Raphael, but a lifetime to paint like a child” is the right approach to art. So much of the art world is full of ‘ideas’ that are put out by people who haven’t the technical skill to represent them. And art-schools are not really helping, as they are moving further and further from teaching technique, giving ever more importance to the idea, yet I continue to reinforce the fact that an idea is useless if you cannot convey it. And the Visual Arts must, in primis, satisfy the need for a visual element of communication, as this is intrinsic to its name. I believe that visual art should be able to stand on its own, without a written manual, to be appreciated. I think that it is only when one is capable of perfect representation that one should be allowed to abstract. I believe that justifying one’s work should involve describing choices or emotions, and not building workarounds and excuses.

q) What do you do (or what do you enjoy doing) when you’re not creating?

A: My life is a full time job: even if I am food shopping, my mind is still grinding part of the process. Again, it is part of the plague of the creative class. I do, however, spend time tinkering. I don’t know if this is a symptom of not having the money to purchase equipment in the condition that I would like to use, or whether it is a foolish disease, but I often will restore a camera, adapt a lens, or try to improve a light. Silly really, but it keeps me in trouble.

q) Do you have any projects or shows coming up that you are particularly excited about?

A: I am currently working on an album cover and a music video. I have been planning a large project in my head for a few months now, that will involve a collaboration with my girlfriend/costume designer and incorporate a level of collage, painting and re-photographing. There is also a small chance that this project may expand into becoming an Opera, collaborating with a composer. I am also part of a collective of self portrait photographers called Seven Selves, with whom we are working on scheduling several shows around the world. And I am starting work on a cross-media collaboration with Hayley Lock, who has created a series of characters that revolve around the idea of hierarchy and secrets. Her work is generally collage, and we plan to develop her images into DADAesque semi-narrative film, probably something like our HZ-Kino.

q) Do you follow contemporary art scenes? If so, how? What websites, magazines, galleries do you prefer?

A: No, I have friends, and live in a present. I tend to lean towards the past, and wish I were part of the DADA movement, or maybe an outcast of it, but regardless, living in that period between the wars.

q) Any advice for aspiring artists?

A: Well, if you are studying, the likelihood is that your tutor is wrong. If you are most comfortable drawing on the floor, then don’t use an easel. If you are most comfortable taking photographs out of focus, then quote Sugimoto’s use of “double infinity”, or Carson’s trademark bokeh-all-the-way. Remember that each year, as technology ‘improves’, and the saturation of film and photography produced hits the web, the actual ratio of good over irrelevant becomes less balanced than it was twenty, fifty or even a hundred years ago, thus it is clear that technology does not make work better. It is a tool. That is all. So given the choice between buying a mediochre dSLR or a Hasselblad 500c/m for the same price, I still would advise getting the machine that has been top of the line for the past 40 years, and not one that will be a doorstop in 4 years.

q) Where can we see more of your work online?

A: www.tobiasfeltus.com, www.feltusfecit.com, www.feltusfeltus.com, www.flickr.com/tobiasfeltus, www.sevenselves.com

Tobias Feltus:
Share

What is a C-Type today?

When we hung our first shows in 2005 I was unclear about how I should label my prints, and still today, it is unclear how contemporary colour prints should be labeled. I have read and talked, and come to my conclusions. By posting this in as many places as possible, I hope that some continuity of nomenclature may be obtained.

Going back ten years, things were simple: a black and white print was called “Silver Gelatine” or “Bromide”, a colour print from negative was called a “C-Type”, and a print from a transparency was called “Cibachrome”, as that was the most common process for making positive-to-positive prints. Silver/Bromide were terms which described the basic chemical composition of the print, and since silver nitrate/bromide are the two chemical states of silver in the photographic process, these terms were correct. Colour film and paper is also based on silver nitrate/bromide chemical process, thus colour prints were called C-Types, meaning a Chromogenic silver bromide print. Cibachrome was a mixture of the manufacturer Ciba-Geigy and Chrome, the suffix Kodak uses to denote reversal film.

When I started fooling around in my first darkroom, these processes were all that was, and digital meant a watch that had digits on its face.

When I started to work with colour photography in 2003, however, things were already different. Now colour prints are made equally from negative or transparency, by scanning at 16bit (per channel), and printing at 8bit. The technical degradation of this is significant, as a colour transparency may hold information that is greater than 64bit, but this is what we have to live with. And most of the time you can obtain good results. I cross-process most of my work, which does not help with knowing what is right and what is wrong. The digital stage also confuses the ethics of what is acceptable wilst preserving the “real” aspect of the photograph’s origin. But this is a different topic. The fundamental issue, is that a print is made, and none of us know how to call it. I have seen many prints labeled as “Lambda Print”, which really only tells you what printer it was printed with. This would be like calling it an “Epson 2400 Print”, or going back to my darkroom, a “Laborator 138 Print”. No, that is silly. There are better solutions. Better names. And then you have many people calling their prints Giclée, which is an insult to those who have not looked it up. The name was invented in the early 1990s when digital layout for offset printing started to exist, and it was a fancy name applied to and inkjet print when the print was seen as the end product, rather than a proof. Giclée is simply a fancy word for inkjet. It means nothing more. I would not be caught dead trying to sell a print made at home on my inkjet as something special, no matter how long they claim the Chromalife 100 inks will last. A photograph should be treated in a more respectful manner than my bargain airline booking.

The process of making an image by using a lens and a chemical process to record it is an Opto-Chemical process. Thus I would assume that it would be fair to say that a digital camera produces an image by means of an Opto-Digital process. A printer like the Durst Lambda or Epsilon, which prints to RE-4 photochemical paper, thus, must be Digi-Chemical printers… An inkjet? Maybe something like Digi-Ink.

In the film industry (as in Motion Pictures), it is now widely accepted that 35mm stock goes through a Digital Intermediate (DI) process, where it is scanned, graded, edited and then printed back to film. Is this not much the same thing that we are doing when scanning a negative on a Hasselblad/Imacon scanner, and print it back to photochemical paper?

My conclusion, thus far, has been to call a colour print made from a negative or transparency, by means of a digital intermediate stage, and printed back to photochemical paper, a C-DIP, standing for Cromogenic Digital Intermediate Print. It is clean. It fits into the classic nomenclature, and it leaves little area for misinterpretation.

So what do you do if the image originates from a digital camera? A single lens reflex camera (SLR) became a dSLR when it was armed with a digital sensor, thus it would seem fit that a print from a digital source should be called a dC-Type, and if you want to specify how it was made, then add D-Chem or D-Ink as a suffix. But how much manipulation of a digital source image is allowed in its intermediate stage before it requires yet another initial to denote its pedigree? Or is that not a concern, since Playboy models have been airbrushed for decades, Victorian nudes often had genital regions blended, and I have a couple of early ‘30s 8×10” negatives of my grandmother that are so heavily manipulated by pencil and scalpel, that I wonder how much of our world has ever been truly representational.

Tobias Feltus:
Share

Take it apart or take it to fix?

I have always been a fool when it comes to screwdrivers and spanners. My mum tells me of how I dismantled a typewriter when I was three. and from there, well, I have done many things that I should not have. Over the years I have got better at it, and slowly the success rate of my tinkering has increased. With camera equipment I have generally had very bad luck with repairs when I have taken them to a technician, so I have grown to do things myself first, and if I fail, then I can take them to be fixes by someone “qualified”.

Here I shall talk about some photographic technique, equipment use, repair, and a couple of other sidelines which are, in some respect, related to general tinkering.

Tobias

Tobias Feltus:
Share

To crit or not to crit: which is the question?

I often have opinions about other people’s work. I rarely can be objective with my own, however. And my opinions often jar with friends and family, though I always pride myself in having enough of a rational grounding to be able to argue my point. I plan to use this space to write my thoughts on art, and sometimes on terminology that decribes art, as I am a fan of etymology and nomenclature.

Tobias

Tobias Feltus:
Share

The Blog.

I have decided, finally, to ad a Blog to my site, as there are many things that I toil with, ruminate over, conquer, resolve, eat discover and battle with, that some other people like your good self, might be interested in reading, and might even find useful. Sometimes I feel like publishing an article, a critique. Sometimes I feel like sharing a tutorial, maybe about lighting, maybe about repairing a piece of equipment… And sometimes I even feel like having a good old rant, though that kind of stream of consciousness seems fit for myspace (www.myspace.com/tobiasfeltus).

So this is the beginning. I hope you enjoy the ride.

Tobias

Tobias Feltus:
Share